Burst Pipe Repair: Quick Fixes & Expert Help
You hear it before you see it. A sharp crack in the wall, a rushing sound in the ceiling, or water moving fast where it has no business moving. In Southwest Florida homes, a burst pipe doesn't always come from a hard freeze. Just as often, it starts with corrosion, stressed fittings, aging well plumbing, pool lines, or a hidden leak that finally gives up.
When that happens, panic makes people lose time. The right move is to slow down, make the house safe, stop the water, and then think clearly about what failed and why. That last part matters in SWFL. If you only patch the break and ignore the water quality, pressure issues, or corrosion that caused it, you may be back in the same mess again.
A lot of homeowners think of burst pipe repair as a one-time emergency service. In practice, the better approach is broader. Fix the failed section, protect the house from moisture and electrical hazards, and then address the conditions that shorten pipe life in the first place. Around here, that often means paying close attention to hard water, salt air exposure, well-system wear, and whether a whole house reverse osmosis system could reduce the corrosion load moving through the home every day.
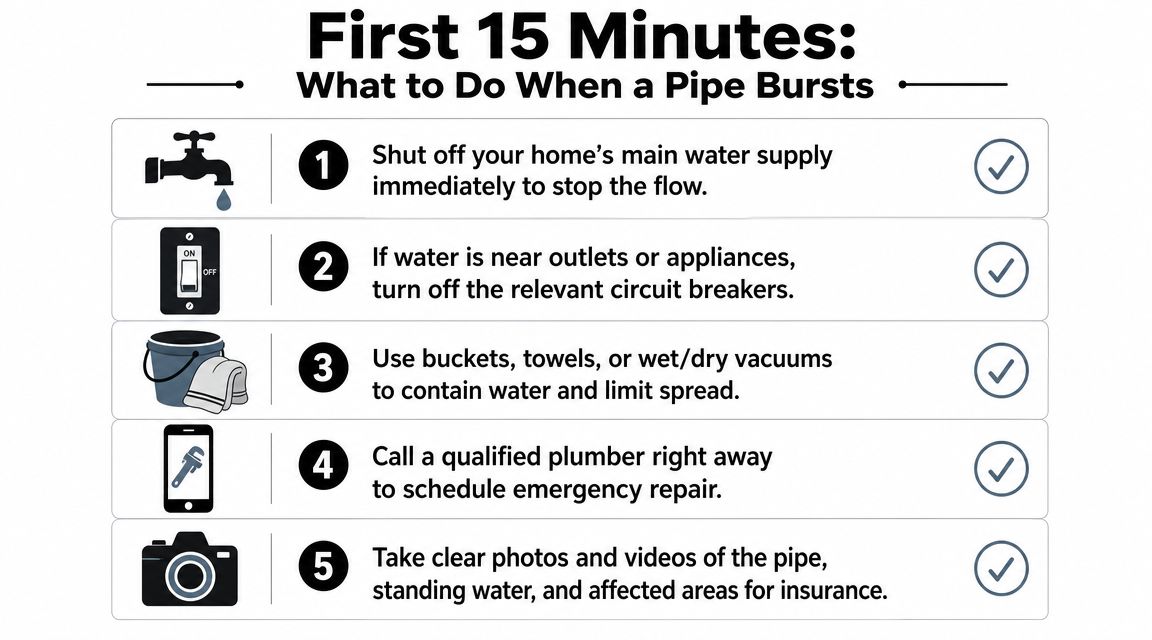
First 15 Minutes What to Do When a Pipe Bursts
The first job is simple. Stop the flow of water. Everything else comes after that.
If you're standing in water, hearing water behind a wall, or watching a ceiling stain spread, go straight to the main shutoff valve. In many SWFL homes, that's near where the water line enters the house, near the garage, utility area, or exterior service location. Turn it off fully.
If the burst is close to the water heater, shut off power to the water heater too. For an electric unit, that means the breaker. For a gas unit, shut down the appliance safely.
Shut off water first
A burst pipe keeps causing damage every second it stays pressurized. Floors soak up water. Cabinets swell. Drywall softens. Hidden framing holds moisture long after the visible puddle is gone.
After you shut off the main, open a faucet or two to help drain the system and relieve pressure in the lines. That reduces the chance of more water pushing through the damaged section while you're trying to get control of the situation.
Deal with electrical risk early
Water and electricity are a bad pairing. If water is near outlets, appliances, garage equipment, or your panel area, turn off the affected breakers only if you can do it without stepping into wet areas. If you can't reach the panel safely, stay clear and wait for qualified help.
Practical rule: If you have to ask whether an area is electrically safe, treat it as unsafe.
This matters even more in homes with garage fridges, pool equipment, irrigation controls, lift stations, and well-system components. A pipe failure in one part of the house can create an electrical hazard in another.
Contain what you can
Once the water is off, work on limiting spread.
- Use buckets and towels: Catch active drips and keep water from moving into adjoining rooms.
- Move what can be moved: Lift rugs, boxes, pet beds, paperwork, and electronics out of the wet zone.
- Use a wet/dry vacuum if safe: It's useful for shallow standing water, but only when power conditions are safe.
- Take photos before cleanup gets too far: Insurance questions start early.
Make the right call fast
Some burst pipe events are obvious. You can see the split, the fitting, or the failed valve. Others are concealed behind tile, under a slab, or in a ceiling cavity.
In either case, don't restart the system just to “see if it's still leaking.” That usually turns a manageable problem into a bigger restoration job. Keep the system isolated until someone can inspect it properly.
Water damage gets more expensive the longer the house stays wet. Fast decisions matter more than perfect ones in the first few minutes.
Assessing the Damage and Applying a Temporary Fix
Once the house is stable, the next question is whether you're looking at a simple exposed repair or a hidden failure that needs leak detection, wall opening, or slab investigation.
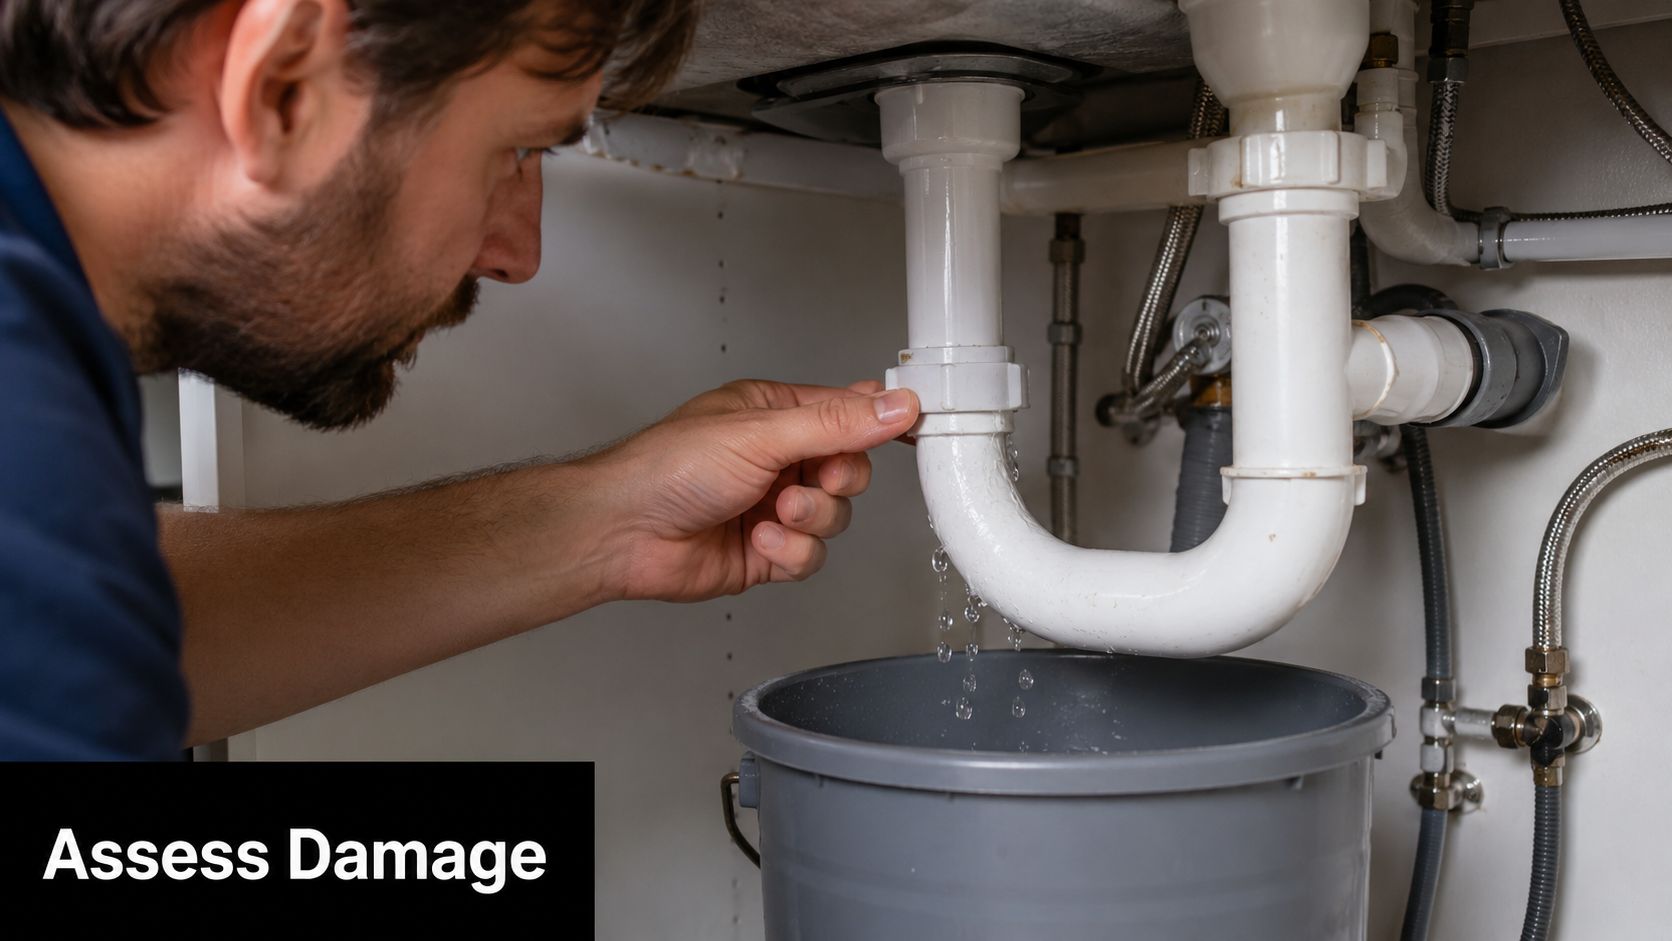
An exposed break under a sink, in a garage, or on an accessible copper run is one thing. A wet wall with no visible source is something else. The second category is where homeowners often waste time on the wrong fix.
What you can safely evaluate
Start with visible clues:
- A single exposed split or pinhole: Often a localized repair candidate.
- Bulging drywall or bubbling paint: Usually points to concealed water migration.
- Warm floor spots or unexplained moisture near the slab: Often means the failed section isn't visible.
- Water near pool equipment or well equipment: Could involve more than household supply piping.
A visible leak doesn't always mean a small problem. Water may have traveled far from the actual break.
A practical temporary repair on an exposed rigid pipe
For copper or another rigid accessible pipe, a practical workflow is to shut off the main water supply and water-heater power, drain the system, cut out at least 10 inches of damaged pipe, which is about 5 inches on each side of the rupture, then install push-fit couplings before reopening the water slowly, as shown in SharkBite's burst pipe repair workflow.
That method works when the damaged area is exposed, straight enough to work on, and free of broader structural or corrosion issues. It's a repair procedure, not a blanket answer for every burst line.
If the pipe failed because the wall cavity stayed wet, the line is heavily corroded, or the break is under the slab, a neat-looking patch may only buy a little time.
Before repressurizing, the cut ends need to be clean, deburred, and properly seated. Rushing that step is one of the most common reasons temporary fixes leak again.
A helpful visual walkthrough is below.
When a temporary fix is the wrong move
Some failures shouldn't be patched by trial and error.
Hidden lines, under-slab lines, and high-pressure system components need a professional diagnosis before anyone starts cutting or clamping.
That includes:
| Situation | Why it's risky |
|---|---|
| Behind-wall leak | You may repair the wrong section and leave trapped moisture behind |
| Under-slab burst | The visible symptoms rarely match the pipe's exact location |
| Well-system piping | Pressure behavior can be different from city-water assumptions |
| Pool plumbing crossover issues | The source may be part of a larger system problem |
| Repeated leaks in one area | Usually points to a material or water-quality issue, not a one-off split |
If you can't see the failure clearly, the smarter step is proper diagnosis. A focused professional leak detection service can keep you from opening the wrong wall or tearing into flooring unnecessarily.
Understanding Professional Burst Pipe Repair Costs and Options
The part homeowners usually underestimate is labor. The pipe itself often isn't the expensive part. Access is.
For burst pipes, about 80% of the repair cost is labor, and professional repairs commonly range from $150 to $250 per linear foot, while complex cases can exceed $5,000, especially when underground replacement or major water damage restoration is involved, according to Angi's burst pipe repair cost guide.
That cost structure makes sense when you've seen what goes into the work. Finding the break, isolating the line, opening walls or flooring, protecting finished areas, completing the repair, testing the system, and dealing with moisture all take time.

Why professional work costs what it costs
A simple comparison helps:
| Repair scenario | What drives the bill |
|---|---|
| Exposed pipe in a garage or utility area | Fast access, limited demolition, straightforward testing |
| Pipe behind tile or cabinets | Protection, demolition, careful restoration coordination |
| Under-slab or underground break | Locating, access planning, longer repair path |
| Repeat failures across multiple lines | Investigation into water quality, material condition, and system strategy |
The worst mistakes happen when someone chooses the cheapest immediate patch on a line that's already telling you the system has a bigger problem. One split can be random. Repeated corrosion leaks usually aren't.
Traditional access versus trenchless methods
Under-slab and buried line failures are where repair options really matter. Old-school excavation has its place, but it's not always the best first answer. If the failed line is concealed under finished surfaces or outside hardscape, less invasive methods deserve a serious look.
For trenchless pipe bursting, the operating sequence includes utility locates, excavation to about 2 inches below the existing pipe, support setup, and close crew communication on alignment, drag, and pump pressure. One important field practice is laying the bursting pipe in a C-shape toward the machine to reduce drag and pressure spikes, as outlined by Trenchless Technology's pipe bursting guidance.
That kind of work isn't DIY territory. But it does show why a modern repair plan can be far better than tearing up large areas blindly.
Hidden leaks deserve a different conversation
A lot of burst pipe content stops at “shut off the water and call a plumber.” That's too shallow for homes with slab leaks and concealed line failures. Homeowners often need help deciding whether to open the floor, reroute a line, or use a trenchless method that limits disruption.
If the repair scope is larger than expected, payment options matter too. Many homeowners look into available financing for major plumbing and water system work when a hidden burst turns into a broader correction project.
What works long term
The right repair option depends on more than today's leak.
- Localized replacement works when the surrounding pipe is in good shape.
- Rerouting makes sense when access to the failed line is destructive or repeat leaks are likely.
- Trenchless approaches fit best when buried or slab-related conditions make excavation especially disruptive.
- System-wide prevention matters when corrosion is the core problem.
That last point is big in Southwest Florida. If your water quality is shortening pipe life, every repair decision should include a prevention discussion.
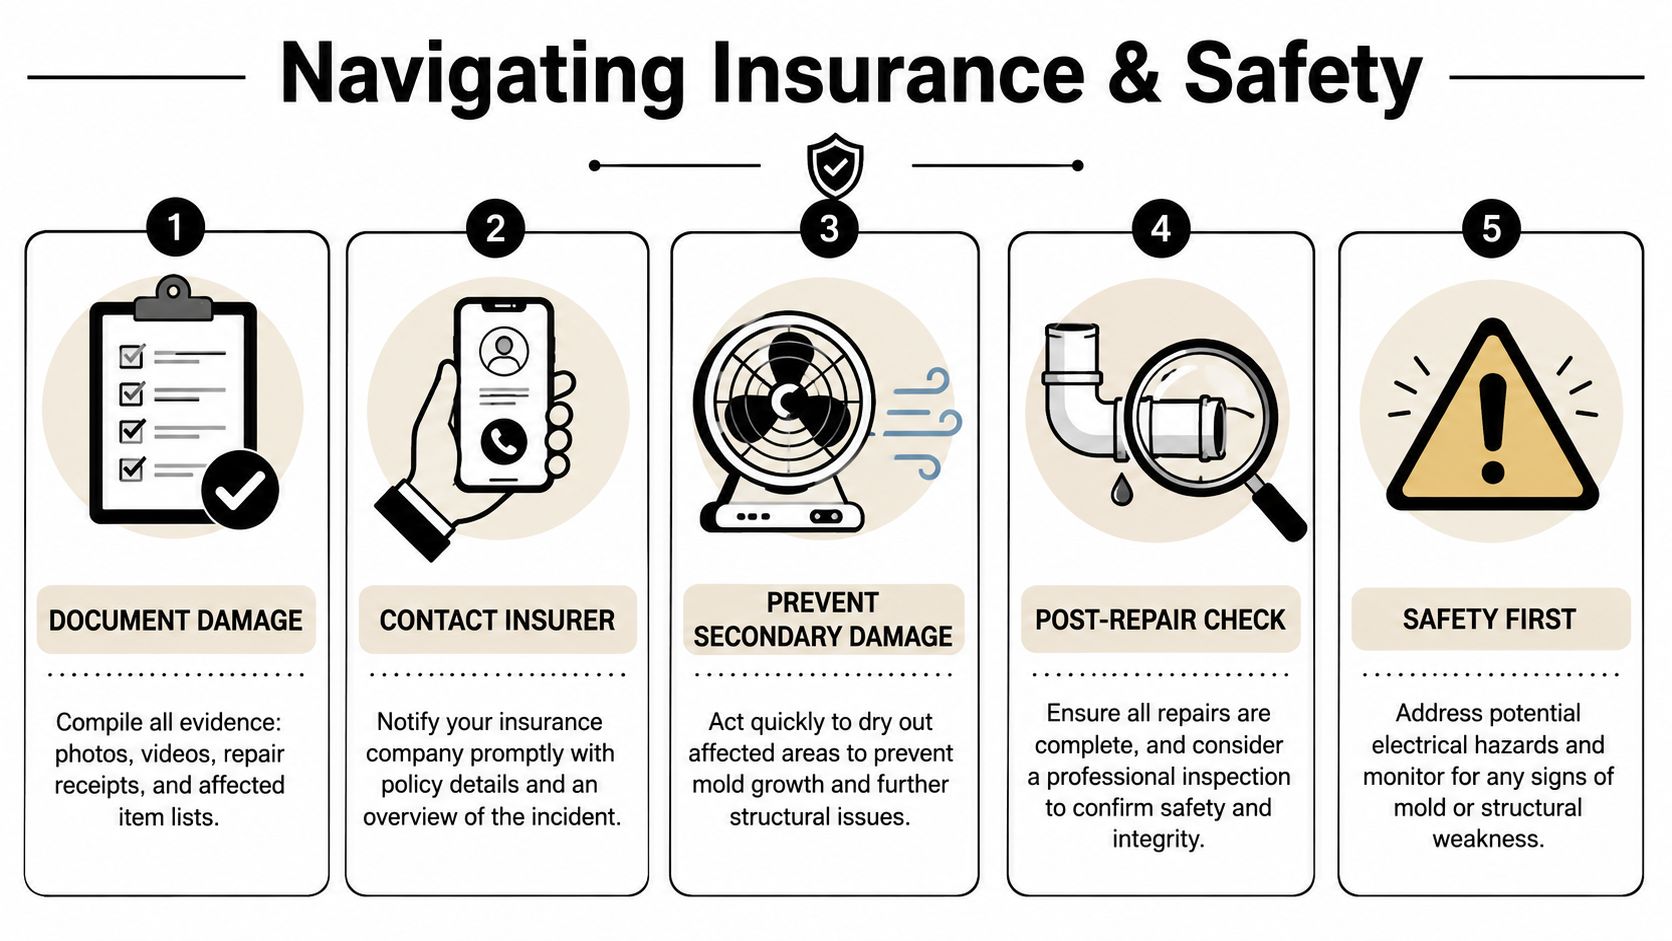
Navigating Insurance Claims and Post-Repair Safety
Once the leak is stopped and the repair plan is in motion, the next job is protecting your claim and your house. A lot of homeowners lose money here because they clean too aggressively, throw things away too soon, or assume the danger ended when the pipe was fixed.
Beyond fixing the pipe, post-burst risk management is critical. Homeowners need to document all damage for insurance, get an electrical safety assessment if water contacted wiring, and remember that mold can begin growing within 24 to 48 hours, which makes fast drying important, as noted in this post-burst safety guidance.
Document before the scene changes
Insurance carriers want a clear record of what happened and what was affected. Do that before damaged materials are hauled off or soaked items disappear into trash bags.
Keep it simple and thorough:
- Photograph the burst area from wide and close angles.
- Capture room-by-room damage including floors, baseboards, cabinetry, drywall, and contents.
- Save invoices and receipts for emergency work, cleanup supplies, and temporary protective measures.
- Write down the timeline of when you found the issue, shut off the water, and called for help.
If adjusters need to inspect, those records matter.
Don't overlook the non-plumbing hazards
Florida homes stay humid. Once water gets behind walls, under flooring, or into insulation, the danger shifts from active leaking to trapped moisture.
Watch for these issues after the repair:
- Electrical exposure: If water reached outlets, wiring, appliances, or equipment, get that checked.
- Odor changes: A musty smell often shows up before visible mold.
- Soft materials staying damp: Baseboards, door trim, and drywall corners hold water longer than people think.
- Ceiling or wall staining that keeps spreading: That can mean moisture remains in the assembly even if the pipe itself is fixed.
A finished plumbing repair doesn't automatically mean the property is dry and safe.
What homeowners often miss in SWFL
In Southwest Florida, post-repair safety has to account for local conditions. High humidity slows natural drying. Well closets, garage utility areas, and pool-adjacent mechanical spaces can stay damp long after the obvious water is gone.
That's why a proper follow-up often includes more than “watch it for a few days.” If water hit structural materials, hidden cavities, or electrical zones, inspection matters.
Here's a practical post-repair checklist:
| Area | What to verify |
|---|---|
| Electrical | No water-contacted wiring or wet devices left energized |
| Walls and ceilings | No trapped moisture, sagging, staining, or soft spots |
| Flooring | No cupping, swelling, or persistent dampness |
| Cabinets and trim | No hidden swelling or mildew odor |
| Mechanical spaces | No damp insulation or wet equipment surfaces |
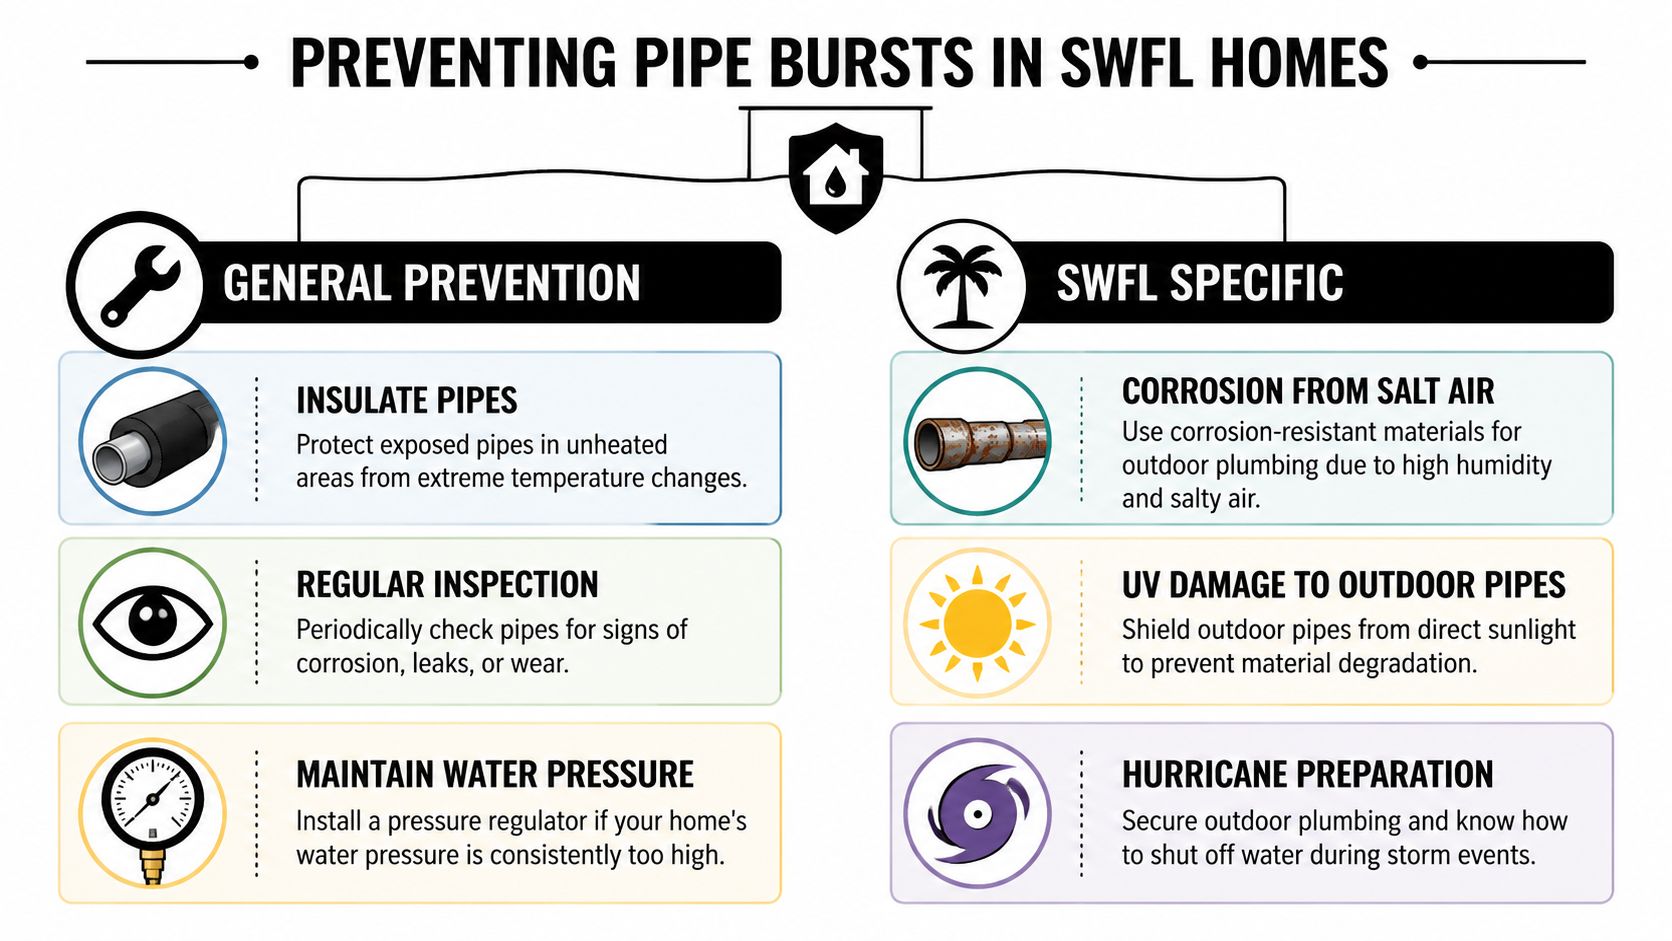
Preventing Future Pipe Bursts in Your SWFL Home
Burst pipe repair solves the emergency. Prevention protects the house.
In colder markets, frozen pipes drive a lot of the conversation. In the UK, burst pipes were estimated at about 2,650 incidents per year, causing nearly £50 million in annual repairs, with January and February as peak months, according to Direct Line Group's burst pipe report. Southwest Florida is different. Here, the bigger long-term concerns are corrosion from hard water, salt air, and system stress around storm season.
That difference changes the prevention plan. Around here, homeowners should think less about freeze-only protection and more about how water chemistry affects every pipe, fitting, appliance, valve, and fixture in the home.
The SWFL problem most people miss
Many homes in this region deal with mineral-heavy water, well-system variability, and outdoor conditions that are rough on exposed plumbing. Over time, that combination can wear out the system from the inside and the outside.
Common local pressure points include:
- Hard well water: Mineral load can contribute to scale and accelerate wear in plumbing components.
- Salt air exposure: Exterior piping, hose bibs, valves, and hardware age faster near the coast.
- Pool plumbing and outdoor plumbing: UV, heat, and exposure all work against long-term durability.
- Storm prep and recovery: Hurricane season adds stress to shutoff planning, equipment protection, and system restart procedures.
You can't control the climate. You can control what kind of water your plumbing handles every day.
Why whole house reverse osmosis belongs in this conversation
In this context, whole house reverse osmosis systems move from “nice upgrade” to practical plumbing protection.
If your home has corrosive or mineral-heavy water, every gallon moving through the lines leaves a mark over time. That affects copper, fittings, fixtures, appliances, water heaters, valves, and even the way scale builds inside the system. A burst pipe is often the moment homeowners start paying attention, but the underlying damage started long before the rupture.
A whole house reverse osmosis system treats water at the home level instead of only at one sink. That matters because pipe protection has to be system-wide to be meaningful. Cleaner, better-conditioned water doesn't just improve taste. It helps reduce the daily burden on the plumbing network itself.
What a whole house RO system can help protect
Think about where untreated water goes in a typical SWFL home:
| Part of the home | Why treated water helps |
|---|---|
| Interior supply piping | Reduces the load that contributes to scale and corrosion stress |
| Water heater | Helps limit buildup that shortens service life and affects efficiency |
| Fixtures and valves | Less mineral stress means fewer sticking, leaking, or prematurely worn parts |
| Appliances | Dishwashers, ice makers, washing machines, and similar equipment benefit from cleaner feed water |
| Showers and faucets | Fewer deposits, cleaner operation, and less ongoing wear |
| Whole-home plumbing strategy | Supports prevention instead of waiting for repeat failures |
The key point is this. A whole house RO system addresses a root cause, not just a symptom.
If the water itself is rough on the plumbing, burst pipe prevention has to include water treatment.
What doesn't work as a prevention strategy
Homeowners often try partial fixes that don't solve the underlying issue.
- Replacing one leaking section only: Fine for an isolated problem, weak for a house with ongoing corrosion.
- Treating drinking water at one faucet: Good for taste, irrelevant for the rest of the plumbing system.
- Waiting for visible leaks: By the time a leak shows itself, the pipe has usually been degrading for a while.
- Ignoring outdoor and well equipment: In SWFL, failures often begin in places homeowners don't inspect often enough.
A stronger plan combines inspection, pressure awareness, shutoff readiness, and water treatment that protects the full system. For many local properties, a whole house reverse osmosis system is the most practical long-view move because it supports both water quality and plumbing longevity across the entire house.
Your Partner for Total Water Confidence Water Medic
A burst pipe puts homeowners in emergency mode fast. First you stop the water. Then you make the electrical situation safe, protect the claim, and get the damaged line repaired the right way. After that, the smarter question is why the pipe failed and what will keep it from happening again.
That's where a lot of plumbing companies stop short. They repair the break and move on. In Southwest Florida, that's not enough for homes dealing with hard water, corrosive conditions, aging well systems, outdoor plumbing exposure, and the constant wear that poor water quality places on the entire house.
A more complete approach treats burst pipe repair as one part of a larger water-management strategy. Hidden leak diagnosis matters. Well-system performance matters. Pool-adjacent plumbing conditions matter. Most of all, whole-home water quality matters if you want to slow the corrosion and buildup that shorten pipe life.
If you want to understand the company behind that broader approach, you can learn more about Water Medic of Cape Coral and its water system background. For SWFL homeowners, real peace of mind usually comes from handling both sides of the problem. Emergency repair when something fails, and system-wide prevention so it's less likely to happen again.
If you're dealing with a pipe failure, recurring leaks, hard water problems, or you want a long-term prevention plan built around a whole house reverse osmosis system, contact Water Medic of Cape Coral. They can help you move from emergency response to a more reliable, better-protected home water system.