
Hot Water Tank Thermocouple Guide for Cape Coral Homes
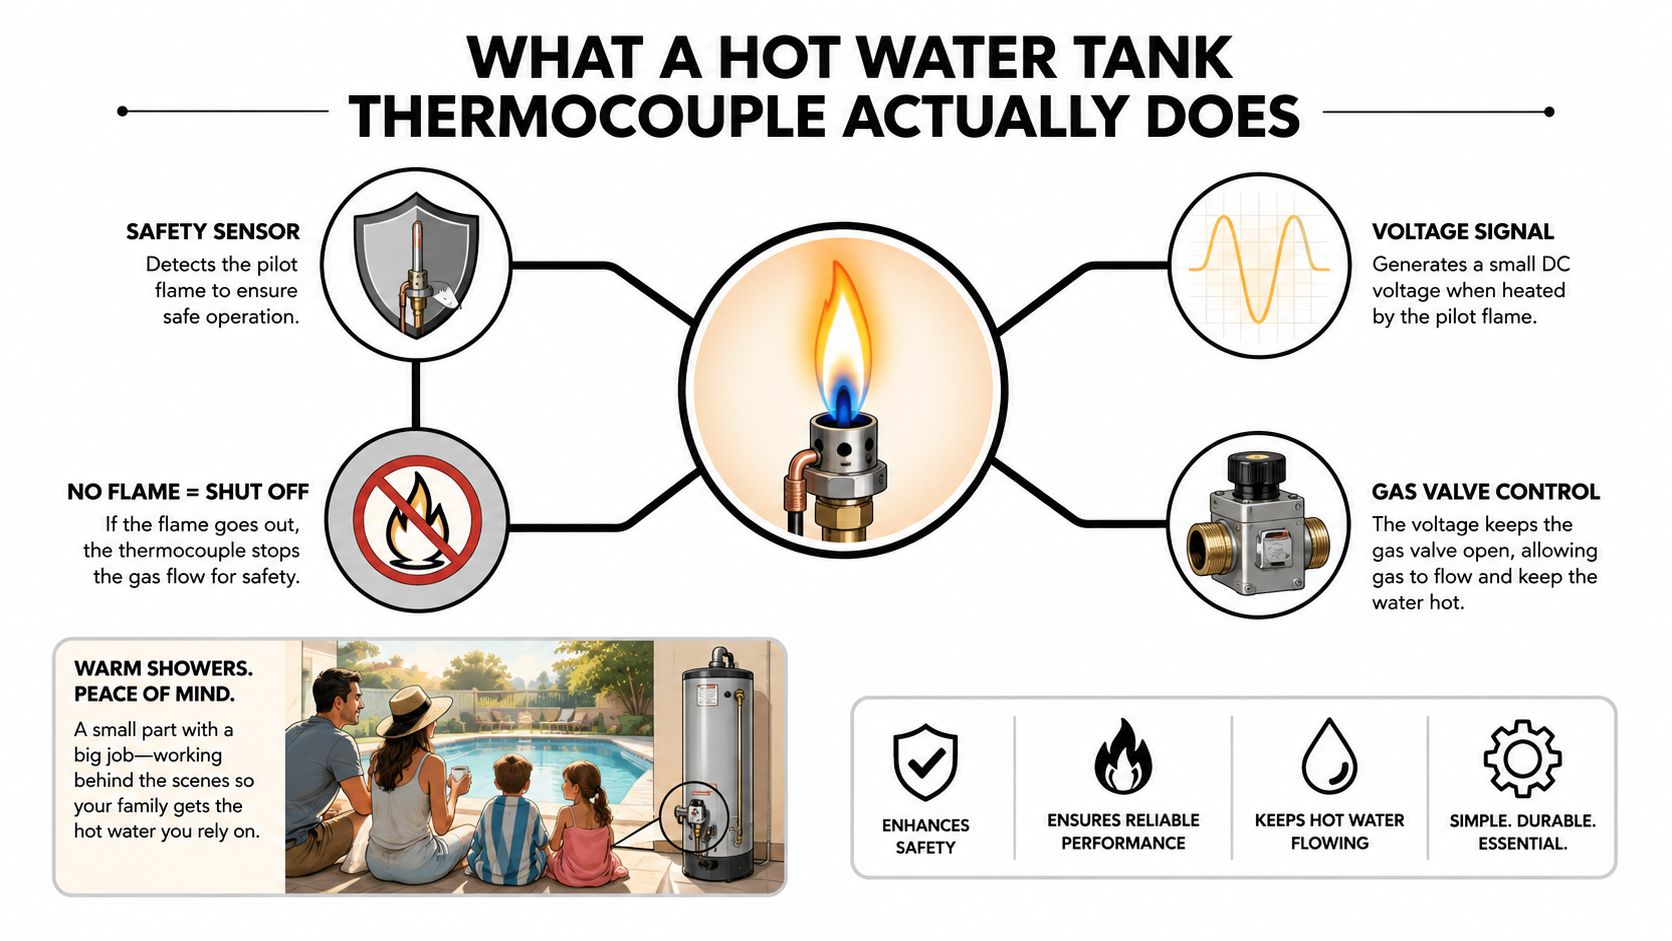
A hot water tank thermocouple is a small safety sensor that uses the pilot flame to generate roughly 20 to 30 millivolts of electricity, and that signal is what holds the gas valve open. If the pilot goes out, the signal drops and the valve shuts off gas flow, which is why a weak or failed thermocouple can leave a home without steady hot water.
That matters fast in a Cape Coral home. One minute the heater seems fine, the next the pilot won't stay lit, the shower turns cold, and everyone starts guessing at the wrong fix. If your home also relies on a whole-house reverse osmosis system, a stable hot water source matters even more because temperature swings can ripple through daily use, cleaning routines, and equipment schedules.
What a Hot Water Tank Thermocouple Does
A gas water heater pilot that keeps dying usually feels bigger than it is. The part behind the trouble is often a thin copper safety probe sitting near the pilot flame, deciding whether gas should keep flowing. That is the hot water tank thermocouple, and it is one of those parts most homeowners never notice until the hot water suddenly disappears.
The simple job it performs
The part works like a guard standing at the burner. The pilot flame warms the tip, the sensor sends a tiny electrical signal, and the gas valve stays open only while that signal is present. That is why the part is tied directly to safety, not comfort alone.
In practical terms, a thermocouple in a gas water heater is a safety device that typically produces about 20 to 30 millivolts while the pilot is lit, and if the pilot goes out, the signal falls and the valve closes. Home Depot's replacement guide says many healthy units should read around 25 to 30 mV during a pilot-light test, and if the pilot will not stay lit after 30 to 60 seconds of heating, the thermocouple is commonly treated as defective. Home Depot thermocouple replacement guide
A homeowner does not need to think of this part as a heater component. It works like a flame-sensing switch that protects the burner from running without ignition.
That is why the probe matters in homes with multiple water demands. A small sensor failure can interrupt hot water at the exact moment a family is trying to get ready, run laundry, or keep a broader water-treatment setup operating smoothly. For a Cape Coral homeowner, it is not just a tiny repair, it is a small part with a big effect on the whole hot-water chain.
How a Thermocouple Senses and Reports a Pilot Flame
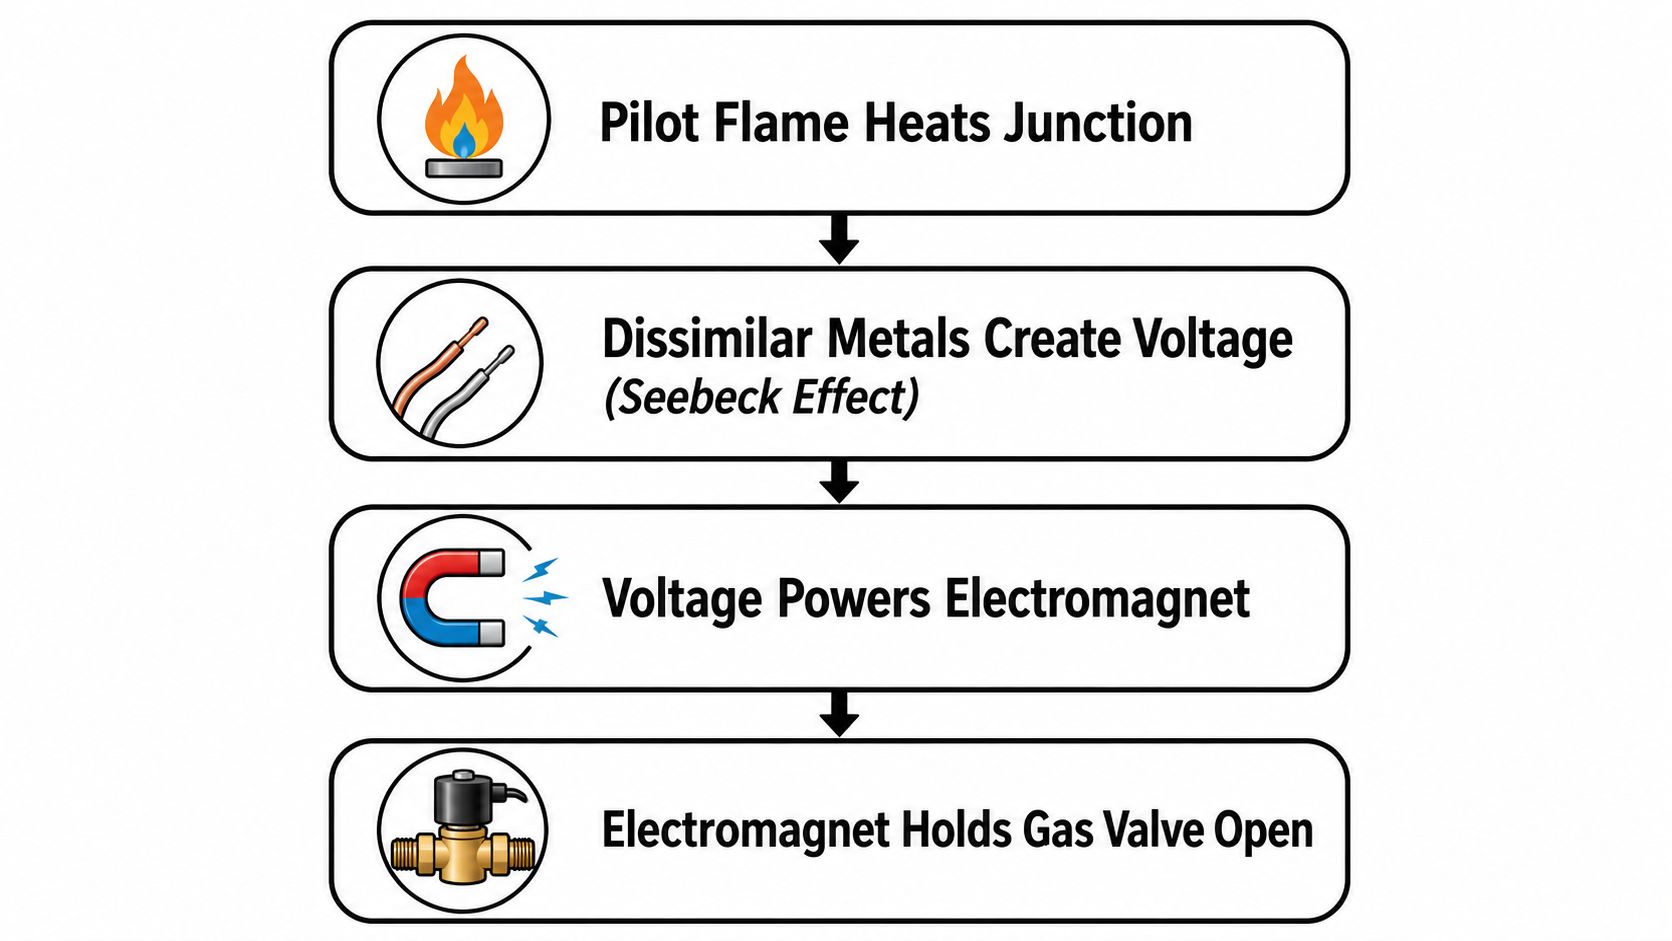
A pilot flame can look steady to the eye and still fail to do its job at the sensor tip. The thermocouple only responds when that small metal junction is heated enough to generate a signal the gas control valve can read. Heat in, electrical output out, valve stays open while the flame is present.
Why the millivolt reading matters
The reading matters because the signal has to be strong enough for the valve to trust it. Service guidance places healthy operation in a narrow range, and many replacement guides use 25 to 30 mV as a practical target during a pilot test. If the number is too low, the gas valve may stop holding open even though the flame still looks present. RV Roadlog thermocouple test guide
That is why a weak output is more than a loose theory. The heater does not guess, it reacts to the signal it receives. When that signal falls short, the system behaves as if the pilot is out, because a gas appliance has to shut down safely.
Why sensor type and placement still matter
The sensor also has to fit the job and sit in the right spot. Type K covers about -200°C to 1250°C, while Type T covers about -250°C to 350°C. Under standard limits of error, Type T is specified at about ±1.0°C or 0.75%, compared with Type K at about ±2.2°C or 0.75%. DwyerOmega thermocouple types
Placement can be just as important as the part itself. If the probe is too short or sits outside the hottest part of the flame, it can under-read the heat it is supposed to sense. Industrial guidance says insufficient insertion can cause low readings, and as a rule the thermocouple should extend at least four times the outside diameter of the protection housing into the process. If it passes through insulation or wall offsets, it should be inserted even farther. Thomasnet sensor insertion guidance
A probe that is out of position can make a good heater look faulty.
Common Symptoms of a Failing Thermocouple
A pilot that lights and then dies when you let go of the control knob is the kind of failure many homeowners notice first. It feels like a small nuisance, but it usually means the hot water tank thermocouple is not sending a steady enough signal to keep the gas valve open. In a Cape Coral home, that problem can show up faster when humidity leaves a little corrosion on the probe tip or on the connection point.
The next clue may not be at the burner at all. A shower that starts hot and then slips toward lukewarm can happen when the flame signal is unstable, especially if the heater is sitting near an area with poor combustion air or a partially restricted vent path. That kind of behavior is like a weak hand signal, it works for a moment, then drops out when conditions shift.
Sometimes the burner tries to start, but the heater never settles into a normal firing pattern. That can point to the sensor, yet it can also point to the gas valve, the pilot assembly, or a combustion problem that is making the flame too small or too dirty to do its job. A pilot flame that looks weak, lazy, or yellow deserves a close look because soot on the pilot orifice, corrosion on the probe tip, or a bad connection can all interfere with the signal. WaterHeaterTimer troubleshooting guide
What the symptom pattern can suggest
- Pilot won't stay lit: Often points to a thermocouple that is not generating enough voltage, especially when the flame goes out right after the knob is released.
- Intermittent hot water: Can come from a sensor that is drifting in and out of stable output, which makes the heater act inconsistent from one cycle to the next.
- Burner doesn't establish normally: May involve the sensor, but the gas valve or pilot assembly can be part of the problem too.
- Visible corrosion or soot: Suggests the tip or lead needs inspection before any part gets replaced.
- Humidity-related corrosion in coastal homes: In places like Cape Coral, moist air can leave a fine layer of oxidation on the probe tip. That small coating can interrupt heat transfer and make the thermocouple look weak, even when the rest of the heater is still usable.
A faint smell near the heater is a reason to stop and inspect the area carefully, not a reason to start swapping parts at random. If the pilot flame is weak and yellow instead of sharp and steady, the heater is giving a clearer warning than the thermocouple label alone. Something in the combustion path is off, and the sensor may only be reporting the trouble instead of causing all of it.
How to Safely Test a Thermocouple with a Multimeter
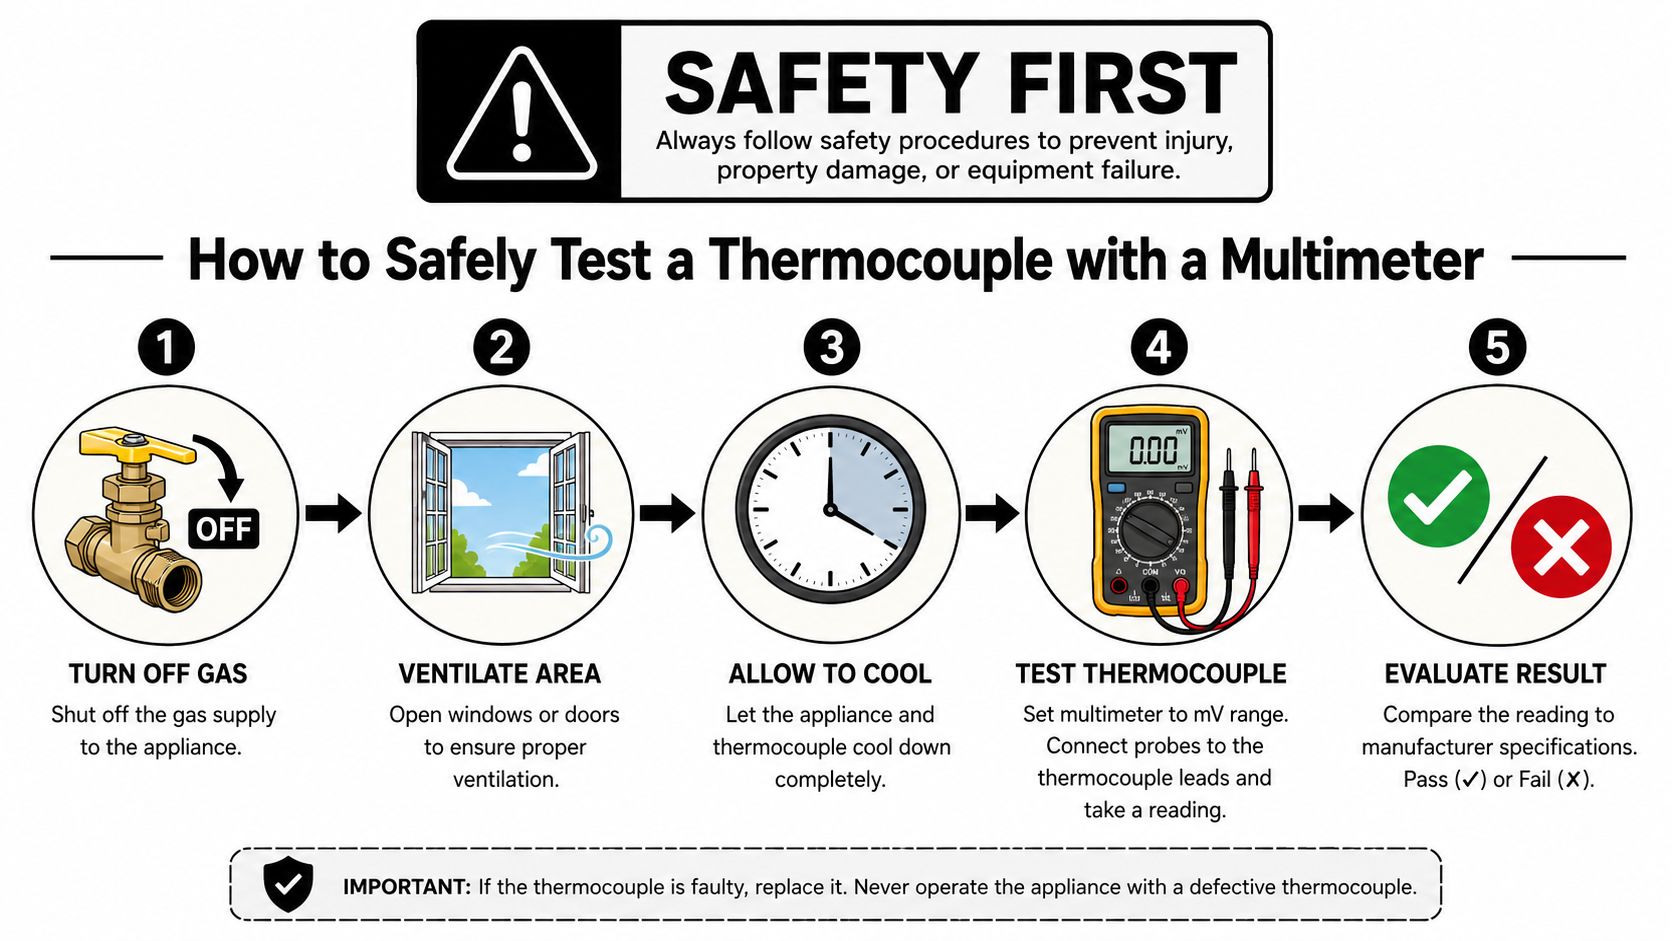
A multimeter test is the bench check, while the flame is the heat source. Like testing a battery with a meter before blaming the toy, you start by making sure the thermocouple has a fair setup and a safe work area. Turn the gas control valve to OFF, ventilate the space, and let the heater cool before you open the access area.
Reading the number the right way
Disconnect the thermocouple lead from the gas valve, then set the multimeter to millivolts DC. Hold the pilot button so the tip is heated, and give the meter a steady moment to settle before you read it. Service guides use the reading as a quick check of whether the sensor is producing usable output. RV Roadlog thermocouple test guide
A stable reading tells you the thermocouple is doing its part. If the number looks weak, the next question is whether the sensor tip is positioned well in the flame, whether the lead is damaged, or whether the control side is keeping the signal from getting through. That keeps you from replacing the wrong part just because the pilot acted up.
A practical safety sequence
- Shut off the gas. Make sure the control knob is at OFF before opening the access area.
- Ventilate the space. Clear the compartment so any lingering gas can move out.
- Let it cool. A hot burner compartment can make even a simple check unsafe.
- Disconnect the lead. Keep track of the wire route so it goes back the same way.
- Test with the meter. Read the output, then decide whether the problem looks electrical, mechanical, or flame-related.
If the reading is weak, do not jump straight to replacement. A poor result can come from a loose connection, poor flame contact, or a damaged lead as well as from the sensor itself.
For a Cape Coral homeowner, that matters because a bad guess can send you buying a part you do not need. It also helps keep the heater, and the hot-water supply feeding the rest of the house, on the right track before the next repair step.
Deciding Between DIY Replacement and Calling a Pro
A homeowner in Cape Coral may replace a thermocouple, relight the pilot, and still find the heater dropping out again because hard water has already left sediment in the tank or around the burner area. That kind of repeat failure is the signal to slow down and look at the whole system, not just the small sensor at the end of the line. A thermocouple is a small part, but it sits inside a much larger chain that depends on clean flame, steady gas flow, and a heater that can support the hot water supply the rest of the house relies on.
A DIY swap can make sense if the problem really is limited to the probe and the burner compartment is otherwise clean and accessible. It is a bit like replacing a flashlight battery. The job is simple only when the rest of the device is in good shape. If the pilot keeps going out, the flame looks weak, or the unit has signs of buildup and poor venting, the safer move is to stop and call a technician who can check the full burner assembly and the gas side together.
| Factor | DIY Replacement | Professional Service |
|---|---|---|
| Skill level | Good for careful homeowners who can follow steps | Better for anyone unsure about gas components |
| Tool needs | Basic hand tools and a multimeter | Diagnostic tools, leak-check equipment, and experience |
| Risk | Lower only if the gas is fully shut off and the job stays simple | Better control of gas safety and component matching |
| Part matching | Common lengths run 18 to 48 inches and the fit has to match the appliance style | Technician can verify the correct length and mounting style |
| System check | Usually limited to the part being replaced | Can also evaluate the pilot assembly and gas control valve |
Commercial-style thermocouples are commonly sold in lengths from 18 to 48 inches, so part matching matters. A sensor that is too long can leave extra slack, and one that is too short can pull against the mounting point or sit poorly in the flame path. The result is the same either way, a repair that looks finished but does not hold up. Home Depot thermocouple replacement guide
A technician is the better choice when you want the heater checked as a system instead of treating the thermocouple as a stand-alone part. That matters if the pilot assembly is dirty, the gas control valve is acting up, or the burner area shows signs of poor combustion air. If you want a broader water-system review along with the heater work, Water Medic's services can help with that kind of inspection.
Why the Thermocouple Is Not Always the Problem
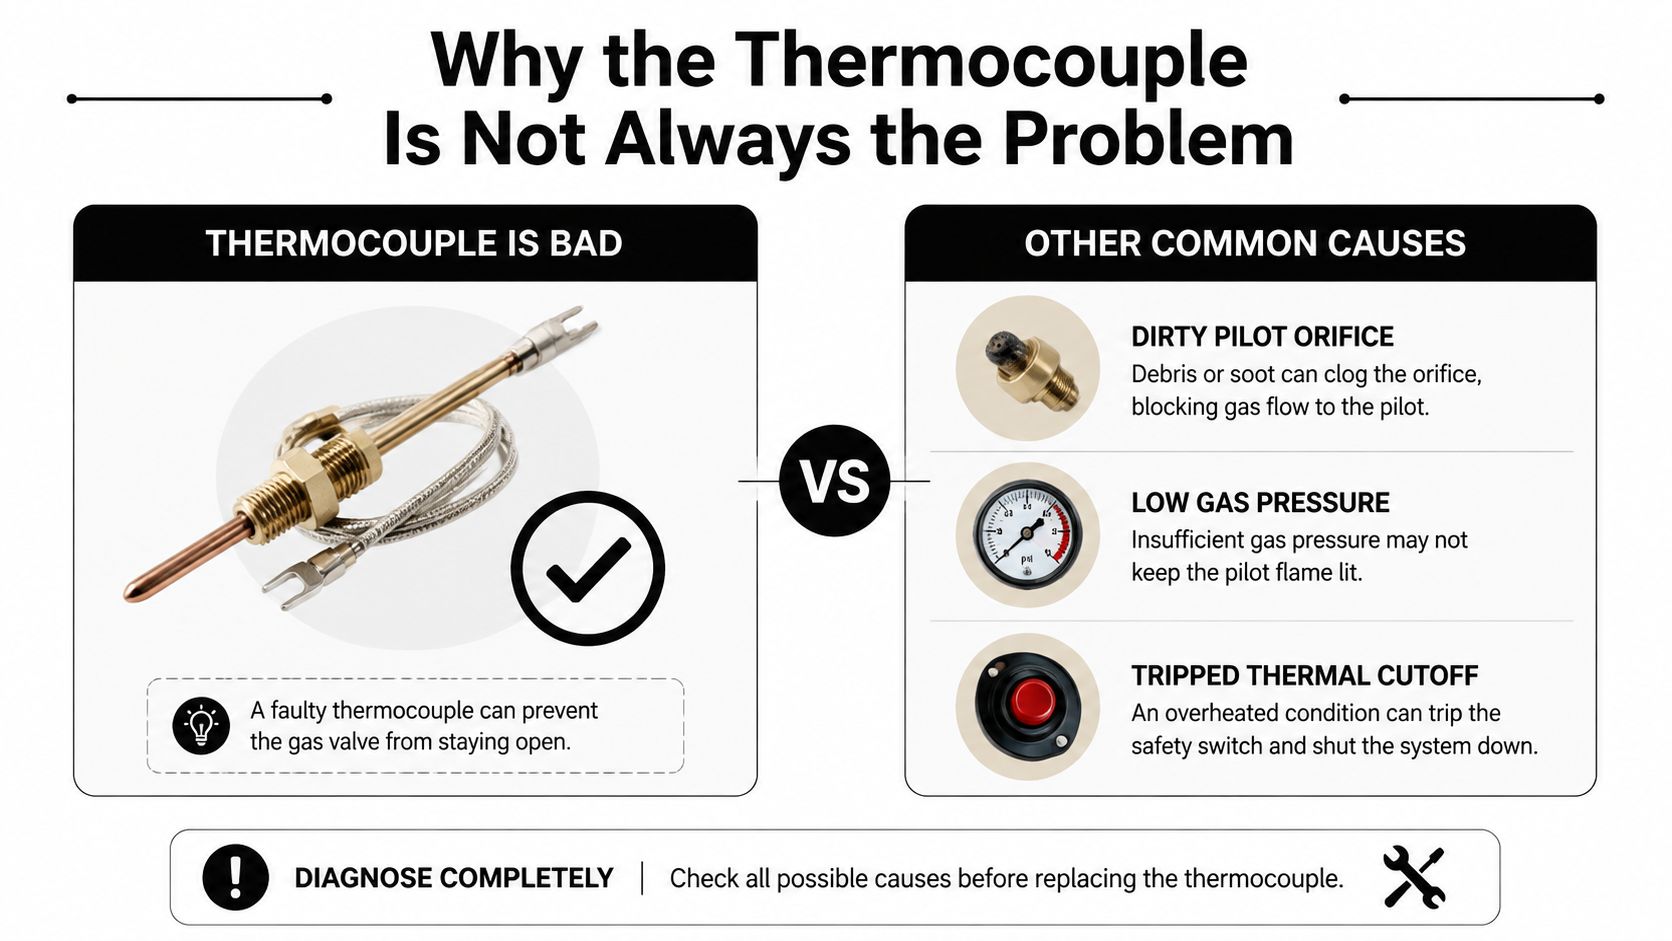
A pilot that goes out can still leave the thermocouple innocent. Homeowners often swap the sensor first because it is the easiest part to blame, but the pilot system works like a small chain, and one weak link can make the whole heater act the same way. Low gas flow, a dirty pilot orifice, a misaligned flame, a failing gas control valve, or restricted combustion air can all produce the same short-lived pilot. The WaterHeaterTimer troubleshooting guide is one place that walks through that broader check.
How to read the symptom pattern
A weak yellow pilot flame usually points to combustion trouble upstream of the sensor. A flame that looks steady but still will not keep the burner going can point more toward the gas valve or the signal path between the thermocouple and the control. If the control knob clicks and the heater still does not respond normally, the fault may be beyond the probe itself. Recent gas work in the home is another reason to pause before buying a replacement part.
The useful question is whether the sensor failed first or whether it is reporting a problem elsewhere. A dirty pilot orifice can starve the flame, which leaves the thermocouple too cool to send a strong signal. A gas control valve can also make a healthy sensor look weak because the signal never gets turned into stable burner operation.
What to check before buying a part
- Check for combustion-air starvation. Make sure nothing is blocking the air the burner needs, since a heater that cannot breathe often acts as if the thermocouple failed.
- Listen for the control response. A valve that clicks inconsistently or seems slow to react can point to a gas-control issue instead of a bad sensor.
- Watch how the pilot behaves during hold time. If the flame only stays lit while the button is held, the problem may be a weak signal, but it may also be a gas-supply or valve issue.
- Review recent changes around the appliance. New storage items near the heater, dusty surroundings, or other changes in the combustion area can alter how the pilot performs.
- Compare the whole burner area, not just one tip. Soot, debris, or a disturbed pilot assembly can send you toward the wrong part if you focus only on the thermocouple.
That wider check saves money and avoids guesswork. A thermocouple is a common failure point, but it is also the part homeowners tend to blame first, and that can lead to a replacement that does nothing because the underlying issue sits in the gas valve, the pilot assembly, or the air supply.
Step-by-Step Thermocouple Replacement for Homeowners
A thermocouple swap is a small repair, but the work only goes well when the problem has already been narrowed down. If the pilot assembly, gas valve, or combustion air is the core issue, changing the sensor will not fix anything. For a homeowner who wants to protect steady hot water, and avoid unnecessary disruption to a whole-house treatment setup, the replacement should be treated like a careful part change, not a guess.
Start by shutting off the gas at the control valve and letting the unit cool completely. Remove the access panel and insulation slowly, then set the screws and any shielding aside in the order you took them off. That keeps reassembly simple and helps you avoid bending the burner parts while you work.
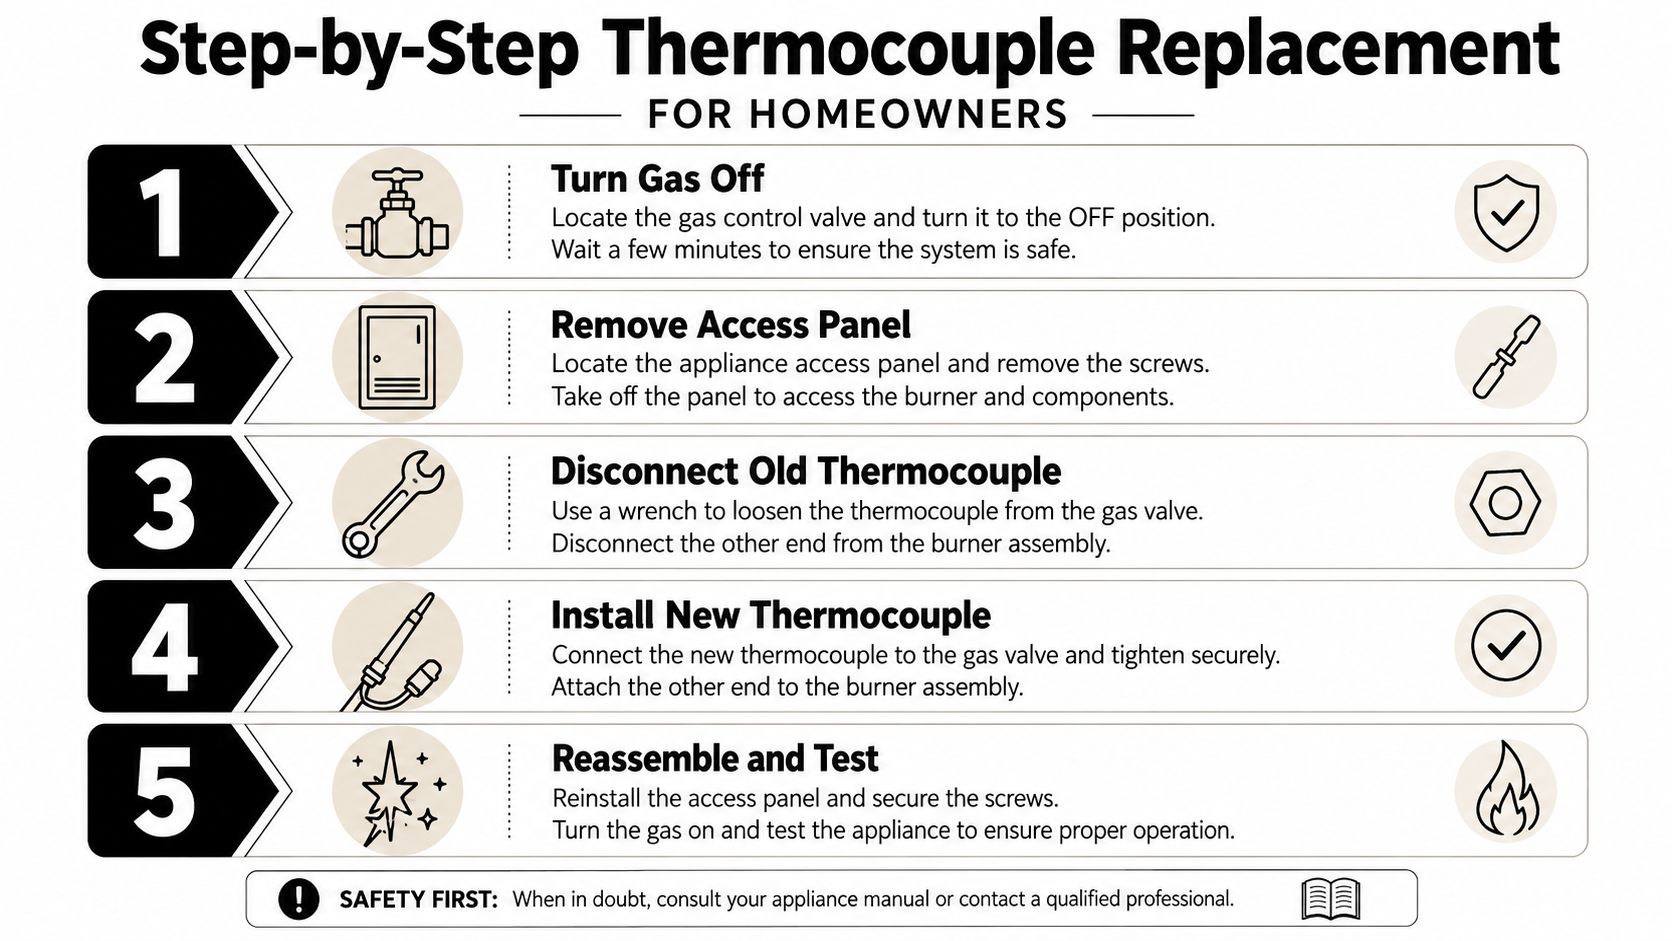
A clean, careful swap
- Turn the gas off. Make sure the control knob is fully at OFF before you touch the burner area.
- Open the access area. Remove the cover, insulation, and any brackets that block access, and keep each piece in order.
- Remove the old thermocouple. Follow the copper lead from the pilot assembly to the valve and note its path before you loosen it.
- Inspect the mounting points. Check the pilot bracket, the sensing tip, and any gasket or seat area for wear, soot, or damage before the new part goes in.
- Install the new part. Match the length and mounting style, then seat the sensing tip in the same flame position as the old one so the pilot can heat it correctly.
- Reassemble and secure the connections. Tighten the fittings to the manufacturer's instructions, restore the insulation and cover, and make sure the copper lead is not kinked or pinched.
- Relight and verify. Restore gas, relight the pilot, and watch for a steady flame that stays on without hesitation.
The replacement itself is mostly about fit, alignment, and keeping the connection points clean. If a replacement kit comes with a new nut, ferrule, or mounting hardware, use the pieces that belong with that part rather than reusing damaged fittings. A good comparison point is the old thermocouple you removed, because the new one should match its length and attachment style before you start tightening anything. For homeowners who want to check basic upkeep habits alongside a repair, Water Medic's monthly maintenance information is a useful reference for keeping small issues from piling up.
Before relighting, inspect the connection points for any sign of looseness and make sure the lead sits naturally instead of under strain. If the heater allows a gasket or seal at the access area, check that it is seated flat and not cracked, because a poor seal can make the burner compartment dirty again sooner than it should. Once the pilot is lit, the flame should hold without you needing to keep pressure on the control for long.
If it still will not stay lit, stop there and look back at the pilot assembly, the gas valve, or the air supply instead of forcing a second replacement. A new thermocouple cannot correct a problem that starts somewhere else in the heater.
When a Hot Water Tank Issue Is Really a Whole-House Water Problem
A thermocouple problem can be a warning sign, not just a small repair. In Cape Coral homes that depend on well water and a whole-house reverse osmosis setup, anything that destabilizes hot water can affect the rhythm of the entire house. If the heater is cycling poorly or the pilot keeps failing, the issue may be tied to broader water conditions that deserve attention beyond one part.
Sediment-heavy water can shorten the life of small components and make flame-related parts work harder than they should. That's one reason it helps to look at the heater, the water source, and the treatment equipment as a connected chain instead of isolated boxes. If the concern is not just the sensor but the overall water environment, a broader evaluation makes more sense than another quick part swap. Water Medic well water repair
For homeowners who already rely on reverse osmosis for better water quality, the heater's stability matters because the hot-water side of the house has to keep up with normal daily demand. If the pilot keeps dropping out, you're not only chasing a heater issue, you're risking avoidable interruptions across the home's water routine. A technician who understands the full water path can help you decide whether the sensor, the heater, or the source water deserves first attention.
If your Cape Coral home needs a fuller look at the water system behind the heater, Water Medic of Cape Coral can help with whole-house water treatment, well water repair, and related service needs. Visit Water Medic of Cape Coral to schedule a conversation about your system and get a practical next step for your home.