
Replacement Sediment Water Filters: A Practical Guide
The cartridge you changed eight weeks ago is already fading. The kitchen tap runs a thin stream, the ice maker takes longer than it used to, and the old cartridge came out with a rust-colored band across the pleats that you wiped off the housing and thought about for a second before dropping it in the trash. So you order another box of 5 micron cartridges, because that's what was in there, and the cycle starts again.
On a private well feeding a whole-house reverse osmosis system, that cartridge is the cheapest diagnostic tool on the property. It reports what the aquifer is sending up, whether the pretreatment matches the water, and whether the RO membrane has been running on clean feed or on fines it was never built to handle. Read it as data and you stop guessing at replacement intervals.
What follows tracks the order you'll meet these problems: matching the cartridge to the housing and the membrane, swapping it without creating a new one, setting a schedule from measurements instead of a calendar, and knowing when the right purchase is a water test rather than another filter.
Match the Cartridge Size, Micron Rating and Material
Sizing starts with the housing already bolted to the wall. Note the bowl length and diameter, the port size, and the micron rating printed on the old cartridge or listed in the system manual. A 10 inch by 2.5 inch housing takes a 10 inch by 2.5 inch cartridge, and a 20 inch by 4.5 inch housing takes its own size. Everything past that is a decision about filtration, not about fit.
The micron rating is where the choice sits, and certified listings are broader than most homeowners expect. Replacement cartridges carry nominal ratings from approximately 3 to 50 microns, which is why two cartridges with identical dimensions can have completely different sediment-removal capability, as the NSF/ANSI 42 certified product listings show. NSF/ANSI 42 is the voluntary standard for drinking-water treatment units addressing aesthetic effects, and it covers claims for particulate, iron, manganese, zinc, chlorine, taste and odor reduction. The 2018 edition requires every performance claim to be verified and substantiated by test data generated under the standard's requirements, and certification also addresses material safety and structural integrity, which matters for a part that sits in your drinking water for months.
| Specification | Typical value | Best fit | Trade-off |
|---|---|---|---|
| Nominal micron rating | 5 micron | Standard pre-filter for most well water | Finer than 5 micron loads faster under heavy sediment |
| Nominal micron rating | 20 micron | High-sediment wells or sandy aquifers | Lets fine silt pass toward the RO membrane |
| Nominal micron rating | 50 micron | Coarse sand as a first stage ahead of a finer filter | Offers little protection for the membrane alone |
| Cartridge length and diameter | 10 in x 2.5 in | Single housing with lower daily demand | Less sediment capacity before replacement |
| Cartridge length and diameter | 20 in x 4.5 in | Whole-house flow with higher sediment load | Larger housing and higher cost per change |
| Material | Spun or pleated polypropylene | General residential sediment duty | Confirm the certified construction for the stated claim |
The trade-off is capture against resistance. A finer rating holds silt back from the membrane, but a lower micron rating can capture smaller particles while creating greater flow resistance, and it needs changing more often whenever sediment loading is high. A coarser rating keeps pressure up and lets fines through to whatever sits behind it.
Practical rule: match the certified micron specification to the original system design first, then move one step at a time based on what the old cartridge looked like when it came out.
In a whole-house RO system, the sediment stage is the first line of protection for the membrane, so the rating you pick belongs in the same record as the membrane model and the system's recovery figure. The EPA WaterSense specification overview defines recovery as the percentage of water entering the RO membrane that becomes treated water available to the user, and its proposed specification identifies a minimum system recovery of 40 percent for the applicable tested configuration under NSF/ANSI 58. A cartridge that starves the membrane changes the recovery the household gets, whatever the spec sheet claims.
Buyers already judge these parts on performance rather than convenience. A 2025 market analysis by Accio reported that 21.9% of positive customer feedback about sediment and carbon replacements cited good performance, while 12.2% cited ease of use.
Before the cartridge goes into the bowl, confirm three things on the package: the micron rating, the connection size, and the certification claim attached to it. Then write the rating on the housing with a marker and log it for the next visit. Sediment and carbon work as a pair ahead of the membrane, and the carbon filtration stage only performs as well as the sediment cartridge protecting it.
How to Swap a Sediment Cartridge Step by Step
The swap takes about fifteen minutes on most housings and goes wrong in the same three places every time. Work through the sequence in order and keep the reason behind each step in your head, because the reasons are what keep the next cartridge honest.
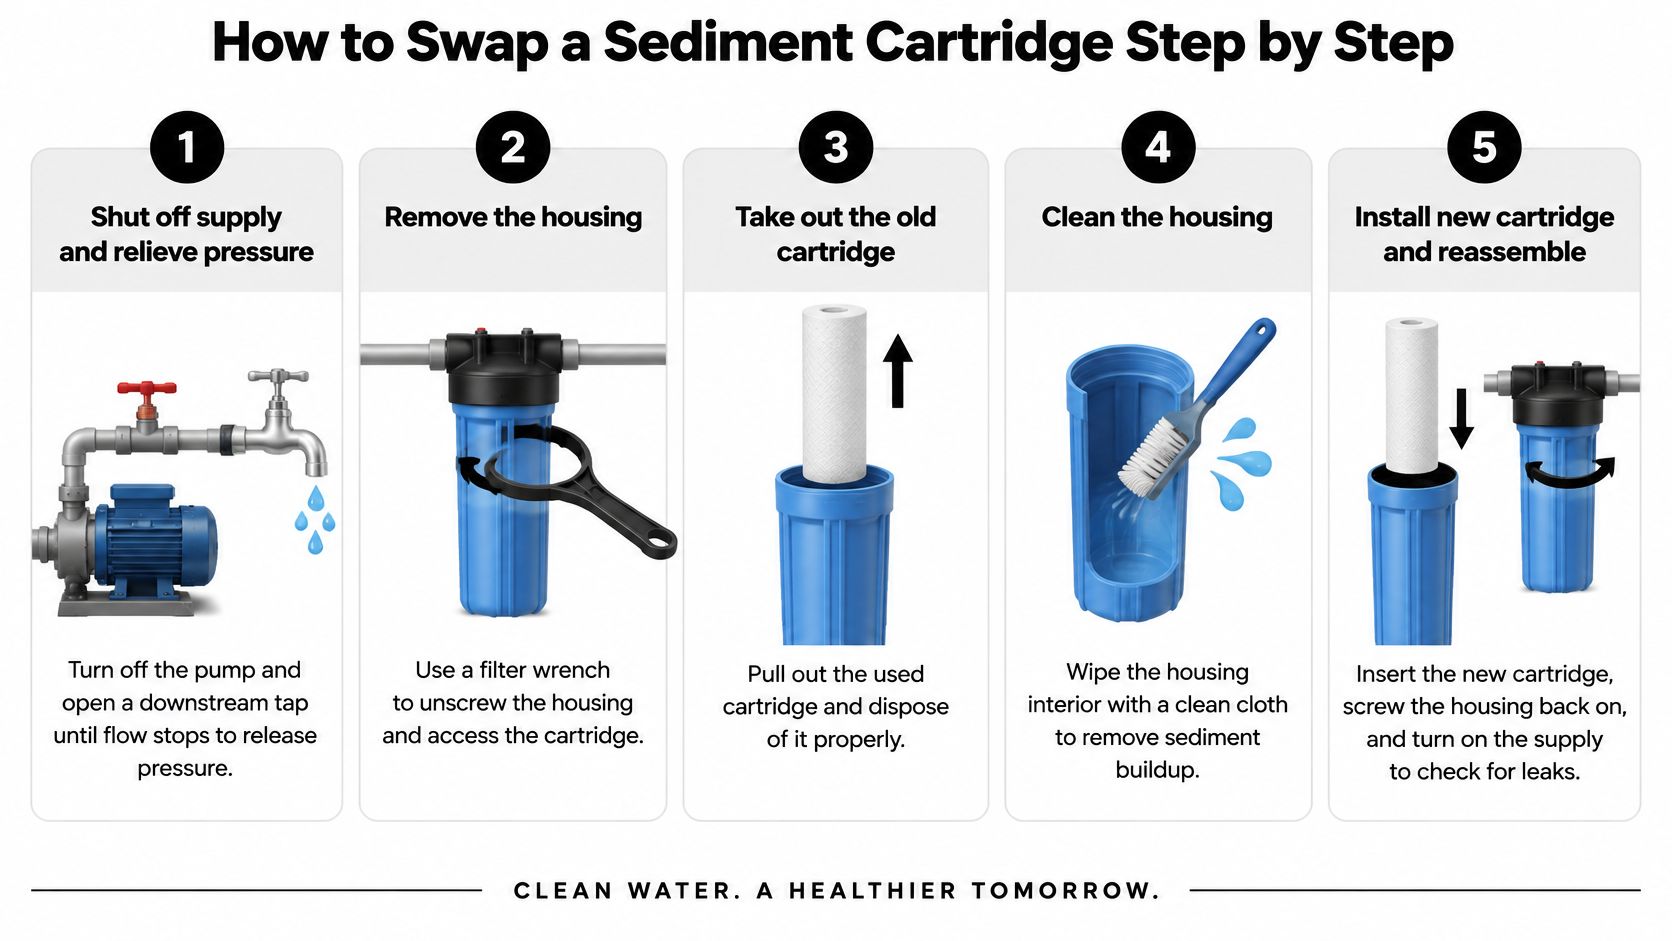
Shut off the supply pump and relieve pressure. Open a downstream tap until the flow stops before you touch the bowl. A housing under pressure sprays its contents across the room and, worse, a bowl you've over-tightened before can crack when it opens under load.
Unscrew the bowl and pull the old cartridge. Use a filter wrench on a stubborn bowl instead of channel locks that crush the plastic. Then look at what came out: coarse sand, iron staining, rust-colored bands or slime all point to different conditions in the well, which is why the Nebraska Extension sediment filter guide puts inspection ahead of replacement.
Clean and sanitize the housing. Wipe the interior with a mild disinfectant and scrub the O-ring groove where grit packs in, then rinse until the water runs clear. Residue left behind goes straight into the new cartridge and into the drinking water behind it, and a fouled housing contributes to bacterial contamination between changes.
Seat the new cartridge in the correct flow direction. Some pleated cartridges have a gasket end that must face the inlet. Lubricate the O-ring with food-grade silicone grease, tighten the bowl by hand, then give it a quarter turn with the wrench.
Reopen the supply slowly and purge the air. Crack the valve, let the housing fill, then open it fully with a downstream tap running. Run until flow is steady and the water clears, and don't drink the first draw.
Record the install date, the micron rating and the pressures. Upstream and downstream readings taken now become the baseline that later tells you the media is loaded.
Pressure and flow, not the calendar, decide when the cartridge is finished. Before you close up, measure delivered flow at the kitchen tap and record pressure upstream and downstream of the housing while several fixtures run. That commissioning record is the most useful note you'll keep on a whole-house RO system, because the sediment stage is the first thing to check when permeate output drops.
Where swaps go wrong: a cross-threaded bowl forced by hand, or a supply valve cracked open too fast, which unseats the cartridge and lets water bypass the media entirely.
What a good restart looks like
Steady flow, clear water after a short purge, and a pressure reading that matches the number you wrote down. Anything else deserves attention before the next change rather than after it. A housing that won't sit square, a cartridge that floats loose when the bowl comes off, or a reading that starts high and climbs all point to something the next cartridge won't fix.
How Often to Replace and What Sets the Schedule
A cartridge may look clean while its performance has slipped, or appear dark while still doing its job. Set the replacement interval by checking system performance and the cartridge's stated claims, not by the calendar alone.
Start a log when the cartridge is fresh. Record the pressure and delivered flow as your baseline. Later readings can show whether the sediment stage is loading normally or whether a recurring problem needs investigation.

Several factors shape the interval: sediment in the raw water, household water use, filter surface area, and how much pressure drop the system can tolerate before flow suffers. An upstream oxidation stage also changes what reaches the cartridge. Follow the manufacturer's stated capacity as the upper limit; well conditions do not extend it.
The University of Maryland's 2021 well owners guide identifies approximately 30 psi as typical household water pressure and recommends considering delivered flow, estimated treatment volume before maintenance, and desired water quality when selecting a sediment device.
Certification sets another boundary. The NSF's explanation of water treatment standards explains that residential treatment standards are voluntary and apply to specific contaminant-reduction claims. NSF/ANSI 42 covers aesthetic effects, while NSF/ANSI 53 covers contaminants with health effects. A cartridge certified for particulate reduction does not establish that it treats other contaminants.
Use the log to guide the next decision:
| Log observation | Action |
|---|---|
| Pressure difference rises above the commissioning baseline | Replace the cartridge |
| Kitchen-tap flow drops noticeably against baseline | Replace the cartridge and re-measure |
| Flow drops again within days of a change | Stop replacing cartridges; inspect the old one and test the well |
| Water appearance changes after a replacement | Use the symptom table in the next section |
The sediment stage protects a whole-house RO membrane by limiting what reaches it. If flow repeatedly falls soon after a cartridge change, buying another cartridge may only mask the cause. Inspect the used media and test the well; recurring loading can signal a change in the source water or a pretreatment problem. A consistent record across several changes helps establish an interval suited to your water and system, rather than one copied from a box.
Troubleshooting Low Flow and Discolored Water
Low flow after a few weeks of service isn't a filter defect. It's the filter working, and the useful question is which problem you're facing before you spend money on the wrong cartridge. Work down the table from the most common symptom to the rarest.
| Symptom | Likely cause | First fix |
|---|---|---|
| Flow drops slowly over weeks | Normal sediment loading on the cartridge | Replace the cartridge and compare pressure to the baseline |
| Flow drops within days of a change | Undersized media or sand from the well | Step up the micron rating only after inspecting the old cartridge; test the well |
| Brown or rust-colored water after a change | Dissolved iron or manganese oxidizing downstream, or fresh fines shedding | Run water to drain until clear, then test raw water for iron |
| Dark or slimy cartridge within a short interval | Biological growth in the housing | Sanitize the housing and test for bacteria |
| Gritty water at the tap | Sand passing the filter or cartridge not seated | Reseat the cartridge and confirm the certified micron rating |
| Rotten-egg smell with clear water | Dissolved hydrogen sulfide | Sediment cartridge will not remove it; test and plan a different treatment step |
Separating suspended from dissolved
A sediment cartridge removes suspended material and nothing dissolved. Sand, silt, loose scale, clay and organic matter come out; dissolved iron, manganese and hydrogen sulfide pass through unless they've been oxidized into particles first. If your system uses air injection or chemical oxidation, the sediment housing belongs downstream of that stage, or the media loads with material the oxidizer was supposed to convert.
A brown tint that returns after a change is usually one of two things: dissolved iron meeting air, or fines shedding from a cartridge that needs a longer purge. Run water to drain until it clears, then pull a raw sample before the filter.
Treatment effectiveness depends on the contaminant's physical characteristics and the filter technology chosen. The CDC's guidance on choosing home water filters describes microfiltration as having an approximate pore size of 0.1 micron, effective for sediment, protozoa and some bacteria, and not effective for viruses or chemicals. That's the ceiling on what any sediment cartridge can claim, whatever the packaging says.
When two changes don't fix it
Private wells aren't covered by EPA public-water regulations, and the CDC's guidance on testing well water recommends annual testing for total coliform bacteria, nitrates, total dissolved solids and pH. It also notes that high total dissolved solids contribute to buildup on pipes and devices, a problem a sediment cartridge can't solve.
If the same symptom returns after two changes, stop buying cartridges and test the well. Repeated clogging reflects well disturbance, damaged components, iron or manganese precipitation, scale, or a change in the aquifer far more often than it reflects a bad cartridge. That investigation is the work we do under well water repair, and it starts with a raw-water sample rather than a parts order.
On a whole-house RO system, check the sediment stage first when permeate output falls, because a loaded pre-filter starves the membrane. Compare reject flow against the recovery figure you recorded instead of judging the system by how much water reaches the tap.
A cartridge that keeps loading is telling you the water changed. It isn't telling you the cartridge is bad.
Disposing of Used Cartridges Responsibly
A spent sediment cartridge is a record of your well wrapped in polypropylene, and it's also a wet, dirty object that shouldn't ride in the truck loose.
- Drain it before you pull it. Isolate the housing, open a downstream tap, and let the cartridge drip into the bowl for a minute so it doesn't trail sediment across the floor.
- Bag it. A zip bag keeps iron staining, silt and any slime contained, and it keeps the cartridge intact if a lab or a service visit needs to see what it collected.
- Check the local rule first. Solid waste rules differ across Cape Coral and Lee County, so confirm whether spun or pleated polypropylene cartridges belong in household trash or need a special drop-off.
- Ask about take-back. Some manufacturers run recycling or return programs, and the packaging or system manual names the option when one exists.
- Keep the housing. The bowl and head stay in service. Wipe the empty housing with a clean cloth, inspect the O-ring groove, and store spare cartridges sealed, dry and out of direct sun so they're still sound when you need one.
Label the bag with the date and the micron rating if the cartridge came out heavily loaded. When the next conversation turns to why a whole-house RO pre-filter loads so fast, a labeled cartridge and a pressure reading beat a description every time.
Confirm Your Whole-House RO Pretreatment Next
A sediment cartridge that clogs repeatedly is a warning about the water or the pretreatment design, not just a reason to buy another cartridge. Use it alongside pressure readings and water-test results to identify what the system needs.
For private wells, testing helps determine whether sediment pretreatment is enough or whether the system must address dissolved contaminants that a sediment cartridge cannot remove. The Lee County drinking water program recommends annual testing for bacteria and chemicals. Its information also covers county testing for total-coliform and fecal-coliform bacteria, statewide guidance on testing for coliform bacteria and nitrates annually, and lead testing for most homeowners every three years. Bacteria, nitrates, total dissolved solids and pH can help inform treatment choices.
Reject water is another part of system design. The EPA's WaterSense overview of point-of-use reverse osmosis systems explains that reject-water amounts vary by system. It also notes that NSF/ANSI 58 requires TDS reduction, while claims for other contaminants, including arsenic, nitrate/nitrite, lead, fluoride, barium, radium, selenium, VOCs and turbidity, are optional and must be supported by testing. Whole-house RO operates at a different scale, so check the system's certified claims and account for its reject stream when considering the design.
What a consultation covers
Water Medic sells and installs whole-house reverse osmosis systems and provides monthly maintenance. For well water, its systems are customized based on each well's water-test results. A privately owned, direct-to-consumer RO system can be designed to meet a higher water quality standard than city tap water.
Water Medic designs, installs and maintains customized water filtration systems. Monthly maintenance is available for whole-house RO systems, but recurring sediment loading still calls for attention to the water and pretreatment, not just the cartridge schedule. If low flow or discoloration is the immediate problem, use the symptom guidance above and note the cartridge condition and pressure readings.
Start with three practical checks: record the cartridge's micron rating, compare upstream and downstream pressure while household taps are running, and arrange a well-water test. Together, these observations help distinguish a cartridge change from a water-quality or system-design issue.
Water Medic of Cape Coral sells, installs and maintains whole-house reverse osmosis systems, with monthly maintenance available. If cartridges keep loading quickly or RO output falls, water-test results can help identify what the system needs. Visit Water Medic of Cape Coral to get started.