How to Balance Pool Water for a Perfect Swim
Learning how to balance your pool water isn't complicated. At its core, you're just testing for a few key things—like pH and alkalinity—and then adding the right chemicals to nudge them into their ideal ranges. It's this simple rhythm of testing and adjusting that is the real secret to keeping your water crystal clear, totally safe for swimmers, and protective of your pool’s surfaces and equipment.
Why Pool Chemistry Is Your Key to a Sparkling Pool
Let’s be real: nobody wants to jump into a pool that’s cloudy, green, or makes your eyes burn. The secret to that perfect, inviting water isn't some expensive magic trick; it's all about balanced chemistry. Before we get into the "how-to," it’s important to understand why this matters so much.
Think of balanced water as the foundation of a healthy swimming environment. It has a direct effect on swimmer comfort, how long your equipment lasts, and the overall look of your pool. When your levels are out of whack, you're just inviting a whole host of frustrating and potentially expensive problems to the party.
Protecting Swimmers and Your Investment
The number one reason to keep your pool balanced is for the safety and comfort of everyone who gets in. Unbalanced water is the culprit behind itchy skin rashes and those painful, red eyes after a swim. It’s more than just an annoyance—it's a clear signal that the water is either too acidic or too alkaline for people.
Beyond swimmer comfort, balanced chemistry is a shield for your pool itself. Corrosive water, often caused by low pH, can literally eat away at everything from your pump and filter to the ladders and vinyl liner, leading to some seriously costly repairs. On the flip side, water with high calcium hardness can cause ugly scale buildup on your pool surfaces and clog up your plumbing.
Key Takeaway: Balancing your pool isn’t just about making it look pretty. It’s a vital maintenance task that protects both the people swimming in it and your property. You'll prevent irritation and avoid premature wear and tear on expensive equipment.
The Core Components of Water Balance
To get a real handle on managing your pool, you need to get to know the key players in its chemical ecosystem. Each one has a specific job, and they all have to work together to keep the water in harmony.
Here’s a quick rundown of what you’ll be testing and adjusting.
For a quick reference, here’s a look at the ideal ranges for the most important chemistry parameters. Use this as your cheat sheet when you're testing and balancing your water.
Ideal Pool Water Chemistry Levels At a Glance
| Parameter | Ideal Range | What It Does |
|---|---|---|
| Total Alkalinity (TA) | 80–120 ppm | Acts as a buffer to stabilize pH levels and prevent wild swings. |
| pH Level | 7.2–7.8 | Measures acidity/alkalinity; ensures swimmer comfort and sanitizer effectiveness. |
| Calcium Hardness (CH) | 150–250 ppm | Protects pool surfaces from corrosion (too low) or scaling (too high). |
| Sanitizer (Chlorine) | 1–3 ppm | Kills bacteria, algae, and other harmful contaminants in the water. |
Keeping these levels in check is the key to a healthy, happy pool.
- Total Alkalinity (TA): Think of this as the anchor for your pH. It helps prevent drastic pH swings, which makes the water much more stable and easier to manage. You’re aiming for a range of 80–120 parts per million (ppm).
- pH Level: This is a simple measurement of how acidic or basic your water is on a scale of 0 to 14. For pools, the sweet spot is slightly alkaline, right between 7.2 and 7.8. This is not only comfortable for swimmers but also the range where your chlorine works best.
- Calcium Hardness (CH): This is just the amount of dissolved calcium in the water. If it’s too low, the water gets aggressive and corrosive. If it’s too high, you’ll start seeing scale buildup. A happy medium of 150–250 ppm is what you want.
- Sanitizer (Chlorine): This is your workhorse. It's what kills all the nasty bacteria and algae. But here’s the catch: its effectiveness is directly tied to the pH level. If your pH is too high, your chlorine gets lazy and can’t do its job properly.
Trying to keep up with these chemical interactions can sometimes feel like a chore. For those in Southwest Florida who would rather spend more time swimming and less time with test strips, our professional swimming pool services can handle all the complexities for you.
Proper pool care is only becoming more important. The global swimming pool market was valued at around USD 8.90 billion in 2025 and is on track to hit USD 11.54 billion by 2030. You can see the full market growth analysis on Mordor Intelligence. This boom just shows how many homeowners are realizing the need for solid maintenance knowledge.
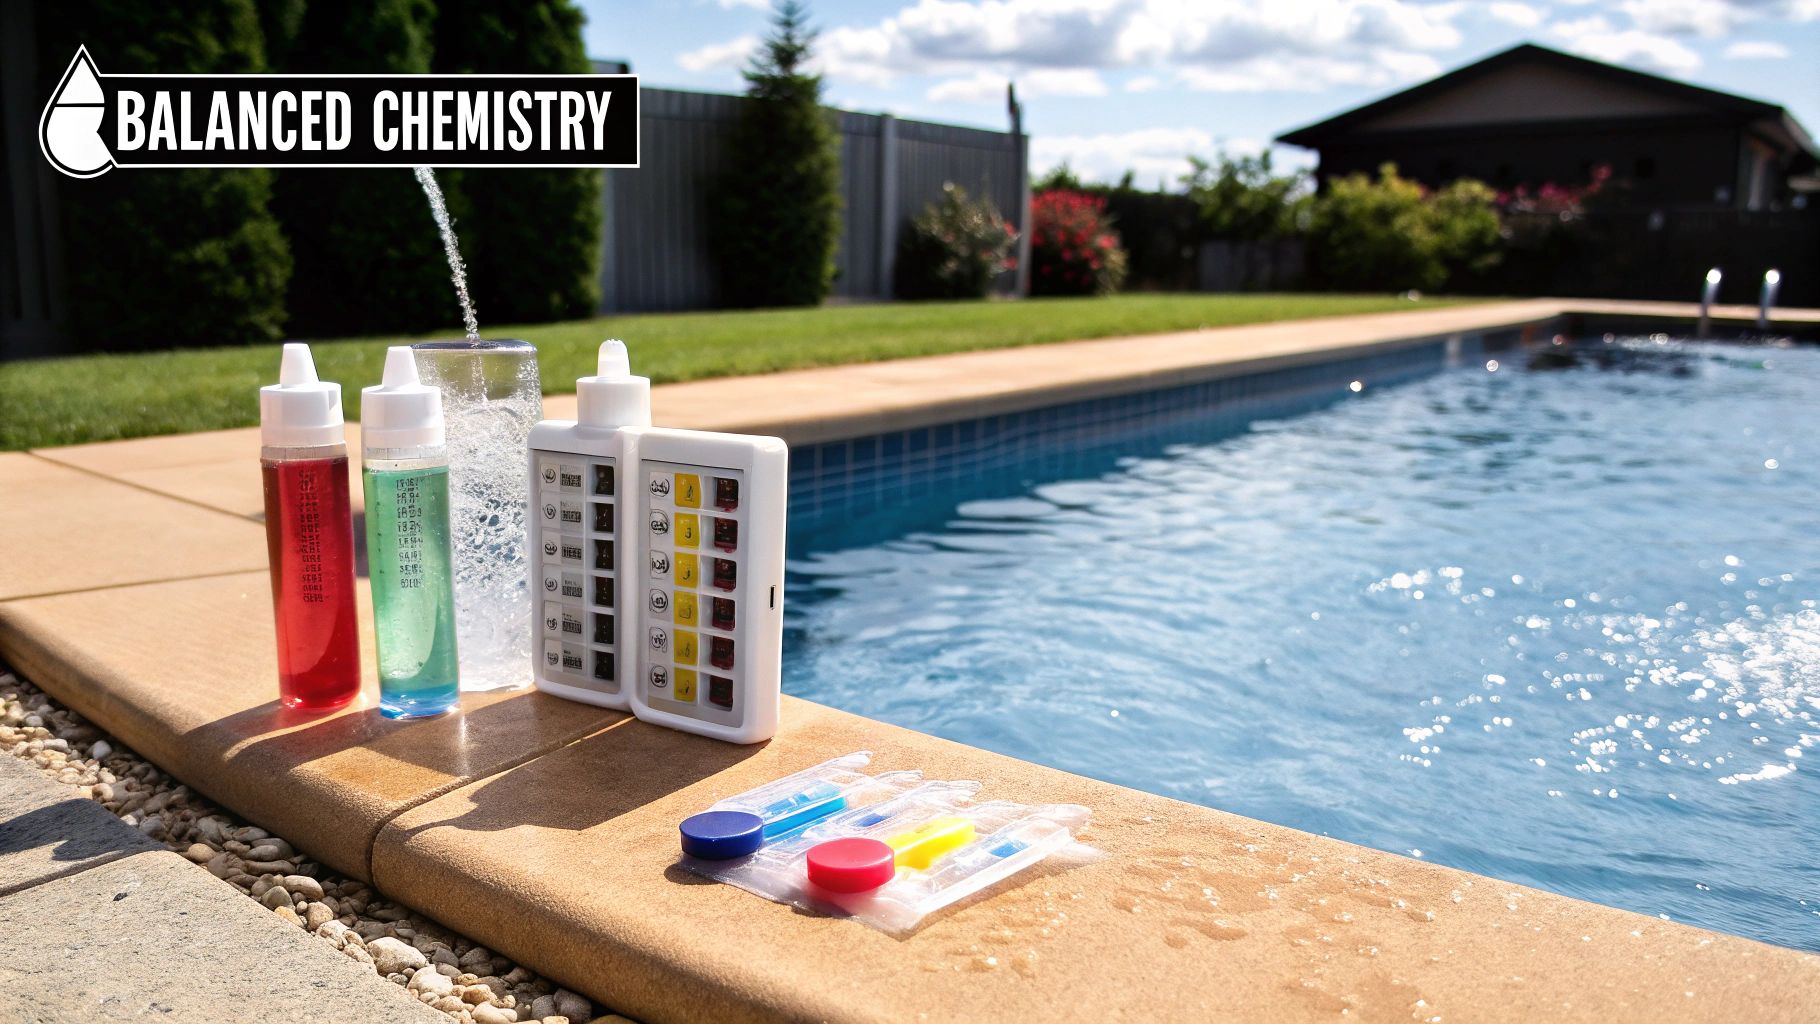
Assembling Your Pool Water Testing Toolkit
You can't balance what you can't measure. Before you even think about adding chemicals, you have to get a clear picture of what's happening in your pool water. This is your pre-flight check, the crucial first step that ensures every adjustment you make is purposeful, not just a shot in the dark.
Having the right gear on hand transforms pool chemistry from a confusing chore into a straightforward routine. It’s the difference between guessing what your pool needs and knowing for sure.
Choosing Your Testing Method
First things first, you need a reliable way to test your water. There are a few different paths you can take here, and the best one for you really boils down to your budget, how precise you need to be, and frankly, your personal preference.
- Test Strips: These are the quick-and-dirty option. Just dip a strip, wait a few seconds, and match the colors to the chart on the bottle. They're fantastic for a quick daily check-in, but just know they can be a bit less accurate than other methods.
- Liquid Reagent Kits: If you’re looking for more accuracy, a liquid kit is a solid step up. This method involves adding specific drops of reagents to a water sample and watching the color change. It takes a little more effort, but you get more reliable readings for critical levels like pH and chlorine.
- Digital Readers: For those who want to completely eliminate the guesswork, a digital reader is the ultimate tool. These electronic devices give you exact, numerical readings for various chemical levels, offering the highest degree of accuracy you can get at home.
If you want to dive deeper into the pros and cons of different options, check out a comprehensive guide to water testing kits. While it's geared toward ponds, the core principles for choosing quality testing equipment are nearly identical.
Stocking Your Chemical Arsenal
Once you've figured out your testing method, the next move is to get your chemical cabinet in order. Don't wait until you have a problem—like the first signs of an algae bloom—to run out and buy what you need. That delay can turn a small issue into a big headache.
Having these core chemicals on hand makes the whole adjustment process seamless. Think of it as stocking your poolside lab for success.
Here's what every pool owner should have ready:
- pH Increaser (Soda Ash): Use this to raise the pH level when your water gets too acidic.
- pH Decreaser (Muriatic Acid or Sodium Bisulfate): This is for when the pH creeps up too high and needs to be brought back down.
- Alkalinity Increaser (Sodium Bicarbonate): This is your tool for raising total alkalinity, which is key to preventing wild pH swings.
- Calcium Hardness Increaser: Use this to boost calcium levels, which helps protect your pool's plaster, tile, and equipment from corrosion.
Keeping all these chemicals sourced and stored can feel like a part-time job. If you'd rather not deal with it, our comprehensive pool maintenance packages have you covered. We handle everything—bringing all the professional-grade products needed and applying them with expert precision. We make sure your pool has exactly what it needs, when it needs it, taking the burden completely off your shoulders.
Getting Your Pool Water Chemistry Just Right
Alright, you've got your test kit and your chemicals lined up. Now for the most important part of keeping your pool crystal clear: getting an accurate reading of what's actually happening in the water. This is where so many pool owners go wrong. A bad test reading will have you chasing your tail, adding chemicals that only make the problem worse.
Getting a true snapshot of your pool's health isn't just about dipping a strip in the water. It’s about how you collect the sample and, most importantly, the specific order you test and adjust things. Nail this process, and you’ll spend less time fighting cloudy water and more time enjoying your pool.
How to Collect a Good Water Sample
Believe it or not, where you grab your water from can completely change your test results. You want a sample that represents the main body of water, not the outliers.
Avoid scooping water right off the surface. That top layer is full of dust, pollen, and sunscreen oils that will throw off your readings. You also want to stay away from the return jets, since that's where freshly treated water is being pumped back in. Testing there won't give you an accurate picture of the whole pool.
Here’s the simple, pro-approved method for grabbing the perfect sample:
- Take your collection bottle or tube and turn it upside down.
- Plunge it into the water until your elbow is submerged (about 18 inches down).
- Once you're deep enough, turn the container right-side up and let it fill.
- Pull it straight up and out of the water.
This little trick ensures you're testing the real deal—a representative sample from the heart of your pool.
The All-Important Order of Operations
If you take away just one thing, let it be this: the order you test and adjust your chemicals is everything. I've seen countless frustrated homeowners get stuck in a loop, fixing one problem only to create another. This happens because pool chemicals are interconnected; changing one level directly impacts others.
To avoid this chemical rollercoaster, you have to follow a specific sequence. This infographic lays it out perfectly for the three core balancing parameters.
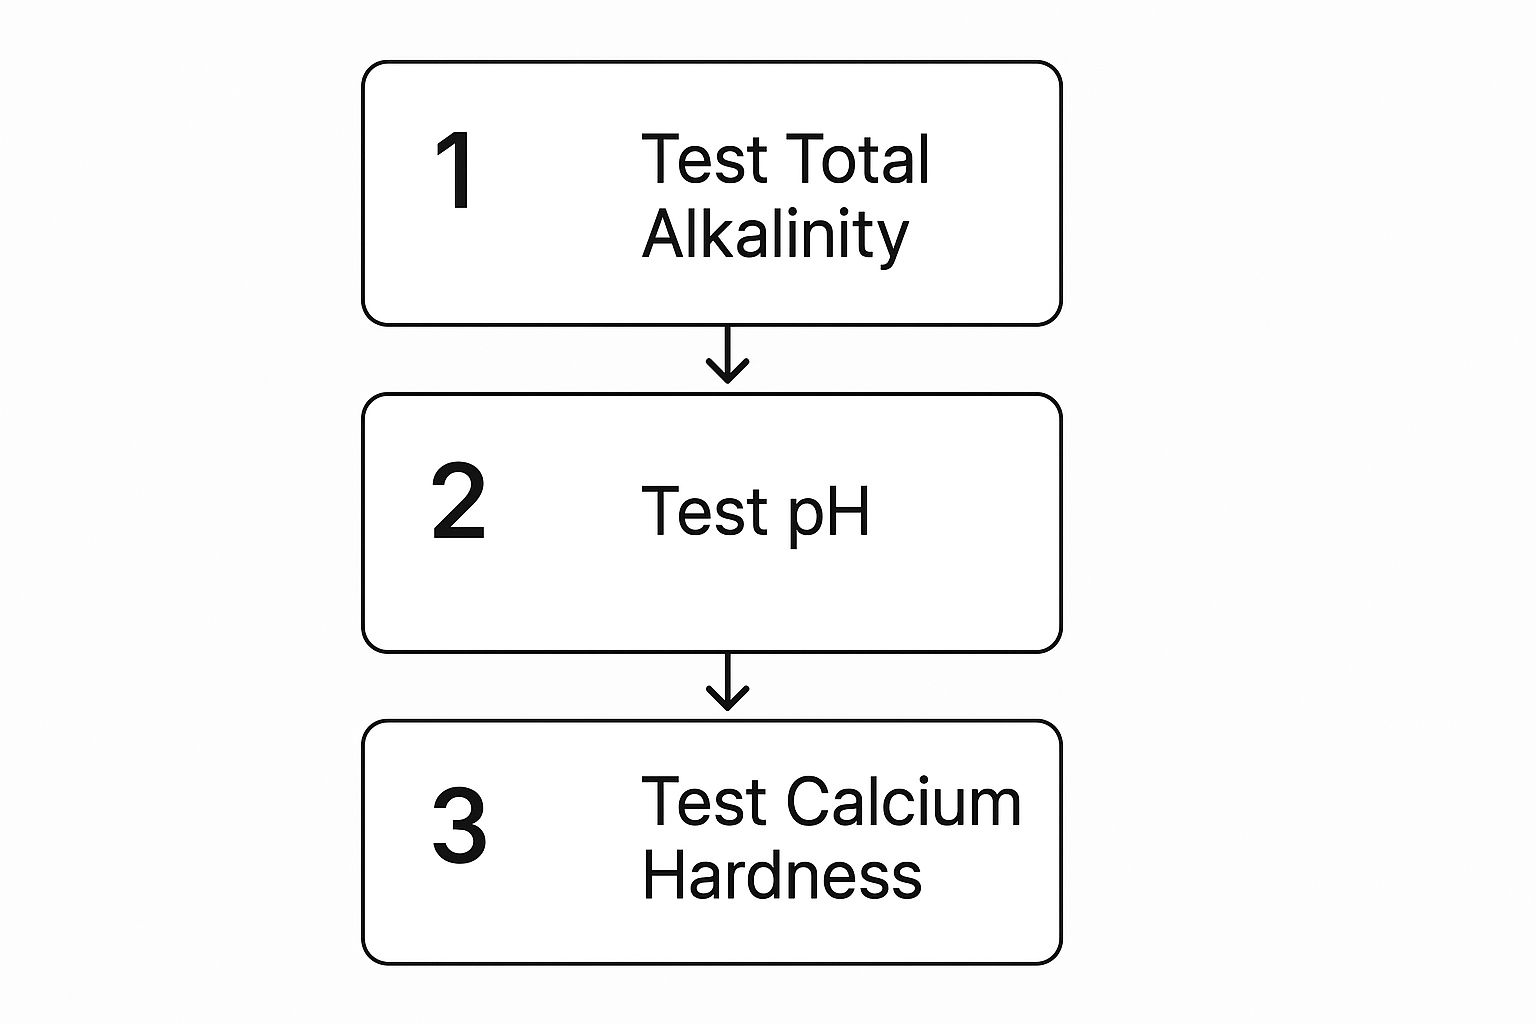
The path is always the same: Total Alkalinity first, then pH, and finally Calcium Hardness. You handle these before you even think about adjusting your sanitizer levels.
So, why this specific order? Think of Total Alkalinity as the anchor for your pH. It acts as a buffer, preventing wild pH swings. If you try to adjust your pH while your alkalinity is out of whack, the pH level simply won't hold. It’ll drift right back out of range. By getting the alkalinity right first, you create a stable foundation that allows your pH adjustments to stick.
Expert Insight: Trying to fix your pH before your Total Alkalinity is like trying to paint a wall before you've put on the primer. You'll use way more product and the results just won't last. Get the alkalinity sorted, and balancing your pH becomes incredibly easy.
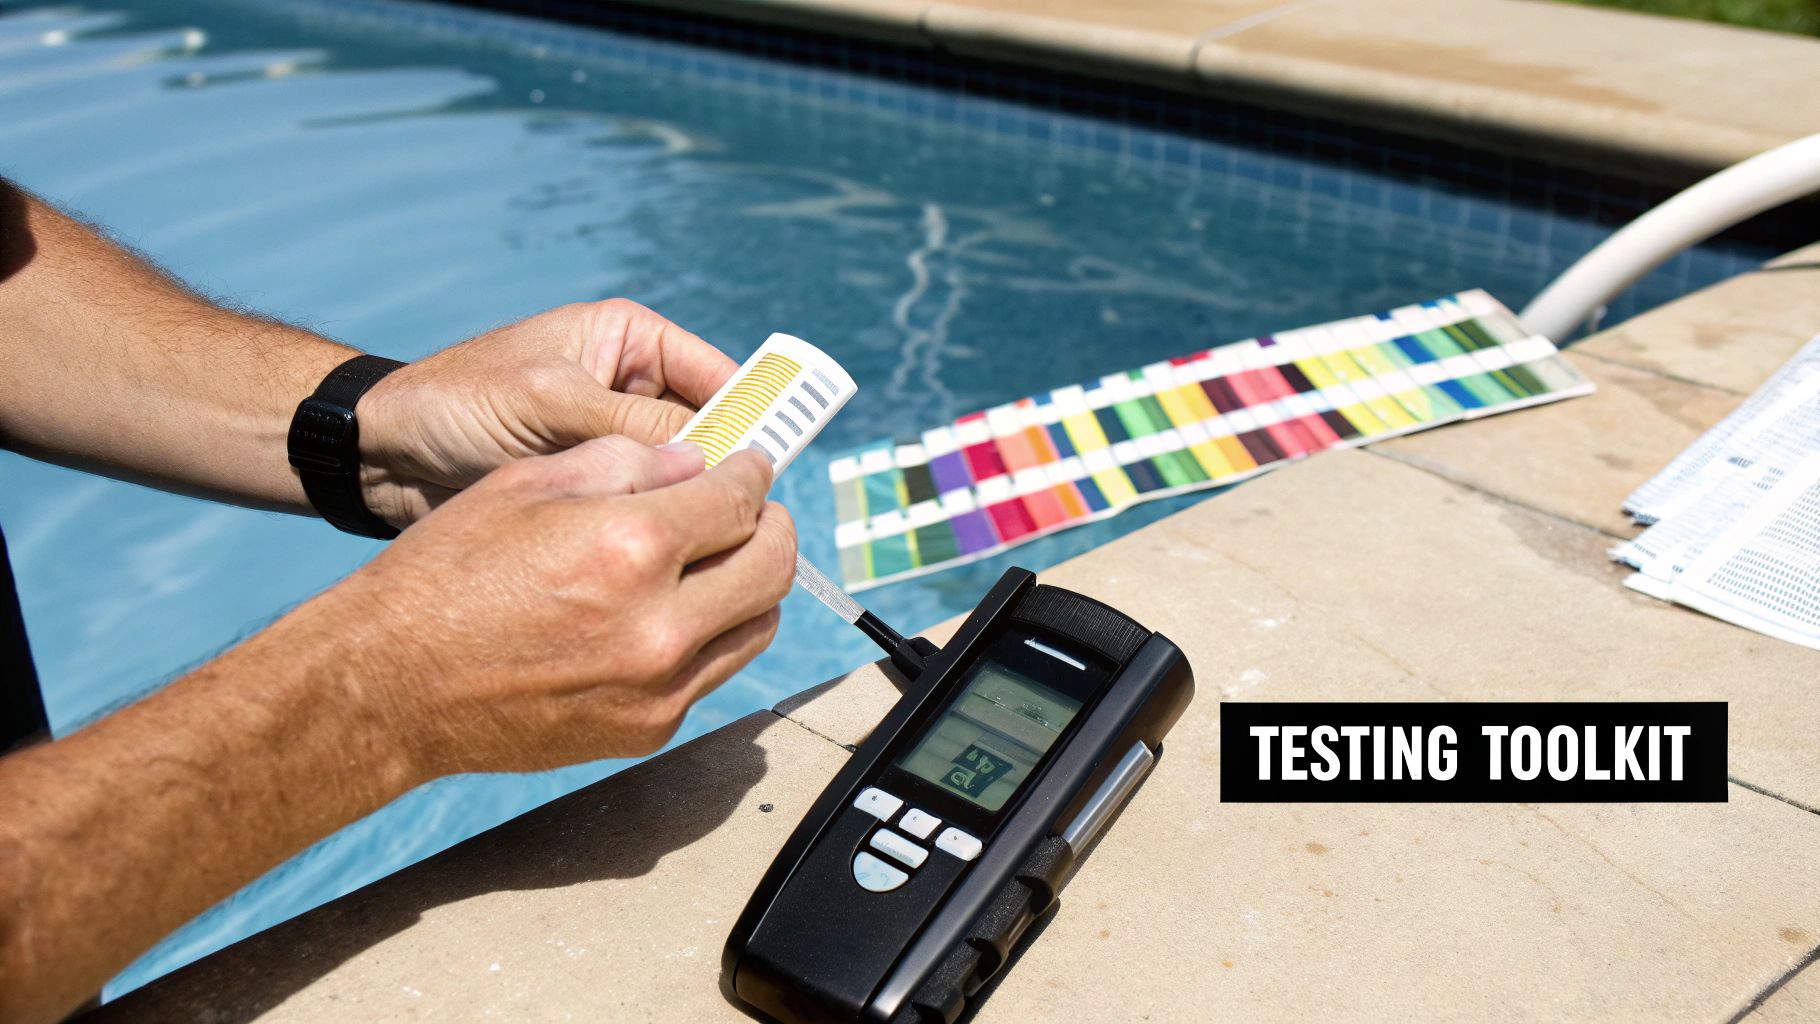
Reading Your Test Results Like a Pro
With a good sample in hand, it's time to read the results. Whether you're a fan of test strips or a classic liquid reagent kit, a few simple techniques can make all the difference in accuracy.
Tips for Using Test Strips:
- Hands-Off: Never touch the little colored pads on the strip with your fingers. The oils on your skin can mess with the chemical reaction.
- Quick Dip & Out: A quick one-second dip is all you need. Don't let the strip soak in the water.
- Time It Right: Read the results within the timeframe given on the bottle, usually 15-30 seconds. If you wait too long, the colors will continue to develop and give you a false reading.
Tips for Using a Liquid Reagent Kit:
- Go Vertical: When adding the reagent drops, hold the bottle completely vertical. This ensures each drop is the same size, which is critical for an accurate test.
- Keep it Clean: Always rinse the comparator tube before and after each test to avoid contamination from old results.
- See the Light: Natural daylight is your best friend here. Head outside to read the colors, as indoor lighting can make shades of red and yellow look very different.
Getting comfortable with this process takes a bit of practice, but it's a skill that will save you a ton of headaches. Of course, if you'd rather skip the chemistry lesson and just enjoy a perfectly maintained pool, our weekly pool maintenance services are a great option. We use professional-grade digital testing gear for pinpoint accuracy every single time, so you can have total peace of mind without ever having to squint at a color chart again.
Making Precise Chemical Adjustments Like a Pro
Alright, you've got your test results. Now comes the part where all that testing pays off: actually adding the chemicals. This is where theory meets practice, and I get it—it can feel a little intimidating. But the key is to be methodical and safe. Think of it less as a guessing game and more as a simple recipe for perfect, sparkling water.
Making smart, precise adjustments is what separates the pros from the frustrated pool owners. It's not about dumping a bunch of chemicals in and hoping for the best. It's a measured process that protects your pool's surfaces and equipment, ensuring every chemical does its job effectively. A little know-how here goes a very long way.
Safe Handling and Application Techniques
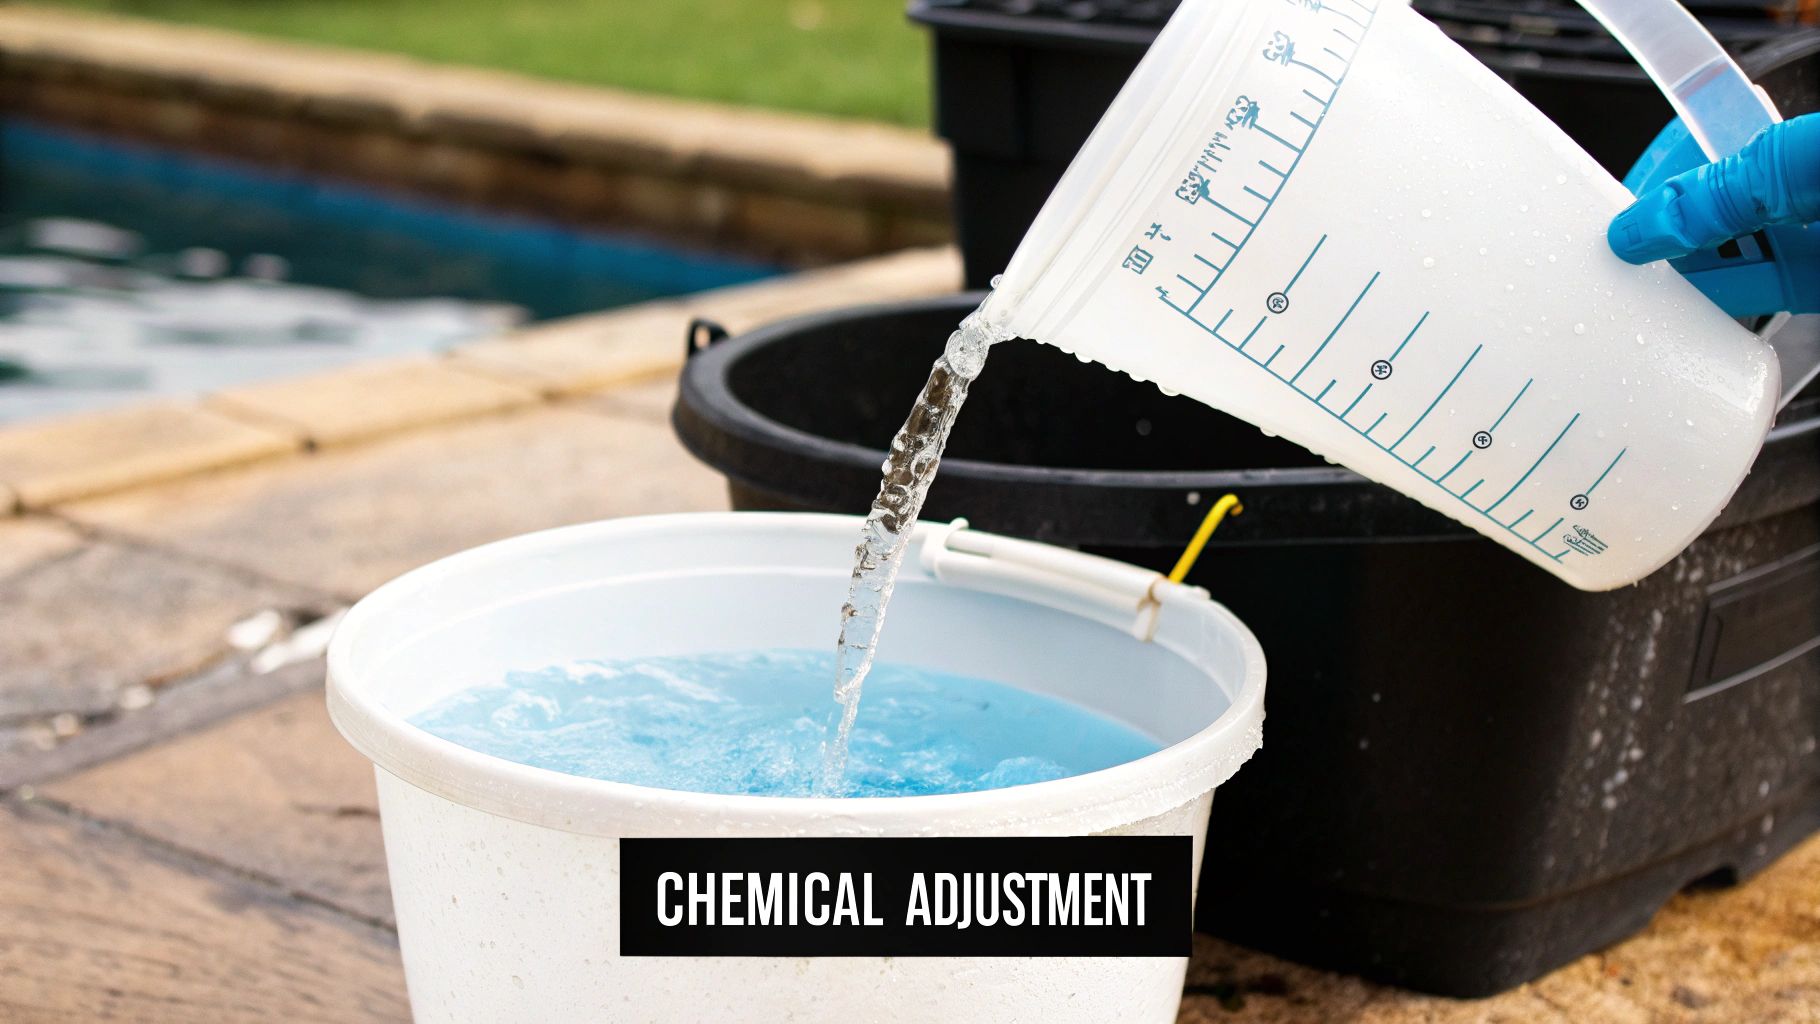
First things first: safety. Before you even twist a cap, remember that you’re handling powerful chemicals. Always read the label, wear protective gloves and eyewear, and never, ever add water to chemicals—always add chemicals to water.
One of the most valuable tricks of the trade is pre-dissolving certain granular products. Things like calcium hardness increaser or soda ash are notorious for dissolving slowly. If you just toss them into the pool, they can sink straight to the bottom and bleach or stain your vinyl liner or plaster finish. It’s an ugly, expensive mistake.
Here’s how to avoid it:
- Grab a clean, five-gallon bucket and fill it with pool water.
- Slowly pour in the measured amount of the granular chemical.
- Use a plastic or wooden stick to stir until it’s all dissolved.
- Walk around the edge of the pool, pouring the solution slowly into the water to distribute it evenly.
This extra step ensures the chemical disperses properly and gets to work immediately without causing any damage. For liquid chemicals like muriatic acid, you can pour them slowly into the deep end—away from skimmers and returns—while the pump is running to help circulation.
A Real-World Balancing Scenario
Let's walk through a classic example I see all the time. Imagine your test kit shows a pH of 8.0 and a Total Alkalinity of 150 ppm. Both are too high. So, which do you fix first?
Here’s the golden rule: always adjust Total Alkalinity before pH. Why? Because alkalinity acts as a buffer for pH. If your alkalinity is out of whack, you’ll fight a losing battle trying to get your pH to stay put. It'll just keep creeping back up.
In this case, you'd use a pH decreaser (like muriatic acid or sodium bisulfate) to lower the Total Alkalinity. This chemical will also lower the pH, which is exactly what you want since the pH is high anyway. You’ll add the right amount to bring the alkalinity into that ideal 80-120 ppm range.
After letting the pump run for a few hours, you re-test. Now your alkalinity might be a perfect 110 ppm, but your pH may have dropped to 7.0. With the alkalinity now stable, you can make a small, precise adjustment with a pH increaser to nudge the pH right back into that 7.2-7.8 sweet spot. Easy.
Calculating the Right Chemical Dosage
The math is often what trips people up, but it doesn't have to be a headache. Every chemical package has a dosage chart right on the label. These charts tell you exactly how much product to add per 10,000 gallons of water to make a specific change.
First, you need to know your pool's volume. If you're not sure, here's a quick and easy formula:
Length (ft) x Width (ft) x Average Depth (ft) x 7.5 = Volume in Gallons
Once you have your pool's volume, the rest is just following the directions. For example, if the label says to add 1 pound of product per 10,000 gallons to raise alkalinity by 10 ppm, and you have a 20,000-gallon pool, you’ll need 2 pounds to get the job done.
Pro Tip: When you need to make a big adjustment, it’s always smarter to add half the recommended dose first. Let it circulate for a few hours, then re-test. This helps you avoid overshooting your target, which is just as frustrating as being out of range in the first place.
Getting this right isn't just for looks; it has a major impact on your wallet. Improper water chemistry leads to scaling, corrosion, and algae, all of which drive up chemical use and can lead to costly repairs. In fact, poor water balance can increase maintenance costs by as much as 30%. For instance, when pH climbs above 7.8, chlorine's effectiveness plummets by about 50%, forcing you to use way more sanitizer to keep the water clean. You can read more on the importance of pool water balance over at WorkInAquatics.com.
Water that's out of balance actively damages your equipment. If you're constantly fighting chemistry issues, it could be a sign of a bigger problem with your pump, filter, or heater. For an expert diagnosis of persistent issues, you can learn more about our professional pool equipment repair services.
Maintaining Balance and Troubleshooting Common Problems
https://www.youtube.com/embed/wb2R9hgBAXE
Keeping your pool water balanced isn't a one-and-done job; it's an ongoing process. The real goal is to shift from constantly reacting to problems to proactively maintaining your water. That simple change in mindset is what saves you from the headache of a sudden algae bloom or cloudy water, keeping your pool swim-ready at all times.
The key is getting into a consistent rhythm. For most residential pools, testing the water thoroughly once a week is the perfect schedule. This regular check-in lets you spot small chemical drifts before they turn into big, expensive problems, meaning you'll only need to make minor, inexpensive tweaks.
Of course, life has a way of throwing a wrench in the works, and certain events can knock your carefully balanced water for a loop. Think of these as red flags that demand more frequent testing.
When to Test Your Water More Often
Your pool is a living environment, and your testing routine needs to be flexible enough to adapt. When certain things happen, it's a signal to grab your test kit, even if it's not your usual day. A quick test right away can stop a small issue from spiraling.
You should always test your water after:
- A Big Pool Party: A high bather load means a ton of new organic stuff—sunscreen, sweat, oils, you name it—gets dumped into the water. This stuff eats up sanitizer fast and can throw your pH out of whack.
- Heavy Rainfall: Rain is usually a bit acidic and doesn't have the minerals your pool needs. A good downpour can dilute your chemicals, dropping your pH and total alkalinity while washing in contaminants.
- A Heatwave: High temperatures and blazing sun are chlorine's worst enemy. During a hot spell, your sanitizer levels can nose-dive way faster than normal, leaving the door wide open for bacteria and algae.
Balancing your pool water after one of these events is non-negotiable. By testing immediately, you can make the right adjustments right away and prevent bigger, costlier problems from taking root.
A Quick Guide to Common Pool Problems
Even with the best routine, you're going to run into frustrating issues. The good news? Most common problems are pretty easy to diagnose and fix once you know what you’re looking for. Here’s how to tackle a couple of the usual suspects.
Problem: The Water is Cloudy, But My Chlorine is Fine
This is a classic head-scratcher. Your test strip says the chlorine is perfect, but you can barely see the bottom of the pool. Nine times out of ten, the real culprit is your pH or just a dirty filter.
When your pH creeps up too high (above 7.8), it handcuffs your chlorine, making it incredibly ineffective. The chlorine is there, it just can't do its job. Start by testing your pH and total alkalinity—chances are, you'll need to lower them. If the chemistry is all good, your filter is the next place to look. A simple backwash or a good cartridge cleaning might be all it takes to bring back that sparkle.
Problem: A Sudden Algae Bloom Appears
You walk outside one morning and see that dreaded green haze on your pool walls. Algae can take over in a flash, so you have to act fast. Your first move is to "shock" the pool with a powerful dose of chlorine to kill the living algae.
Next, get in there and thoroughly brush the walls and floor to break loose any stubborn spores. After that, run your filter continuously for at least 24 hours to suck up all the dead algae. The day after shocking, be sure to test your water again, as the whole process can throw your other chemical levels off.
Sometimes, a problem just won't go away. If you're dealing with stubborn cloudy water or algae that keeps coming back, it might point to a deeper issue. If you're tired of the endless troubleshooting cycle, our expert technicians can step in. Explore our pool troubleshooting services to get a fast, effective solution from our team right here in Southwest Florida.
Your Top Pool Chemistry Questions, Answered
Even with a step-by-step guide, you’re bound to have questions when you start managing your own pool water. That’s totally normal. After 25 years of servicing pools here in Southwest Florida, we’ve pretty much heard it all. So, I’ve put together some of the most common questions our technicians hear from homeowners every single day.
Think of this as a quick-reference guide, full of real-world answers to help you troubleshoot common issues and get a better handle on the nuances of pool care.
How Long Do I Have to Wait to Swim After Adding Chemicals?
This is probably the most important question we get, and for good reason—it’s all about safety. The answer really hinges on what you just added to the water.
As a general rule, give it at least 20 to 30 minutes after adding standard balancing chemicals like pH or alkalinity increaser. You absolutely need to have the pump running to get everything circulated properly.
But when you’re talking about a more intense treatment like a pool shock, you need to be much more patient. You'll want to wait several hours, and often overnight is best. The real test is to check your water again before anyone gets in. You’re looking for the free chlorine level to drop back down into a safe, comfortable range, which is typically below 5 ppm.
Pro Tip: Never, ever add chemicals when people are in the pool. Always dose an empty pool and let your pump and filter do the hard work of mixing everything in. It's safer for swimmers and makes the chemicals far more effective.
Can I Really Use Baking Soda to Raise My Pool’s Alkalinity?
You bet. This is one of my favorite money-saving tips for homeowners. Your standard box of household baking soda is just sodium bicarbonate—the very same active ingredient in most products sold as "Alkalinity Increaser." It's a perfectly safe and effective way to bump up your pool's total alkalinity.
The best part is that baking soda raises alkalinity without sending your pH level through the roof, which makes it a fantastic, precise tool for your chemical kit. Just remember to dissolve it in a bucket of pool water first before pouring it in. This little extra step helps prevent it from temporarily clouding up your water.
My Chlorine Is High, So Why Is My Pool Water Cloudy?
Ah, the classic cloudy water mystery. It's a frustrating situation that stumps a lot of pool owners. You look at your test strip, see a high chlorine reading, but the water is hazy and uninviting. High chlorine doesn't automatically equal clear water. Usually, one of these three culprits is to blame:
- High pH: This is the #1 reason, hands down. When your pH creeps up above 7.8, it essentially puts chlorine in handcuffs. The chlorine is technically in the water, but it's chemically locked up and can't do its job of sanitizing. This allows tiny contaminants to build up and cause that cloudy look.
- High Calcium Hardness: If your calcium levels are off the charts, the excess minerals can start to precipitate out of the solution. This will give your pool a "milky" appearance that no amount of chlorine can fix.
- A Dirty Filter: Sometimes the simplest answer is the right one. Your filter might just be clogged and overwhelmed, unable to capture the fine particles making your water look dull. A quick backwash or a good cartridge cleaning can sometimes clear things up instantly.
When faced with cloudy water, always start by testing and adjusting your pH and alkalinity. More often than not, that’s where the problem lies. We get into even more common head-scratchers like this in our complete guide to pool FAQs.
Keeping your pool water balanced is completely manageable, but it's not for everyone. If you’d rather spend your weekends enjoying your pool than playing chemist, Water Medic of Cape Coral is ready to step in. Our weekly pool maintenance service takes all the guesswork and hassle off your plate, ensuring your pool is always sparkling, safe, and ready for a swim. Let our experienced pros handle the science so you can focus on the fun. Contact us today to learn more about our reliable pool services at https://watermedic.com.