How to Winterize a Pool in Southwest Florida | Easy Guide
Even though we don't get ice and snow here in Southwest Florida, "winterizing" your pool is still one of the most important things you'll do all year. It's less about a full shutdown and more about a smart, modified closing that protects your big investment from the unique challenges of our milder winters.
This process is all about safeguarding your pool's surfaces and systems, which guarantees a much faster, easier opening when swimming season kicks back into high gear.
Why Winterizing Your Florida Pool Is a Smart Move
Learning how to properly "winterize" a pool in our climate is a non-negotiable for any pool owner. We might not worry about pipes freezing and cracking, but our mild winter presents a different kind of threat to an unattended pool.
As the weather cools down and you're not swimming as often, the sanitizer levels in the water naturally start to drop. This dip creates the perfect environment for algae. I've seen it happen countless times: a tiny green spot one week becomes a full-blown infestation the next, turning a beautiful backyard oasis into a murky swamp that costs a fortune in chemicals and time to fix.
Protecting Your Investment
A proper "winter" closing is a complete strategy to protect your entire pool system, not just a way to keep algae at bay. The real benefits are what you don't have to deal with in the spring.
- Safeguards Pool Surfaces: When water chemistry is off for months on end, it can cause stubborn stains on your plaster or vinyl liner. These aren't easy to get out and can become a permanent eyesore.
- Prevents Equipment Strain: By reducing filtration times and following the right shutdown steps, you give your pump, filter, and heater a well-deserved break. This extends their lifespan and helps you avoid premature, costly repairs.
- Avoids Costly Spring Cleanup: This is the big one. A clean closing means a clean opening. You'll sidestep that horrible moment of pulling back the cover to find a green, debris-filled mess that’s going to cost hundreds in chemicals and a whole weekend of labor to fix.
Think of it this way: you're not really shutting the pool down, you're just putting it into a low-maintenance hibernation. A little time and effort now will save you a world of headaches and money down the road.
The whole process can feel a bit overwhelming, and it's easy to miss a step. If you'd rather have total peace of mind, our professional winterization service ensures every single detail is handled correctly. We'll get your pool perfectly balanced and protected, so it's ready for an effortless spring reopening. It's the smartest way to protect your backyard investment during the off-season.
Your Pre-Winterization Pool Prep Checklist
A successful off-season really starts the week before you even think about closing the pool. This is all about setting the stage for an easy spring opening. I can't tell you how many times I've seen homeowners make the single biggest mistake: trying to winterize a dirty pool. Doing that just traps all the leaves and gunk, creating a perfect buffet for algae to feast on all winter.
The goal here is simple: get your pool as pristine as possible. This ensures your winter chemicals can do their job, which is preventing new growth, not fighting an existing mess. Trust me, this prep work is the secret to peeling back the cover in a few months to find crystal-clear water.

Deep Cleaning Every Surface
First things first, give your pool one last, incredibly thorough cleaning. This isn't your average Tuesday skim. It’s a deep dive to get every last bit of debris that could cause a headache later.
- Skim Everything Off the Top: Get every last leaf, bug, and floating bit of debris out of there. Anything you leave behind will just decay, potentially staining your plaster and feeding algae.
- Brush It All Down: Grab a good pool brush and scrub the walls, steps, and floor. You’re trying to dislodge any invisible algae spores and dirt that are clinging to the surfaces. This pushes everything into the water where your vacuum can get it.
- Vacuum Like You Mean It: After everything is brushed down, vacuum the entire pool. Take your time with this. A slow, methodical pass over every square inch of the floor will pick up all that sediment you just kicked up.
This deep clean is the absolute foundation for a proper winterization. If you skip this, you're just making more work for yourself in the spring.
The cleaner your pool is when you close it, the cleaner it will be when you open it. Every leaf you remove now is one less potential stain or algae spot you'll have to deal with later.
Don't Forget the Filter
Once the pool itself is spotless, turn your attention to the filter. If you leave a dirty filter to sit all winter, you’ll come back to a grimy, hardened brick of gunk that’s a nightmare to clean.
Give your filter one final, deep clean based on its type:
- Cartridge Filters: Pull the cartridges out and soak them in a filter cleaner solution before giving them a very thorough rinse.
- Sand Filters: Run a long backwash—I’m talking at least 3-5 minutes—until the sight glass shows perfectly clear water. Follow it up with a final rinse.
- D.E. Filters: Backwash the system, then take the grids apart for a detailed cleaning with a hose and filter cleaner.
This last filter cleaning makes sure no trapped contaminants are left to fester over the next few months. This is exactly how we handle it in our professional services. It’s this kind of detail that makes all the difference. For homeowners who’d rather have this expert-level care all year, our monthly pool maintenance plans offer that consistent, worry-free approach to keeping your pool perfect in any season.
Getting Your Water Chemistry Right for the Off-Season
If there’s one thing I’ve learned over the years, it’s that perfectly balanced water is your best defense against opening up to a green, swampy monster in the spring. Think of winter chemicals as a protective shield for your pool's surfaces while it sits dormant.
Getting this balance right can be a bit of an art form, which is why many homeowners opt for our professional water chemistry services to get flawless results without the guesswork. You're basically creating an environment that’s hostile to algae but gentle on your plaster or vinyl liner. Skipping this step is just asking for trouble.
Once the chemistry is dialed in, you'll move on to the mechanical side of things—protecting your equipment and plumbing from the (mild) Florida winter.
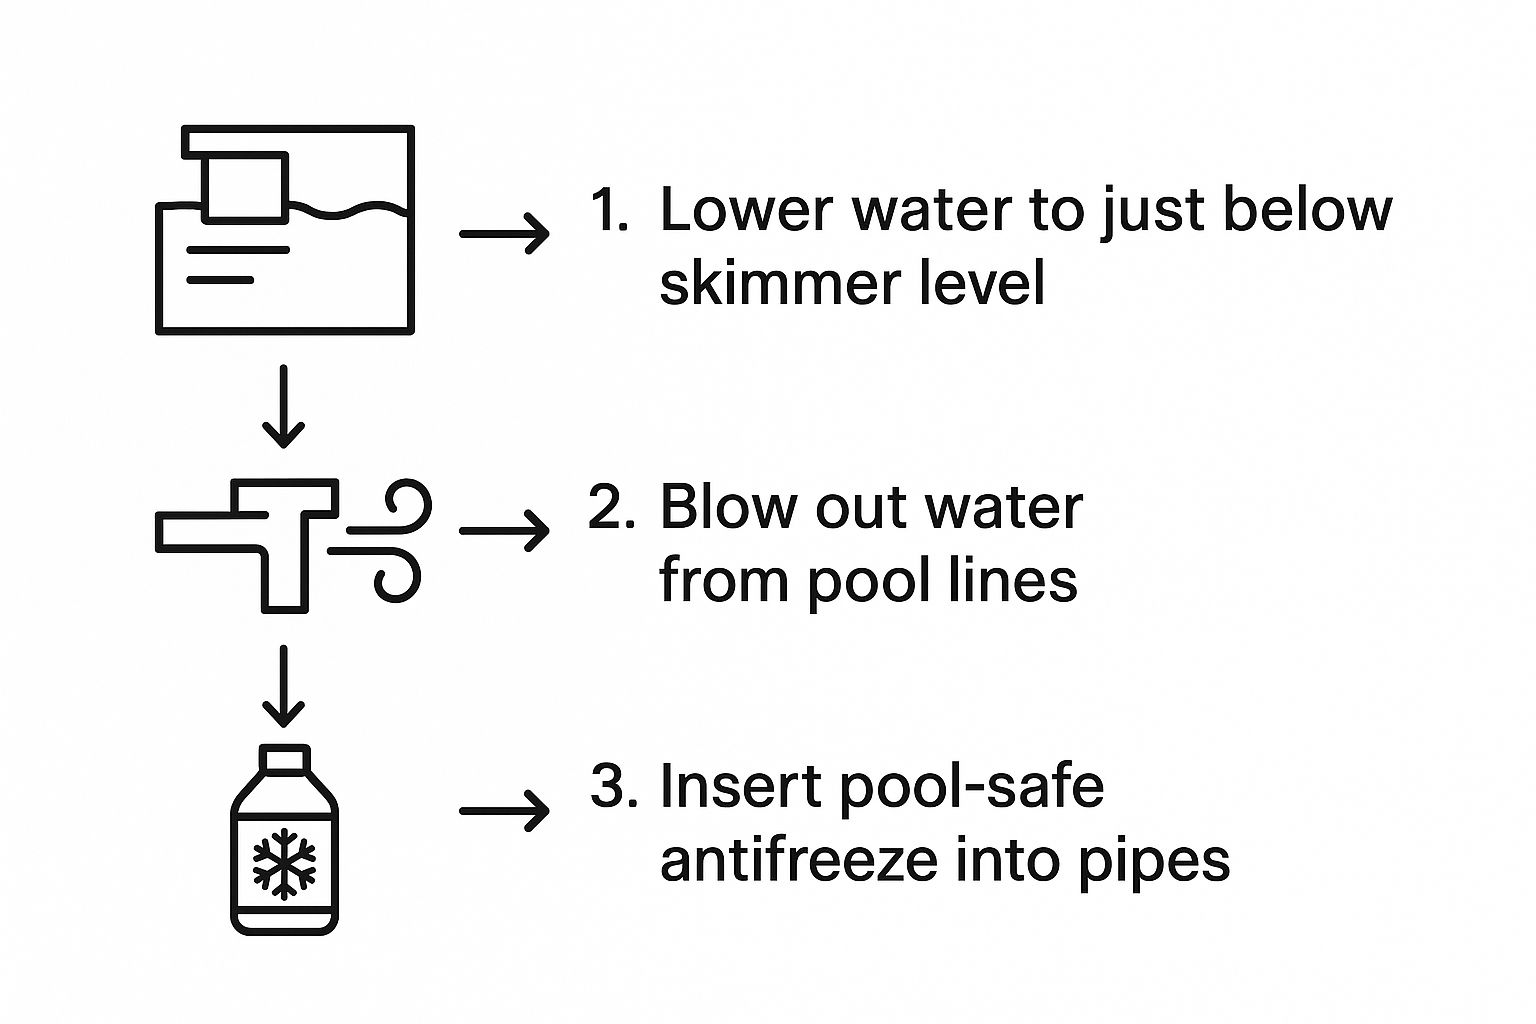
As you can see, the core idea is to get the water out of the pipes. You'll lower the water level below the skimmer, blow out all the lines to clear them completely, and then plug them up to keep them dry and safe.
The Key Chemical Players
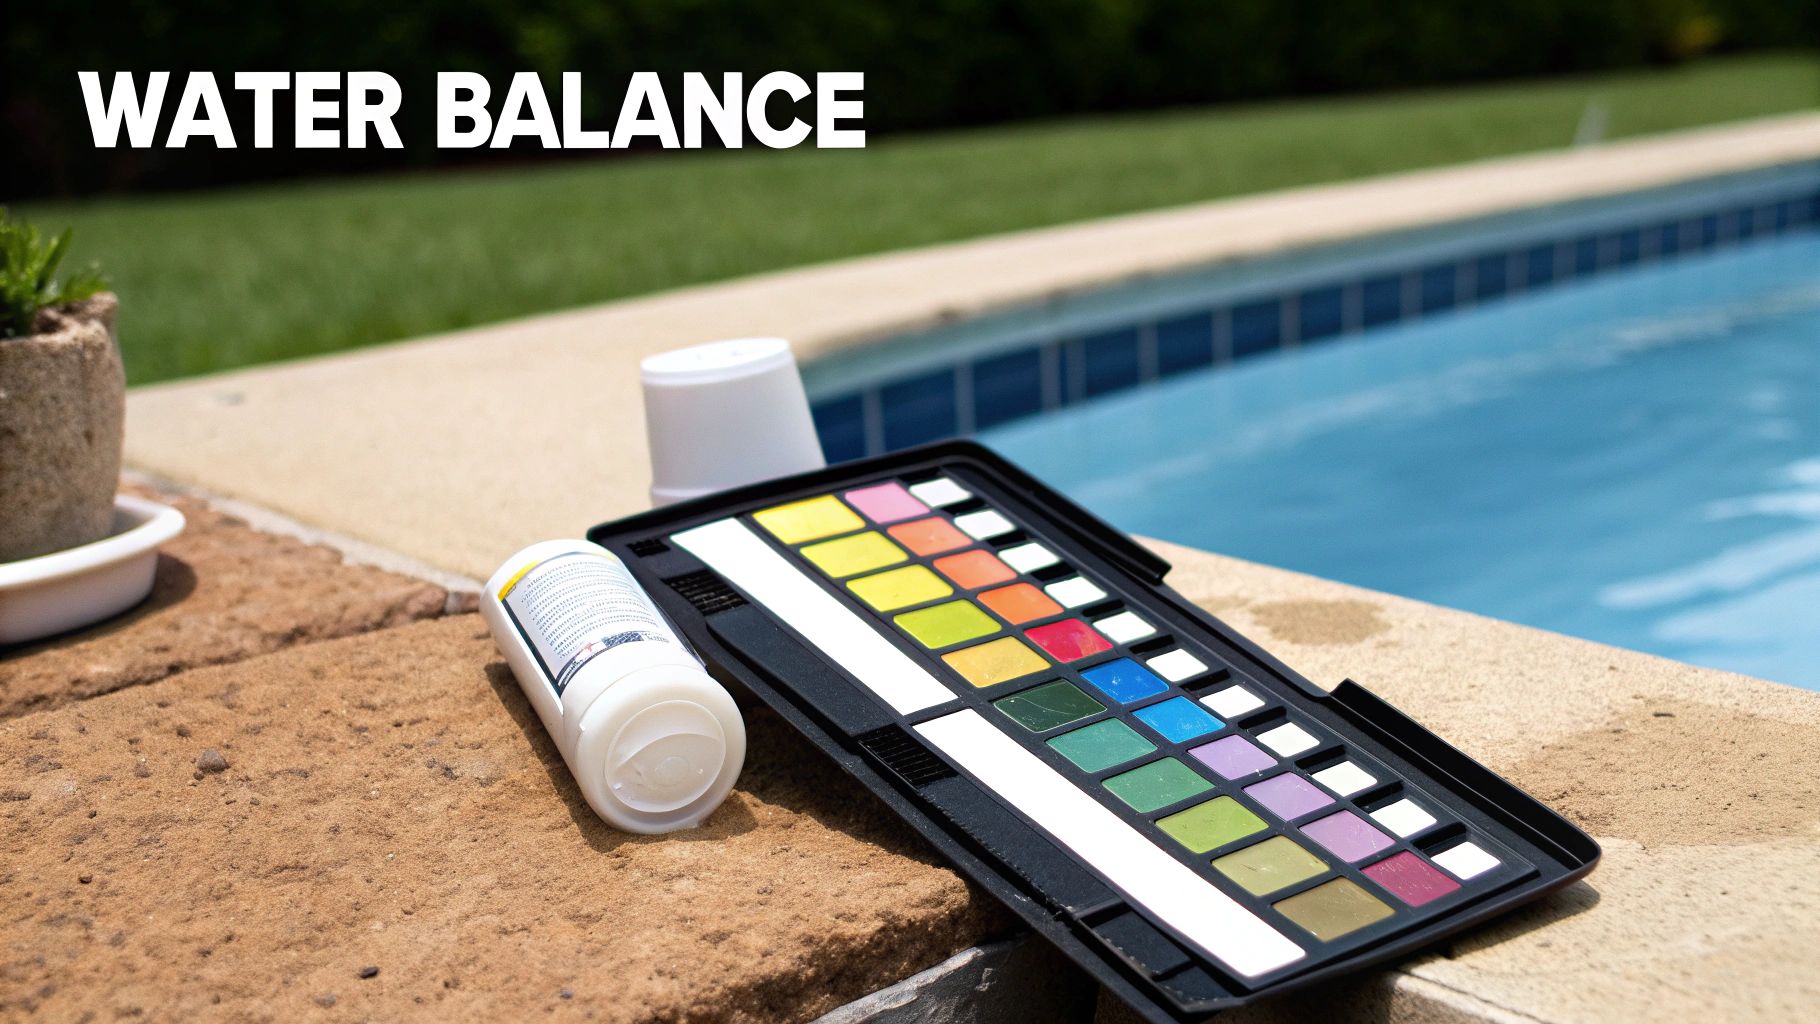
Before you even think about adding winterizing products, you need to test and adjust your core water parameters. Grab your test kit—it's your best friend right now. You're aiming for specific targets that will keep the water stable for months.
Here’s what you should be aiming for:
- pH: 7.2 to 7.6. A balanced pH is crucial because it ensures all your other chemicals work effectively and won't damage your pool surfaces.
- Total Alkalinity: 80 to 150 ppm (parts per million). Alkalinity is the buffer for your pH, preventing wild swings that can lead to ugly scaling or corrosive etching.
- Calcium Hardness: 175 to 275 ppm. Hitting this number protects plaster from pitting and helps keep vinyl liners from wrinkling.
A little pro tip: I usually aim for the higher end of these ranges. Over the winter, these levels will naturally drift downwards, so starting a bit high gives you a valuable safety cushion.
Getting the water chemistry right before you cover the pool is 90% of the battle. It's the single most important step in ensuring you open up to clear water instead of a costly green mess.
Winter Shock and Algaecide: The Finishing Touch
With your base chemistry dialed in, it’s time for the one-two punch that stops algae in its tracks. This isn't your normal weekly shock; it's a bit more potent.
First, you'll add a winterizing shock treatment. This is usually a strong, non-chlorine oxidizer that zaps any lingering contaminants. The non-chlorine part is key because it won't degrade your pool cover over the winter. Always follow the manufacturer's instructions, broadcasting it evenly across the water while the pump is still running.
After letting the shock circulate for a few hours, it's time to add a long-lasting winter algaecide. This is your long-term insurance policy. I always recommend a high-quality, copper-free algaecide to avoid any chance of staining your pool surfaces. Pour it around the pool's perimeter and let the pump run for at least one more hour to make sure it's mixed in completely.
Properly winterizing a pool is a real investment in its health. The cost to have a pro close your pool typically runs from $175 to $400, which is a small price to pay to avoid a nasty surprise in the spring. You can learn more about pool closing costs on Angi.com to see how a professional service can provide both value and peace of mind.
Protecting Your Pool Pump and Plumbing
https://www.youtube.com/embed/_VV7_MR4HTo
Once you've got the water chemistry dialed in, it's time to shift focus to the heart of your pool: the pump, filter, and plumbing. This equipment is easily the most expensive part of your whole setup. Even here in Southwest Florida, where a hard freeze is rare, leaving water sitting in your equipment all winter is asking for trouble.
Believe it or not, most of the expensive repairs we see in the spring come from equipment that wasn't shut down properly. This isn't just about preventing freeze damage; it's about relieving pressure and making sure stagnant water doesn't corrode seals, gaskets, and other internal parts. A little work now really does extend the life of your equipment and protects your investment.
Lowering the Water Level
First things first, you need to drop the water level in your pool. The target is to get the water about 4 to 6 inches below the bottom of the skimmer opening. This measurement is key. If the water is too high, it'll find its way back into the skimmer lines. Too low, and you could put unnecessary stress on a vinyl liner.
You've got a couple of ways to do this:
- Use Your Filter Pump: The easiest method is to set your multiport valve to "Waste" or "Drain." Turn the pump on and keep a close watch—it can drop the water level faster than you think.
- Use a Submersible Pump: If you don't have a multiport valve with a waste setting, a small submersible pump (sometimes called a cover pump) is your best friend. Just drop it on the top step of your pool and let it run.
As soon as the water hits that sweet spot, head to your circuit breaker and shut off all power to your pool equipment. This is a non-negotiable safety step before you touch any of the plumbing.
Clearing the Lines and Installing Plugs
With the power off and the water level down, the next goal is to get every last drop of water out of the plumbing lines. Stagnant water is a playground for algae and bacteria.
Grab a high-powered blower or a shop vac switched to the "blow" setting. You're going to force air through the entire system, pushing all the remaining water out into the pool. You'll know it's working when you see a torrent of bubbles shooting out of the return jets.
Keep the air blowing until the bubbles stop and you just see air coming out. That's your signal the line is clear. As you clear each line, immediately seal it off with a winterizing plug. You’ll need to plug every return line and the skimmer lines to create a completely airtight system.
Don't forget the small things. Go to your pump, filter, heater, and chlorinator and remove every single drain plug. I always toss them into the pump's strainer basket for safekeeping—it saves a headache trying to find them again in the spring. This simple five-minute task can prevent hundreds of dollars in damage from cracked equipment housings.
Taking the time to do this ensures your entire plumbing network stays dry and protected through the cooler months. If you've noticed your equipment isn't running as well as it used to, now might be the time to think about an upgrade. You can learn more about the latest high-efficiency pool pumps on our website, which can save you a surprising amount on your energy bills.
A little bit of care now makes for a much faster, cheaper, and stress-free pool opening come springtime.
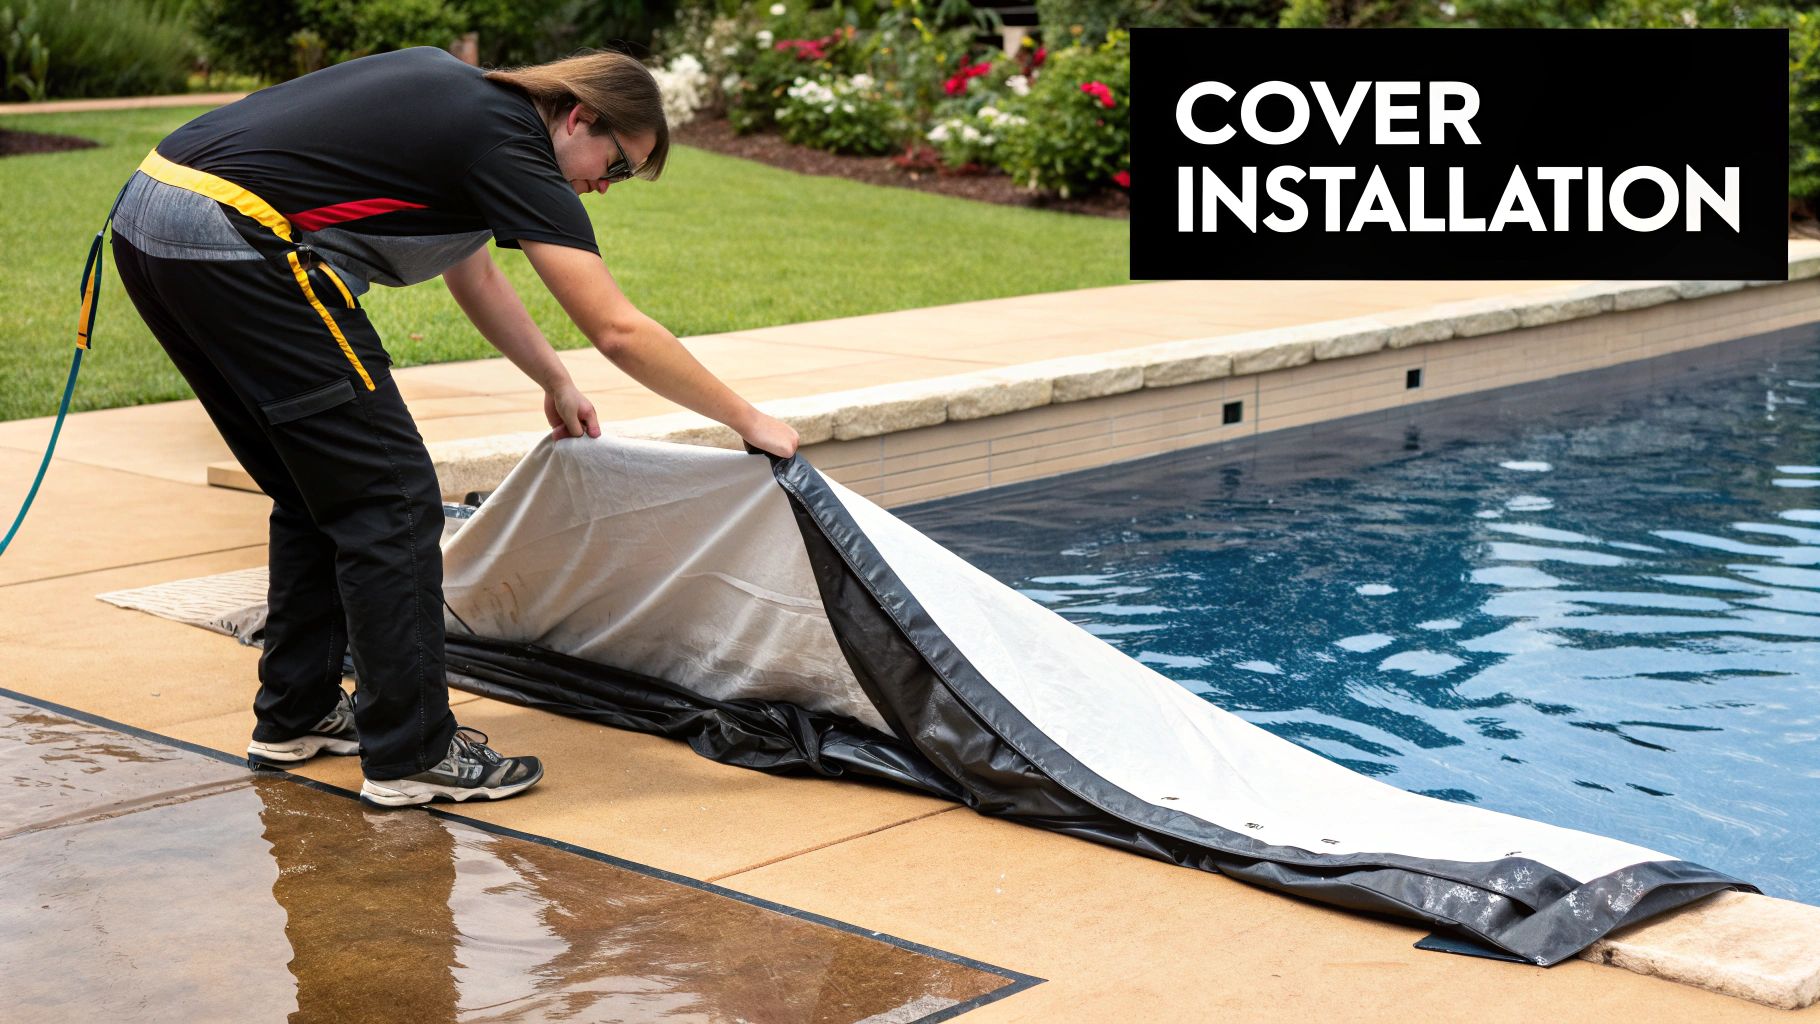
Choosing the Right Winter Pool Cover
Alright, now for the final step: putting your pool to bed for the winter. Your cover is the shield that protects all your hard work, keeping your water safe from leaves, debris, and the Florida sun during the off-season.
Getting this part right is a critical piece of the puzzle. It’s not just about throwing a sheet over the water; it's about creating a secure barrier that holds your water chemistry in place and guarantees a much easier spring opening.
This last layer of protection is what separates a quick, painless reopening from a costly, frustrating cleanup. There are a few different ways to go, so understanding the trade-offs is key to making a smart investment for your backyard.
Comparing Your Cover Options
Down here in our mild climate, you don't need a cover designed to handle a foot of snow, but you absolutely need one that can stand up to high winds and intense UV rays. Let's walk through the most common choices I see in Southwest Florida.
- Standard Winter Tarp Covers: Think of these as the entry-level option. They're basically lightweight polyethylene tarps that you lay across the water and hold down with big water bags. They do the job of blocking sunlight and leaves, but they're the least durable and offer zero safety.
- Mesh Safety Covers: This is a serious upgrade. Mesh covers are stretched taut across the entire pool and anchored directly into the deck. Rainwater passes right through, so you never get those gross, heavy puddles on top. But their real benefit is safety—they're strong enough to support the weight of a person or a pet, which gives you incredible peace of mind.
- Solid Safety Covers: These give you the best of both worlds. Just like mesh covers, they're anchored securely to the deck for maximum safety. The big difference is their solid, non-permeable material, which completely blocks out the sun. This is, hands down, the best defense against algae growth. Most of these come with a small drain panel or require a little pump to get rid of rainwater.
A high-quality cover isn't just a purchase; it's an investment in your time and your pool's longevity. The better the cover, the less work you'll be doing when it's time to swim again.
Securing Your Cover for Florida Weather
No matter which cover you land on, proper installation is everything. This is especially true here, where a strong winter cold front can bring some serious wind gusts. A loose cover can turn into a giant sail in a hurry, potentially ripping the cover or even damaging your deck anchors.
If you go with a tarp cover, make sure those water bags are filled to the brim and placed end-to-end around the entire edge. Leave no gaps.
For safety covers, it's absolutely crucial that you tighten all the straps evenly. You're aiming for a taut, drum-like surface. That tension is what gives the cover its safety rating and stops the wind from getting underneath and lifting it.
It's no surprise that more and more pool owners are seeing the value here. The global market for winter swimming pool covers was valued at around $623 million in 2025 and is only expected to grow. It’s a clear sign that people are getting serious about smarter pool care. You can dig into the numbers and trends yourself over at Market Report Analytics.
Choosing and installing the right cover can feel a little daunting. We carry a curated selection of top-notch, durable covers that we know work great in the Florida climate. You can browse our recommended pool covers and have our expert team handle the professional, secure installation for you. That way, you'll have total peace of mind all winter long.
Answering Your Florida Pool "Winterizing" Questions
Even with a good guide, winterizing a pool in Southwest Florida brings up some unique questions. I get these all the time from homeowners trying to do the right thing, wondering how the usual "rules" apply down here.
Let's clear up some of the most common points of confusion. Getting these answers right is the key to a hassle-free off-season and a crystal-clear pool opening next spring.
Do I Really Need to "Close" My Florida Pool?
This is always the first question, and the answer is a definite yes—but it's a modified closing. You're not trying to prevent a solid block of ice from forming. Your main enemies are algae, staining, and unnecessary wear and tear on your equipment.
Just letting the pool go from November to March is a recipe for a costly, back-breaking cleanup.
Think of it this way. A proper winter routine saves you serious money by:
- Stopping those aggressive algae blooms that can cost hundreds in shock and algaecide to kill.
- Protecting your plaster or liner from ugly stains caused by rotting leaves and out-of-whack water chemistry.
- Giving your expensive pump and filter a well-deserved break, which helps them last longer.
How Often Should I Check on the Pool During Winter?
Even a perfectly winterized pool needs a quick look-see every now and then. I always tell my clients to peek under the cover at least once a month.
You’re not doing a full chemical test. Just a quick visual check to make sure the water level is stable and the water still looks clear. It’s a simple five-minute task that can catch a small issue before it snowballs into a major headache.
Of course, if you'd rather be completely hands-off, our team can handle these monthly check-ups for you. It's total peace of mind while your pool is hibernating.
Can I Just Use My Solar Cover Instead of a Winter Cover?
Please don't do this! It's one of the most common and expensive mistakes I see. A solar cover is designed to trap heat and let sunlight through—that’s the exact opposite of what you need for an inactive pool.
Using a solar cover all winter basically turns your pool into a warm, sunny incubator for algae.
A true winter cover is built to block 100% of sunlight. This is called light deprivation, and it is your single best weapon for preventing algae from growing while the pump is off.
A winter cover also does a much better job of keeping dirt, leaves, and other debris out. Taking this shortcut with a solar cover is a guaranteed way to open your pool to a green, swampy mess.
What’s the Biggest DIY Winterizing Mistake You See?
Nine times out of ten, it’s getting the water chemistry wrong. So many homeowners either skip the final water balancing step or just don't get the levels dialed in for long-term stability.
Adding a fancy winter algaecide to a pool with low pH or alkalinity is literally throwing your money into the water—the chemicals can't work effectively in an unbalanced environment. Getting that final chemical balance perfect is the foundation for everything.
If you've got more questions, you can always explore our comprehensive pool FAQs to find more expert advice.
Figuring out the nuances of a Florida-style pool closing can be a lot to handle. If you want to be certain it’s done right for an effortless spring opening, trust the experts at Water Medic of Cape Coral. Our professional winterization service covers every single detail, from the deep clean and chemical balancing to equipment protection and cover installation. We make sure your pool is perfectly preserved. Protect your investment today.