How to Prime Pool Pump: Quick, Easy Guide
Priming your pool pump is just a fancy way of saying you need to fill it with water before turning it on. Think of it like giving a straw a little sip to get it started—without that initial bit of water, the pump can't create the suction it needs to pull water from the pool.
It’s a simple, five-minute job, but it’s arguably the most critical step in protecting your pump's motor from damage. When a pump runs without water, it's called "running dry," and it's the fastest way to burn out a perfectly good piece of equipment. Our team sees this preventable issue far too often during pool repair visits.
Why Priming Is a Non-Negotiable Step
So, why is this so important? Running a pump dry is like revving a car engine with no oil. The internal parts, especially the mechanical seal, rely on a constant flow of water for cooling and lubrication.
Without that water, friction builds up in seconds. The seal overheats, melts, and fails. This leads to leaks that can quickly destroy the motor's bearings, turning a minor maintenance task into a major repair bill. The entire circulation process depends on creating a vacuum, and you can't create a vacuum with a pump full of air.
The Real Cost of Forgetting to Prime
We see it all the time. A pump motor fails, and the root cause traces back to it being run dry, even for just a minute or two. The main casualty is always the mechanical seal, which separates the "wet end" of the pump (the part with water) from the "dry end" (the motor). Once that seal is compromised, you’ve got a serious problem on your hands.
A failed mechanical seal is one of the most common—and totally preventable—pump repairs we encounter. A few minutes spent priming can literally save homeowners hundreds of dollars in parts and labor.
This simple bit of upkeep is your best defense against premature equipment failure. In fact, pool service technicians estimate that improper priming contributes to over 70% of all pump malfunctions. It's a staggering number for such an easy-to-avoid issue.
When to Call for a Professional Look
Priming should be a straightforward task. If you find your pump constantly losing its prime or it's a real struggle to get it going every time, that usually points to a bigger problem. The most common culprit is an air leak somewhere in the suction-side plumbing.
That's where we come in. Our experienced technicians can not only get your pump primed perfectly but, more importantly, can hunt down and fix those pesky underlying issues. Regular professional maintenance of your pool pump equipment ensures everything runs smoothly, protecting your investment and keeping your pool sparkling.
Getting Your System Ready for a Perfect Prime
A good prime is all about the prep work. A few simple steps beforehand will make the whole process smoother, safer, and much more likely to work on the first try. This is the exact checklist our own techs run through, and it’s a lifesaver for avoiding headaches.
First things first: safety. Before you even think about touching the pump, head straight to your circuit breaker and shut off all power to your pool equipment. This isn't just a suggestion—it's the golden rule. You absolutely don't want that pump kicking on while your hands are in it.
Setting the Stage: Valves and Pressure
With the power safely off, your next stop is the multiport valve. Go ahead and turn the handle to the 'Filter' position. This is the normal, everyday setting for running your pool, so it’s where you want it to be when the pump starts moving water again.
Now, look for the little air relief valve, usually right on top of your filter tank. Give it a gentle turn counter-clockwise to open it up. You should hear a distinct hiss as trapped air escapes. That’s a good sound! It means you're releasing pressure that could otherwise fight against the pump.
Pro Tip: Think of it like this: trapped air in the filter creates back pressure, making your pump work way harder to get going. Bleeding that air out first gives the water a clear, easy path to follow.
Clear the Path for Water Flow
It’s amazing how a few leaves can stop a powerful pump in its tracks. Before you prime, you need to make sure water has an unobstructed path from the pool to the pump.
- Start at the pool and clean out the skimmer baskets.
- Next, open up your pump and pull out the strainer basket, cleaning it thoroughly.
Any debris in these baskets can block the suction lines and prevent the pump from ever pulling water in. This simple cleaning step is non-negotiable.
The global market for swimming pool pumps is massive, expected to hit USD 3.97 billion by 2033. That’s a lot of pumps that need to run well! Keeping yours primed and free of blockages is a big part of that, and it can actually improve its efficiency by up to 15%. You can dig deeper into the growing swimming pool pump market and its trends if you're curious.
If you’re constantly finding clogged baskets or think there might be a blockage further down the line, it might be time to call in a pro. Our pool maintenance services can track down and clear stubborn clogs to get your system back in top shape.
How to Fill and Start Your Pool Pump
Alright, with all your prep work done, it's time for the main event. This is where we get water back into the system to create the vacuum your pump needs to start circulating water properly. It's not a complicated job, but paying attention to the details here is the difference between a two-minute fix and a frustrating afternoon spent trying to figure out what went wrong.
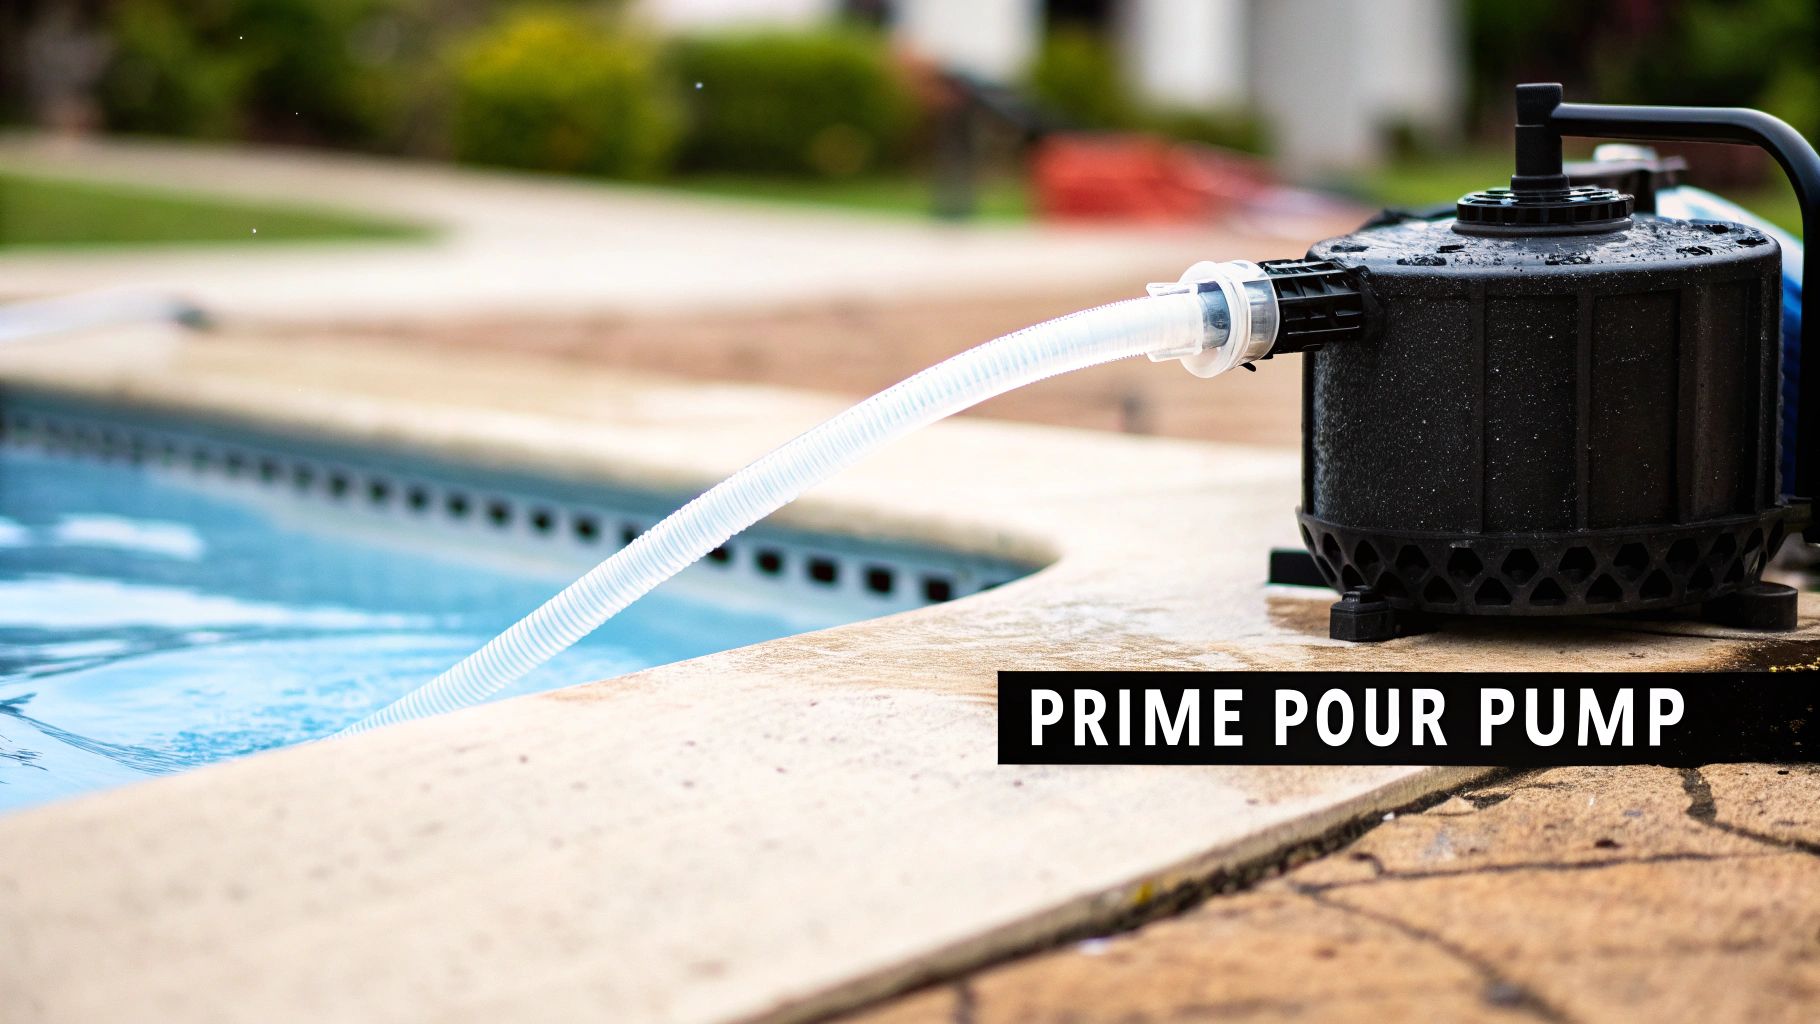
First, you'll need to get the lid off your pump. Most just twist off counter-clockwise, though some older models might have a clamp or a couple of knobs you need to undo. With the lid off, grab a garden hose and stick it right into the pump's strainer basket housing.
Let the water run at a nice, steady pace. You don't need to blast it in there. A gentle, continuous flow is much better at pushing any trapped air out of the suction-side pipes than just dumping a bucket of water in all at once. Keep filling until the strainer housing is completely full and starts to overflow. That’s your signal that you've pushed out most of the air right at the pump.
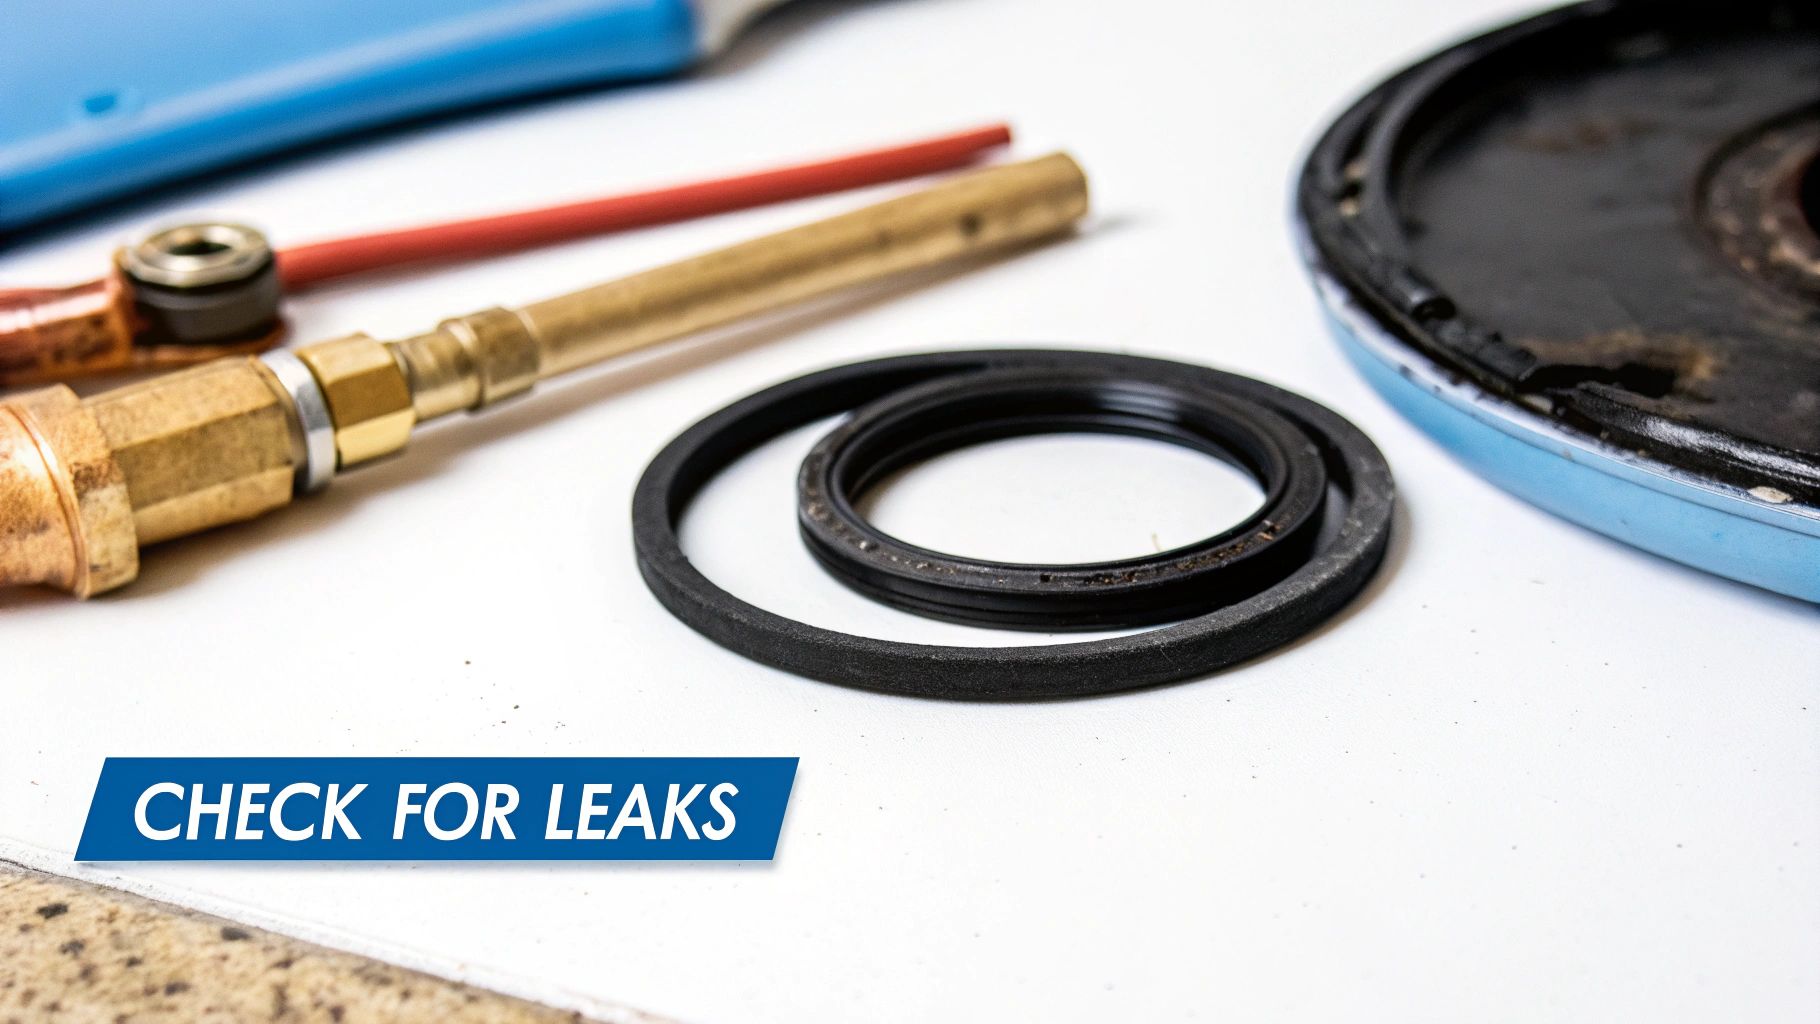
The O-Ring: Don't Skip This Check
Before you even think about putting that lid back on, stop. This next step is critical. Take out the big rubber O-ring that sits either on the lid or around the rim of the pump housing. I can't tell you how many priming problems come down to this one little part.
Give it a good look. You're searching for any signs of trouble:
- Cracks or Dry Rot: Are there any tiny splits? Does it feel brittle?
- Stretching or Flattening: A healthy O-ring should be perfectly round and feel soft and flexible, not squashed flat or stretched out of shape.
If you spot any damage at all, replace it. A new O-ring is only a few bucks and can save you from a massive headache. A bad one will let air sneak in, making it almost impossible for the pump to catch its prime. If it looks good, just wipe it clean and apply a thin coat of a silicone-based pool lubricant to help it seal perfectly.
A bad O-ring is the culprit behind countless priming failures. Seriously, taking 30 seconds to inspect and lube it is the single best thing you can do to prevent problems. Our techs won't even try to prime a pump without checking it first.
The Final Steps: Powering It All Up
Once the O-ring is lubricated and seated back in its groove, go ahead and tighten the pump lid back on. You only need to get it hand-tight; cranking down on it too hard can crack the plastic or damage that O-ring you just inspected.
Now, head back over to your circuit breaker and flip the switch to give the pump power.
Listen closely. You should hear the motor kick on, and within a few seconds, that sound should change as it starts moving water. The best sign of success is seeing water swirling around inside the clear pump lid. That's how you know you've got a good prime!
The infographic below recaps the essential steps leading up to this point.
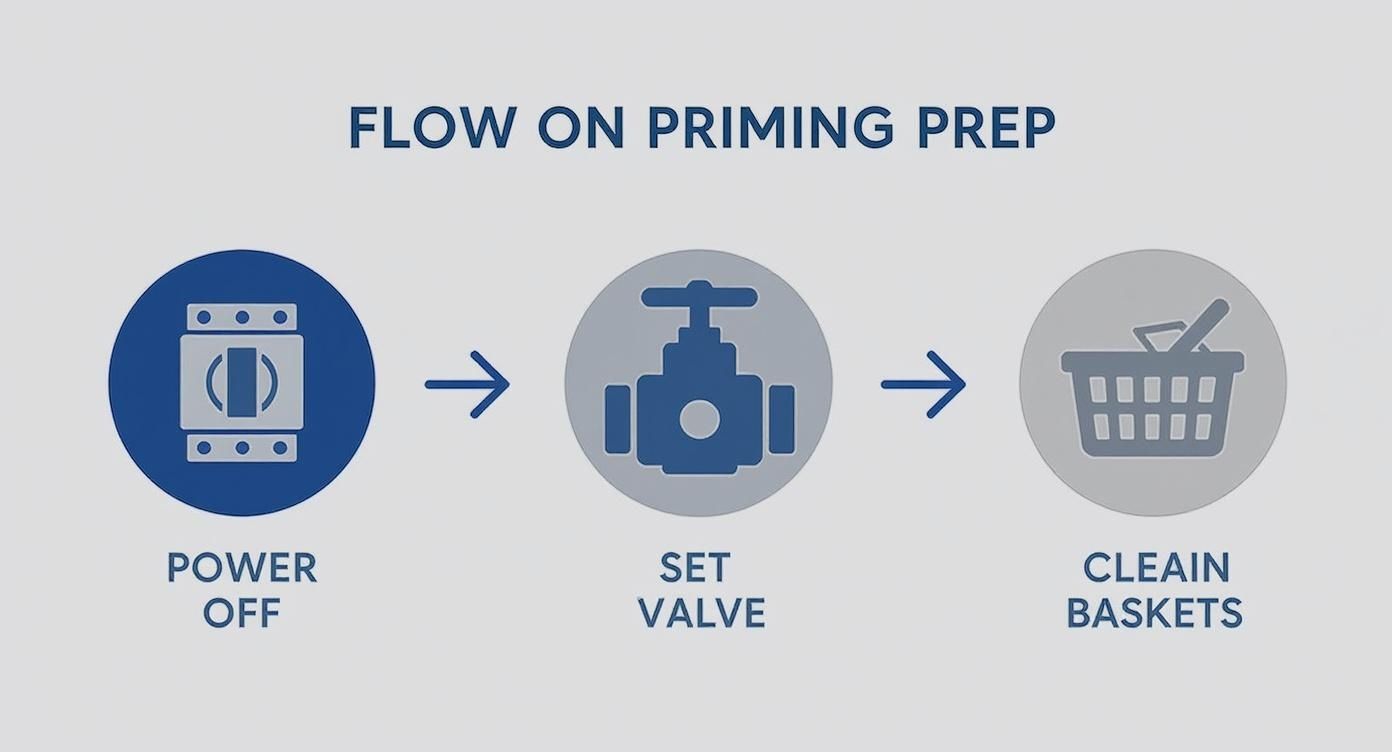
As you can see, a successful prime really starts before you even turn on the hose. If you've tried this a couple of times and it's still not working, don't keep running the pump dry and risk damaging it. Our team handles this every day as part of our professional pool maintenance services, and we can get it running perfectly for you without the stress.
Troubleshooting Common Priming Problems
You've followed all the steps, but the pump just won't catch. It's a frustrating moment every pool owner has faced, but don't throw in the towel just yet. The solution is usually something simple.
Nine times out of ten, the culprit is a pesky air leak somewhere on the suction side of your plumbing. Instead of pulling a solid stream of water, your pump is sucking in air, which prevents it from creating the vacuum it needs to prime.
This is by far the most common reason we get service calls for priming problems. Air is sneaky and can find its way through the tiniest openings, completely derailing the process.
Finding the Source of an Air Leak
Before you try to prime the pump again, it's time to play detective. The leak is almost always located somewhere between your pool's skimmer and the front of the pump.
Here are the usual suspects to check first:
- The Pump Lid O-Ring: This is the number one cause. Is it dry, cracked, or maybe just not seated correctly? Make sure you inspect and lubricate it properly.
- A Cracked Pump Lid: Take a close look at the clear lid. You're searching for hairline fractures, which often form around the edges where it seals.
- Loose Plumbing Fittings: Jiggle the threaded fitting that goes into the front of the pump. If it has any play, it can easily suck in air.
Pro Tip: A simple trick to pinpoint a leak is to turn the pump on and slowly pour water over each of these connection points. If you see the bubbling inside the pump lid suddenly stop or change when the water hits a certain spot, you've found your leak.
Sometimes, the problem isn't a leak at all, but something even more basic. Is your pool's water level at least halfway up the skimmer opening? If it's too low, the skimmer will gulp air along with water, killing the prime every time. It's also worth a quick double-check of your skimmer and pump baskets—a bad clog can create symptoms that look just like an air leak.
When to Call in the Professionals
If you've gone through the checklist and are still stumped, it might be time for a professional diagnosis. Issues like hidden cracks in underground plumbing or more complex equipment failures are tough to find without specialized tools.
Don't risk damaging your equipment by letting the pump run dry. Our expert pool repair team can quickly track down those stubborn, hard-to-find leaks and get your system back to running smoothly and efficiently.
Thankfully, pump technology is always improving. The global self-priming pump market is expected to hit USD 33.24 billion by 2030, largely because newer models can reduce operational downtime by up to 25% by automatically clearing air from the lines. You can learn more about the growth of self-priming pump technology and how it's making pool ownership easier.
How to Keep Your Pump Primed and Healthy
Figuring out how to prime your pool pump is a fantastic skill to have in your back pocket. But honestly, the real secret to a happy pool system is making sure the pump never loses its prime to begin with. Think of it less as a one-time fix and more as a simple maintenance rhythm that keeps everything humming along smoothly.
This isn't about adding complicated chores to your list. It’s about small, consistent habits that pay off big by extending the life of your expensive equipment.
Simple Habits for a Strong Prime
The easiest thing you can do? Just keep an eye on your water level. You always want the water sitting about halfway up the skimmer opening. If it dips too low, the skimmer starts gulping in air, and that's a surefire way to make your pump lose prime and run dry—a major no-no.
A few other quick checks can make a world of difference.
- Check the O-Ring: A couple of times a season, pop open the pump lid and check the rubber O-ring. A quick wipe-down and a little lubrication ensure you’re getting that perfect, airtight seal.
- Empty the Baskets: Get in the habit of clearing out your skimmer and pump baskets weekly. It's amazing how quickly a handful of leaves can choke the water flow, forcing the pump to struggle and eventually lose its prime.
These simple habits are your best defense. A few minutes of your time each week can save you from the headache of re-priming the pump and the much bigger headache of paying for a new one.
Of course, not everyone has the time to stay on top of this. If you'd rather have an expert handle it all, our team takes care of these checks and a whole lot more. Check out our monthly maintenance service plans to see how we can keep your pool in perfect shape without you lifting a finger.
Answering Your Top Pool Pump Priming Questions
Even after you've got the process down, a few questions always seem to pop up. We get calls about this stuff all the time, so I've put together answers to the most common things people ask.
Think of this as your quick-reference guide for those moments when you're standing by your equipment wondering, "Is this normal?" Understanding these little details will help you solve problems on the fly and get to know your pool's circulation system a lot better.
How Often Should I Have to Prime My Pump?
Here’s the short answer: not very often. You should really only have to prime the pump when you open the pool for the season, right after you’ve done some maintenance (like cleaning the filter), or if the power has been off for a while.
If you find yourself having to prime it daily or every single time you turn it on, that is not normal. It's a dead giveaway that you have an air leak somewhere on the suction side—that’s all the plumbing leading to the pump. This constant struggle is tough on the motor and needs to be fixed.
What Happens if I Just Can't Get the Pump to Prime?
If you’ve tried to prime it two or three times and you're getting nowhere, the most important thing to do is stop and turn off the power. Never let a pump run dry for more than a minute or so. Doing so can quickly overheat the mechanical seal, causing permanent damage that's expensive to fix.
Instead, go back to basics and check the usual suspects:
- Is the pool's water level high enough? It should be about halfway up the skimmer opening.
- Is the pump lid on tight with a properly seated O-ring?
- Are the skimmer and pump baskets free of debris?
If you've checked everything and it's still not working, it's smarter to call in a pro than to risk burning out your pump.
Is It Normal to See Bubbles from My Jets After Priming?
Absolutely. It's completely normal to see a blast of bubbles shooting out of your return jets for a few minutes after you get the pump primed. That’s just the last of the air getting pushed out of the filter and the rest of the plumbing.
The bubbles should clear up within 5 to 10 minutes, and you'll be left with a smooth, steady stream of water. If you're still seeing constant bubbles or the water is sputtering, you've probably got a small air leak somewhere.
For more answers to things that make pool owners scratch their heads, check out our big pool FAQs page. It covers a ton of topics well beyond pump priming.