How to Clean Well Water: Your Essential Home Guide
The process of cleaning up your well water always starts with one thing: professional testing. Before you can even think about filtration, UV lights, or any other treatment, you have to know exactly what you're up against. The right solution completely depends on what's actually in your water, which makes a solid diagnosis the most important move you can make.
Understanding What's In Your Well Water
Having a private well is fantastic for self-sufficiency, but it also means you're the one in charge of water safety. It's not like city water, which is treated and constantly monitored by the local utility. Your well is tapped directly into the local groundwater, so it's a direct reflection of the surrounding environment—for better or worse.
It's a common mistake to think that if your water looks, smells, and tastes fine, everything is okay. The truth is, some of the most dangerous contaminants are completely invisible. For example, runoff from nearby farms can introduce nitrates, which are especially harmful to infants. A big storm or seasonal flooding could wash nasty bacteria like E. coli into your well without you ever noticing a change.
Beyond the Obvious Contaminants
Not all well water issues are immediate health threats, but they can still cause major headaches and expensive damage. Your water might be loaded with minerals that create a whole different set of problems.
- Hardness: This is usually from high levels of calcium and magnesium. It's the culprit behind limescale buildup that can destroy your water heater and dishwasher. It also makes it harder for soaps and detergents to lather up. A professional water softener installation is the definitive solution for this.
- Iron and Manganese: If you've got reddish-brown or black stains on your sinks, toilets, and laundry, you can probably blame these two. They also give your water an unpleasant metallic taste.
- Low pH (Acidic Water): Water that's too acidic will slowly eat away at your pipes and fixtures. Over time, this corrosion can leach harmful metals like lead and copper directly into your drinking water.
The only way to know for sure what's flowing from your taps is to get it tested. This isn't just a good idea—it's the essential first step to making your water safe for your family.
Getting a clear picture of your water's makeup isn't just about spotting dangers; it's about being proactive. Once you know if you're dealing with high sediment, specific bacteria, or other dissolved solids, you can pick a treatment system that actually solves the problem. It saves you from guessing with off-the-shelf filters that might not be right for your specific situation.
A professional water analysis gives you a precise roadmap for treatment. For a deeper dive, take a look at these answers to some of our most common well water FAQs. When you understand the unique challenges of your water source, you can build a system that gives you real peace of mind.
How to Get an Accurate Water Quality Test
Before you can even think about treating your well water, you have to know exactly what you’re up against. Guessing about your water's safety is a game you don't want to play; the only way to get a real solution is to start with an accurate diagnosis. And that all comes down to a proper water quality test.
A lot of well owners grab a simple DIY test kit from the local hardware store to get started. These test strips can give you a quick, basic idea of things like pH, hardness, or maybe chlorine. But honestly, they barely scratch the surface.
The real problem is what those kits can't see. They aren't designed to detect the most serious health threats. We're talking about invisible, odorless contaminants like E. coli, arsenic, nitrates, lead, or even pesticides. Relying on a simple strip test can give you a false sense of security while your family is unknowingly exposed to some pretty nasty stuff.
DIY Kits vs. Professional Lab Analysis
The difference here is night and day. A home test kit is like taking your temperature, while a professional lab analysis is like getting a full physical with blood work. One gives you a single data point; the other gives you the complete picture.
A professional test provides a detailed, quantitative report on what’s in your water. You get precise measurements, not just a color-matching chart. This is the level of detail you absolutely need to choose the right treatment system for your home.
An accurate diagnosis from a certified lab is non-negotiable. It's the only way to turn complex data into a clear, actionable plan to make your water safe.
Let's be real, though—navigating this process on your own can be a headache. You have to find a state-certified lab, figure out how to collect a sample without contaminating it, and then try to make sense of a report filled with technical jargon. That’s precisely why we offer a professional well water testing service. We take care of everything, from collecting the sample correctly to giving you a clear, easy-to-understand breakdown of the results.
Understanding Your Lab Report
When that lab report arrives, it can look pretty intimidating. It’s just a wall of numbers and acronyms. The first thing you want to look for is the Maximum Contaminant Level (MCL). This is the legal limit the EPA sets for public water systems.
Even though you're on a private well, the MCL is your most important benchmark. If any contaminant in your report is flagged for exceeding its MCL, it's time for immediate action. The report will typically break things down into a few key categories:
- Microbiological Contaminants: This is where you’ll find bacteria like coliform and E. coli. A positive result here is a huge red flag, often indicating contamination from sewage or animal waste.
- Inorganic Chemicals: This category covers heavy metals like arsenic, lead, and mercury, plus things like nitrates and fluoride.
- Volatile Organic Compounds (VOCs): These are usually industrial solvents and chemicals that can seep into groundwater from fuel spills or old manufacturing sites.
- Secondary Contaminants: These are more of a nuisance than a health threat. Think iron and manganese (which cause staining) or imbalanced pH (which can corrode your pipes).
It's a serious issue. The World Health Organization reports that contaminated water in unprotected sources is a leading cause of illness globally, with approximately 1,000 children under five dying daily from related diseases. While that’s a worldwide statistic, it underscores the very real risks of untreated water. Learn more about the global impact of unsafe drinking water.
Instead of leaving you to figure all this out on your own, our experts walk you through your report line by line. We explain what every number means for your home and your family, turning confusing data into a simple, straightforward plan. It all starts with a precise test—it's the most critical first step you can take.
Choosing the Right Water Treatment System
Alright, you’ve got your water test results. This is the moment of truth. That report is your personal roadmap, telling you exactly what’s in your water and, more importantly, what you need to do to fix it. Now, we can match the right technology to the specific contaminants that have made their way into your well.
Don't make the mistake of thinking you can just grab a generic filter from a big-box store. When it comes to well water, there’s no such thing as a one-size-fits-all solution. Every treatment method is engineered to tackle a specific problem.
For example, a UV light is a fantastic defense against bacteria, but it's completely useless if your problem is the hard water minerals clogging your coffee maker. A water softener will solve that scale buildup beautifully, but it won’t do a thing about harmful microbes. Let's dig into the common solutions and figure out what makes sense for you.
Pinpointing Your Water Problems
The single most important thing you can do is match the treatment method directly to what your lab report says. Think of it like a doctor’s prescription—you need the right medicine for the ailment.
- Bacteria, Viruses, and Other Microbes: If your report flagged any coliform or E. coli, disinfection is not optional. This is a serious health concern that needs to be addressed immediately with a dedicated system.
- Hardness and Scale Buildup: High levels of calcium and magnesium are what we call "hard water." That chalky buildup, or scale, is notorious for wrecking water heaters, dishwashers, and faucets over time.
- Weird Tastes, Odors, and Chemicals: Things like sulfur (that "rotten egg" smell), chlorine, pesticides, or other chemicals require a specific type of filtration media to absorb them.
- Dissolved Solids and Heavy Metals: Some of the most concerning contaminants, like arsenic, lead, and nitrates, are invisible because they're completely dissolved. Removing them requires a more powerful, specialized filtration process.
The right system isn't just about adding a filter; it's about building a multi-barrier defense tailored to your well's unique chemistry. Our specialists analyze your results to design a system that addresses every single issue, ensuring complete peace of mind.
A Head-to-Head Look at Water Treatment Tech
Once you know what you're fighting, you can explore the different tools available. Each technology has its own strengths, weaknesses, and, of course, maintenance needs.
Water Softeners
If you have hard water, a water softener is your best friend. It uses a process called ion exchange to literally trade the hard minerals (calcium and magnesium) for soft sodium ions. Your pipes and appliances will thank you, and you'll immediately notice a difference in how well soap lathers. The only upkeep is adding salt to the brine tank periodically.
Sediment Filters
I almost always recommend a sediment filter as the first line of defense. It's a simple but crucial component that traps all the physical gunk—sand, dirt, silt, and rust—before it can get into your pipes or clog up more expensive equipment down the line. You'll need to swap out the filter cartridge every 3-6 months.
Activated Carbon Filters
Think of activated carbon as a highly effective sponge for chemical contaminants. It's brilliant at adsorbing compounds that cause unpleasant tastes and smells, like chlorine or decaying organic matter. While it dramatically improves the general quality of your water, it doesn't remove minerals, heavy metals, or bacteria.
The reality is that groundwater is easily affected by its surroundings. Globally, about 70% of freshwater is used for agriculture, which often means fertilizers and pesticides can seep into the water table. This makes targeted methods like carbon filtration more critical than ever. Read more on factors affecting global water quality.
Advanced Systems for Purification and Disinfection
For the most stubborn or dangerous contaminants, you need to bring in the heavy hitters. These systems provide a much higher level of purification.
UV Disinfection Systems
A UV (ultraviolet) light system is a modern, chemical-free way to deal with biological threats. As water flows past the lamp, the UV light zaps any microorganisms, destroying 99.99% of bacteria and viruses by scrambling their DNA. They can no longer reproduce, which makes them harmless. Just remember to replace the UV bulb once a year to keep it effective.
Reverse Osmosis (RO) Systems
When you want the purest water possible, nothing beats reverse osmosis. RO uses pressure to force water through an incredibly fine membrane, leaving a huge range of contaminants behind. This includes heavy metals like lead and arsenic, nitrates, fluoride, and other dissolved solids. For those who want this level of purity at every faucet, a whole house reverse osmosis system is the ultimate solution.
Well Water Treatment Methods at a Glance
To make it a bit easier to compare, here's a quick breakdown of the most common treatment systems. We look at what they target, their main benefit, and what you can expect in terms of maintenance.
| Treatment Method | Targets These Contaminants | Key Benefit | Maintenance Level |
|---|---|---|---|
| Water Softener | Calcium, Magnesium (Hardness) | Prevents scale buildup, protects appliances | Low (Add Salt) |
| Sediment Filter | Sand, Silt, Dirt, Rust | Protects other equipment from clogging | Moderate (Change Cartridge) |
| Carbon Filter | Chlorine, Bad Tastes & Odors, VOCs | Improves water taste and smell | Moderate (Change Cartridge) |
| UV Disinfection | Bacteria, Viruses, Microorganisms | Chemical-free disinfection | Low (Change Bulb Annually) |
| Reverse Osmosis | Heavy Metals, Nitrates, Dissolved Solids, Salt | Highest level of water purification | Moderate (Change Filters/Membrane) |
Putting together the right combination of these technologies is where real expertise comes into play. We don't just sell equipment; we look at your water test, your home's plumbing, and your family's needs to design a complete system that works together seamlessly. The goal is simple: clean, safe, and great-tasting water from every single tap.
A Practical Guide to Shock Chlorination
If you've just gotten a positive bacteria test back or had major work done on your well, shock chlorination is your go-to solution. It's the process of using a high concentration of chlorine to basically blitz your entire well system, wiping out any nasty bacteria, viruses, or other microorganisms that have taken up residence. Think of it as a deep clean for your water supply.
But I have to be clear: this isn't something you want to rush into. It’s a job that demands precision. Using the wrong kind of chlorine, or even just the wrong amount, can do more harm than good—from failing to kill the contaminants to actually damaging your well pump and pipes. This is exactly why a lot of homeowners decide to leave this one to the pros.
Calculating the Right Chlorine Dose
One of the biggest pitfalls I see with DIY shock chlorination is getting the math wrong on the chlorine. If you use too little, you’re just wasting your time because it won't be strong enough to kill everything. On the other hand, if you go overboard, you could damage your plumbing and be stuck with water you can't use for a very long time.
The right amount depends entirely on two things: the diameter of your well casing and how deep the water is.
For example, a pretty standard six-inch diameter well holds about 1.5 gallons of water per foot. To shock that well effectively, you’ll typically need around 3 pints of regular household bleach for every 100 gallons of water. As you can imagine, it's easy to miscalculate, which often leads to a failed disinfection and having to do it all over again.
This infographic lays out the big picture of well water treatment, showing how disinfection fits into a complete safety strategy.
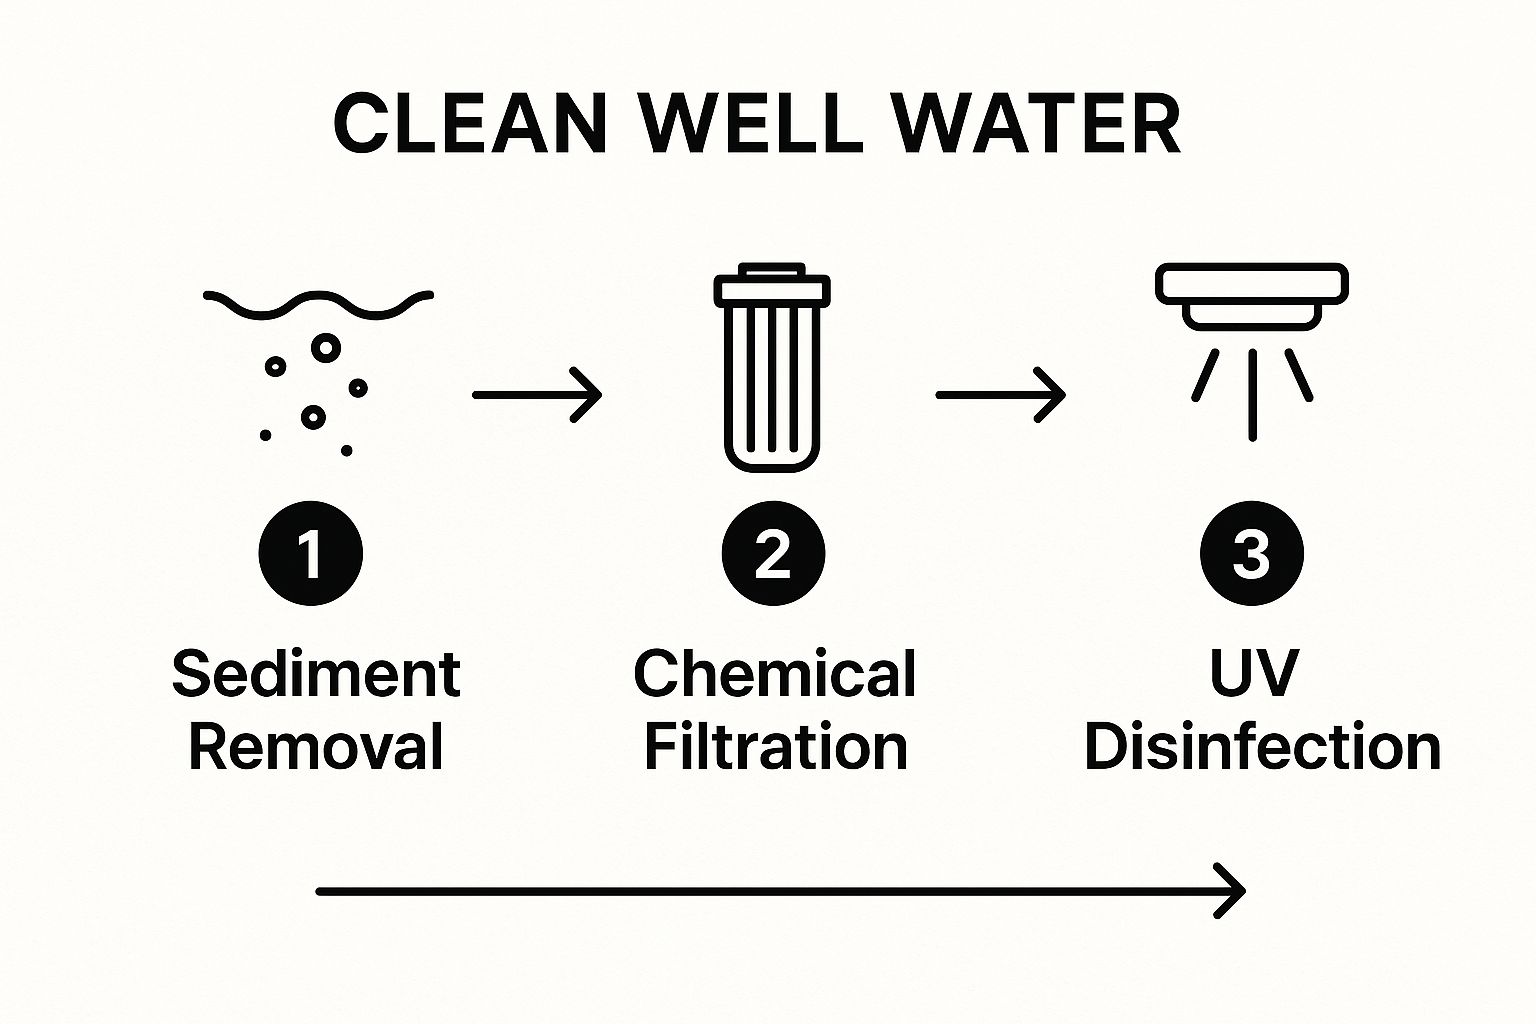
You can see how different treatment layers work together. Disinfection, whether it's chlorination or UV, is that final, crucial step to handle any lingering microbial threats.
Critical Safety Precautions to Take
When you're working with concentrated chlorine, you absolutely have to be careful. The fumes alone can be pretty hazardous, and getting it on your skin or in your eyes is no joke. Safety has to be your number one priority.
- Proper Ventilation is Non-Negotiable: Make sure the area around your wellhead has plenty of airflow. If it’s in a pump house, open up all the doors and windows.
- Wear Protective Gear: Don't even think about starting without safety goggles and chemical-resistant gloves. Splashes happen.
- Use the Right Product: This is a big one. Never use scented or "splash-less" bleach. Those products have additives you do not want in your drinking water. Stick to plain, unscented household bleach, which is usually 5-8% sodium hypochlorite.
Shock chlorination is a precise science. For homeowners who want guaranteed results without the risk and hassle, our professional shock chlorination service ensures the job is done correctly and safely the first time.
The Full Shock Chlorination Process
The whole point is to get that chlorinated water into every nook and cranny of your plumbing system. You start by cutting the power to your well pump and taking off the well cap. Then, you'll pour your carefully measured chlorine mixture right into the well.
Next comes the mixing. A good way to do this is to hook up a hose to an outside faucet and run the other end back down into the well. Let that run for about an hour to really circulate the chlorine solution throughout the well water. After that, you'll turn off the hose and begin systematically opening every faucet in your house—hot and cold—one by one, until you can smell chlorine coming out of each one.
Once the chlorine smell is at every tap, shut everything off. Now you wait. The chlorinated water needs to sit in your pipes for at least 12 to 24 hours. This "dwell time" is what allows the chlorine to do its work and kill off the contaminants.
After the wait, it's time to flush it all out. Take that outdoor hose again and run it somewhere safe, away from your septic system and any plants you care about. Let it run until the chlorine smell is completely gone. Then, go inside and flush every faucet until the water is clear and the odor has vanished. This part can take a while, sometimes hours, but it's the final, vital step to getting your water back to being safe and drinkable.
Keeping Your Well Water Safe for the Long Haul

Getting a water treatment system installed is a fantastic first step, but the job isn't done. Think of it like owning a car; you can't just drive it off the lot and forget about oil changes. Ongoing care is what keeps your well water safe and your equipment running smoothly.
If you let maintenance slide, you're not just risking the investment you made in your system. You could be facing expensive repairs or, worse, re-introducing the very health risks you sought to eliminate.
A simple, consistent routine is all it takes to stay ahead of problems. This is about proactive care, not last-minute panic. The reality is that globally, around 2.2 billion people don't have access to safely managed drinking water. In fact, 115 million people rely on completely untreated surface water, a stark reminder of how fortunate we are to have a private well. You can learn more about what this means for communities worldwide at ourworldindata.org. Maintaining your well properly is a responsibility that comes with that privilege.
Your Seasonal Walk-Around Checklist
You don’t need to be a water pro to keep an eye on things. A few times a year, take a quick walk around your well and give your system a once-over. This is your first line of defense.
- Check the Well Cap: Is it secure? Look for any cracks or damage. A tight-fitting, sealed cap is crucial for keeping out bugs, debris, and runoff.
- Survey the Area: The ground should slope away from your wellhead, not toward it. Puddles or standing water are a red flag for poor drainage that could seep into your well.
- Inspect Exposed Parts: Give any visible pipes, wires, and casings a quick look. You're searching for rust, corrosion, or any other signs of wear and tear.
A well-maintained system is a reliable system. Catching a small crack in the well cap or a minor leak early on can save you from a major contamination event and a hefty emergency repair bill.
Looking After Your Treatment Gear
Each piece of your treatment system has its own needs. Just like a car, ignoring the manufacturer's recommended service schedule will eventually lead to a breakdown. Here's a rundown of the most common tasks you'll encounter.
Filters and Media Replacement
This is probably the most common job. For most setups, you'll be swapping out sediment and carbon filter cartridges every 3-6 months. The timing depends on how much water you use and the quality of your source water. For bigger tanks, like acid neutralizers or iron filters, the internal media might need topping off or a full replacement every few years.
UV System Care
A UV light is an amazing disinfectant, but its power fades over time. The bulb is typically rated for about 9,000 hours, or one year of continuous use. After that, even if it's still lit, it’s not putting out enough UV energy to reliably kill microorganisms. Mark your calendar and change it annually.
Water Softener Top-Up
This one's easy: just keep the brine tank full of salt. I tell my clients to check the salt level once a month. If it's low, the system can't regenerate properly, and you'll start noticing that hard water scale building up again.
When to Call in the Experts
These DIY checks are essential, but they don't replace a professional's trained eye. Having a specialist inspect your entire system once a year is the best insurance policy you can have for your water. A pro can run diagnostics, spot subtle signs of trouble you might miss, and handle the more technical preventative maintenance.
This is where we can be your partner in long-term water quality. Our monthly maintenance plans are designed to take all the stress and guesswork off your plate. We handle everything from routine filter changes to full system check-ups, ensuring your water stays clean and your system runs perfectly, year after year.
Common Well Water Questions Answered
https://www.youtube.com/embed/Xfh_c–7JHQ
When you own a well, questions are bound to pop up. We get it. Over the years, we've heard just about everything from homeowners trying to make sense of their water. Here are some of the most common questions we hear, with answers straight from our field experience.
We've designed these answers not just to solve a specific problem, but to show you how having an expert in your corner can make the whole process of getting clean well water so much simpler.
How Often Should I Test My Well Water?
We tell all our clients the same thing: get a comprehensive lab test done at least once per year. Think of it as an annual physical for your well. This yearly check-up helps you stay ahead of sneaky contaminants like bacteria and nitrates that can build up over time.
Of course, there are times you shouldn't wait. If you suddenly notice a change in the taste, color, or smell of your water, get it tested immediately. You should also test after a major flood, any time you do work on the well or plumbing, or if someone in your home is having recurring tummy troubles. Those DIY kits from the hardware store are fine for a quick check on things like hardness, but they just can't replace a professional analysis that spots the serious, invisible threats.
Can I Use Regular Bleach to Shock My Well?
Please, don't do this. We strongly advise against using standard household bleach to shock your well. The reason is simple: most of the bleach you buy at the grocery store is loaded with scents, thickeners, and other chemicals that are not safe to put into a drinking water system. These things can stick around in your well and pipes long after the chlorine is gone.
For a proper, safe well disinfection, you need to use fresh, unscented chlorine that’s specifically certified for potable water systems—look for an NSF certification on the label. Using the right stuff is one thing, but getting the dosage right is just as critical. Our professional shock chlorination service takes all the guesswork out of the equation, so you know your well, plumbing, and family’s health are protected.
This is a common and dangerous myth. Many of the most harmful contaminants—like E. coli, arsenic, lead, and nitrates—are completely invisible, odorless, and tasteless. Relying on appearance alone is a risk not worth taking.
My Water Looks Clear. Is It Safe to Drink?
Absolutely not. Crystal-clear water can give you a false sense of security, and that’s a dangerous place to be. We've seen perfectly clear water come back with some nasty test results.
The only way to know for sure that your water is free from harmful contaminants is to have it analyzed by a professional lab. This is always our first step. That test gives us the hard data we need to design a system that guarantees your water isn't just clear, but genuinely safe to drink.
What Is the Difference Between a Water Softener and a Filter?
This is a fantastic question because they tackle two completely different issues. It helps to think of them as specialists for your water.
- A water softener has one job: it goes after the "hard" minerals, mainly calcium and magnesium. It’s all about preventing that crusty scale buildup that wrecks your appliances and keeps soap from lathering up. A softener doesn't remove contaminants.
- A water filter, on the other hand, is built to remove contaminants. The type of filter determines what it takes out. For instance, a simple carbon filter is great for getting rid of chlorine and improving taste, while a reverse osmosis system can remove a whole range of dissolved solids, heavy metals, and chemicals.
You can't just guess which one you need. An expert analysis of your water test is the only way to figure out if you need a softener, a specific filter, or maybe a combination of both to get the job done right.
Ready to stop guessing about your water quality? The team at Water Medic of Cape Coral has been at this for over 25 years, making sure homeowners in Southwest Florida have clean, safe, and great-tasting water. From pinpoint-accurate testing to custom system design and installation, we are your trusted local experts.
Visit us at https://watermedic.com to schedule your professional water analysis today!